The Starknet Book
The Starknet Book is a work in progress, shaped by ongoing community input. Some sections may be incomplete or still under review and are marked under a 🚧 emoji. We welcome your suggestions, feedback, and content contributions to make this book a reliable guide for everyone.
The Starknet Book is a step-by-step guide aimed at teaching you the essentials of Starknet development. It’s a community effort, with each chapter guiding you through the Starknet ecosystem.
Understanding Cairo, the key programming language for Starknet smart contracts, is crucial. That’s why this book works hand-in-hand with the Cairo Book, another community resource. You can access the Cairo Book here.
In short, the Cairo Book helps you master Cairo, while The Starknet Book focuses on Starknet’s specific features. For a well-rounded understanding, we recommend exploring both. This book will introduce you to tools, architecture, account setups, STARKs, and Starknet-specific apps.
Table of Contents
Chapter Titles
| Chapter | Description |
|---|---|
| 1: Starknet Introduction | Delve into the fundamental concepts of Starknet and acquaint yourself with the deployment of smart contracts. |
| 2: Starknet Tooling | Familiarize yourself with vital tools, such as Starkli, Katana, Scarb, Starknet-Foundry and more. Explore how languages like Javascript, Python, and Rust can be leveraged for Starknet interactions. |
| 3: Starknet Architecture | Uncover Starknet’s core structure, gaining insights into the transaction lifecycle and the interplay between the Sequencer, Prover, and Nodes. |
| 4: Account Abstraction | Delve deep into Starknet’s unique approach to user accounts, and master the art of crafting custom accounts. |
| 5: STARKs | Dive into the intricacies of STARKs and their pivotal role in shaping Starknet’s landscape. |
Where to Start?
Depending on your goals and interests, you can choose different paths through the Starknet Book. Here are some recommendations based on various objectives:
-
If you’re a complete beginner and want to start learning about Cairo and Starknet from scratch, follow the book in its entirety, starting with Introduction to Starknet.
-
If you’re an experienced developer looking to quickly dive into writing scalable and decentralized smart contracts, focus on the Cairo Book, particularly chapter 12: Starknet Smart Contracts (link).
-
If you’re a frontend developer wanting to integrate Starknet with a React frontend using Javascript, prioritize the starknet-js and starknet-react subchapters in Starknet Tooling
-
If you’re a DevOps engineer or node operator interested in running a Starknet node and indexer, head straight to Starknet Architecture.
-
If you’re a security researcher or smart contract auditor wanting to learn about the Account Abstraction feature and its implications, go for Account Abstraction.
-
If you’re a blockchain enthusiast curious about the underlying architecture and mechanics of Starknet and Cairo, explore Starknet Architecture.
-
If you’re a cryptography expert or researcher eager to understand the fundamentals of STARKs and their connection to the Starknet ecosystem, delve into STARKs.
Feel free to mix and match these paths based on your unique interests and requirements.
Your Contributions Matter
Welcome aboard! By contributing to the Starknet Book, you’re doing more than sharing expertise—you’re shaping the future of decentralized tech. Let’s build a guide that helps developers unlock Starknet’s potential.
For detailed contribution guidelines, visit the Contributors Guide. Every contribution counts. Your skills and passion will help make this book an invaluable tool.
How You Can Help
-
Found an empty section? Fill it in!
-
Think we need a new section? Suggest one.
-
See room for improvement? Go ahead and tweak it.
-
Want to add code in a new programming language? Go for it.
-
Found a bug? Fix it.
-
Exercises unclear? Add explanations.
-
Show off your favorite Cairo features through new exercises.
Additional Key Educational Resources
We’ve compiled a list of valuable educational resources that will help deepen your understanding and enhance your skills in coding with Cairo and staying abreast with Starknet developments:
-
Starklings: A resource specifically designed to guide you through learning Cairo programming, ensuring that you reach a proficient level. You can access it here.
-
Starknet Community Forum: An online platform where you can engage in discussions about the latest developments in Starknet. Join the conversation here.
-
Starknet Documentation: You can browse through the documentation here.
-
Cairo Documentation: Explore it here.
-
Starknet Discord (English): A community for Starknet developers and users around the world. This is a great platform for networking, sharing ideas, learning, and troubleshooting together. Join us on Discord here
-
Starknet Developer Telegram (English): A community for English-speaking Starknet developers. This is a great platform for networking, sharing ideas, and troubleshooting together. Join us on Telegram here.
The Starknet Network
Preamble
Historically, societal roles like currency, property rights, and social status titles have been governed by protocols and registries. Their value stems from a widely accepted understanding of their integrity. These functions have predominantly been overseen by centralized entities prone to challenges such as corruption, agency conflicts, and exclusion (Eli Ben-Sasson, Bareli, Brandt, Volokh, 2023).
Satoshi's creation, Bitcoin, introduced a novel approach for these functions, termed an integrity web. This is an infrastructure for societal roles that:
- Is openly described by a public protocol.
- Operates over a wide, inclusive, peer-to-peer network.
- Distributes value fairly and extensively to maintain societal consensus on its integrity.
While Bitcoin addressed monetary functions, Ethereum expanded this to include any function that can be defined by computer programming. Both faced the challenge of balancing scalability with decentralization. These integrity webs have often favored inclusivity over capacity, ensuring even those with limited resources can authenticate the system's integrity. Yet, this means they struggle to meet global demand.
Defining "Blockchain"
In the ever-evolving realm of technology, defining a term as multifaceted as "Blockchain" can be challenging. Based on current understandings and applications, a Blockchain can be characterized by the following three properties (Eli Ben-Sasson, 2023):
- Public Protocol: The foundation of a Blockchain rests upon a protocol that is openly available. This transparency ensures that any interested party can understand its workings, fostering trust and enabling wider adoption.
- Open P2P Network: Instead of relying on a centralized entity, a Blockchain operates over a peer-to-peer (P2P) network. This decentralized approach ensures that operations are distributed across various participants or nodes, making the system more resilient to failures and censorship.
- Value Distribution: Central to the Blockchain's operation is the way it rewards its operators. The system autonomously distributes value in a manner that is wide-ranging and equitable. This incentivization not only motivates participants to maintain the system's integrity but also ensures a broader societal consensus.
While these properties capture the essence of many Blockchains, the term's definition might need refinement as the technology matures and finds new applications. Engaging in continuous dialogue and revisiting definitions will be crucial in this dynamic landscape.
Starknet Definition
Starknet is a Layer-2 network that makes Ethereum transactions faster, cheaper, and more secure using zk-STARKs technology. Think of it as a boosted layer on top of Ethereum, optimized for speed and cost.
Starknet bridges the gap between scalability and broad consensus. It integrates a mathematical framework to navigate the balance between capacity and inclusivity. Its integrity hinges on the robustness of succinct, transparent proofs of computational integrity. This method lets powerful operators enhance Starknet's capacity, ensuring everyone can authenticate Starknet's integrity using universally accessible tools (Eli Ben-Sasson, Bareli, Brandt, Volokh, 2023).
Starknet’s Mission
Starknet’s mission is to allow individuals to freely implement and use any social function they desire.
Starknet’s Values
Starknet's ethos is anchored in core principles (Eli Ben-Sasson, Bareli, Brandt, Volokh, 2023):
-
Lasting Broadness. Starknet continuously resists power consolidation. Key points include:
- Broad power distribution underpins Starknet's legitimacy and must persist across operations and decision-making. While centralized operation may be necessary at times, it should be short-lived.
- Starknet's protocol and governance should always be open and transparent.
- Governance should bolster inclusivity, with a flexible structure that can evolve to ensure enduring inclusivity.
-
Neutrality. Starknet remains impartial to the societal functions it supports.
- The objectives and ethos of functions on Starknet lie with their creators.
- Censorship resistance: Starknet remains agnostic to the nature and meaning of user transactions.
-
Individual Empowerment. At its core, Starknet thrives on a well-informed and autonomous user base. This is achieved by fostering a culture rooted in its core mission and values, with a strong emphasis on education.
Key Features
These are some key features of Starknet:
-
Low Costs: Transactions on Starknet cost less than on Ethereum. Future updates like Volition and EIP 4844 will make it even cheaper.
-
Developer-Friendly: Starknet lets developers easily build decentralized apps using its native language, Cairo.
-
Speed and Efficiency: Upcoming releases aim to make transactions even faster and cheaper.
-
CVM: Thanks to Cairo, Starknet runs on it's own VM, called Cairo VM (CVM), that allow us to innovate beyond the Ethereum Virtual Machine (EVM) and create a new paradigm for decentralized applications.
Here are some of them:
-
Account Abstraction: Implemented at the protocol level, this facilitates diverse signing schemes while ensuring user security and self-custody of assets.
-
Volition: Will be implemented on testnet during Q4 2023 will allow developers to regulate data availability on Ethereum (L1) or on Starknet (L2). Reducing L1 onchain data can radically reduce costs.
-
Paymaster: Starknet will allow users to choose how to pay for transaction fee, follows the guidelines laid out in EIP 4337 and allows the transaction to specify a specific contract, a Paymaster, to pay for their transaction. Supports gasless transactions, enhancing user accessibility.
Cairo: The Language of Starknet
Cairo is tailor-made for creating STARK-based smart contracts. As Starknet’s native language, it’s central to building scalable and secure decentralized apps. To start learning now, check out the Cairo Book and Starklings.
Inspired by Rust, Cairo lets you write contracts safely and conveniently.
Governance
The Starknet Foundation oversees Starknet’s governance. Its duties include:
-
Managing Starknet’s development and operations
-
Overseeing the Starknet DAO, which enables community involvement
-
Setting rules to maintain network integrity
Our focus is on technical input and debate for improving the protocol. While we value all perspectives, it’s often the technical insights that steer us forward.
Members can influence Starknet by voting on changes. Here’s the process: A new version is tested on the Goerli Testnet. Members then have six days to review it. A Snapshot proposal is made, and the community votes. A majority of YES votes means an upgrade to the Mainnet.
In short, governance is key to Starknet’s evolution.
To propose an improvement, create a SNIP.
SNIP: Starknet Improvement Proposals
SNIP is short for Starknet Improvement Proposal. It’s essentially a blueprint that details proposed enhancements or changes to the Starknet ecosystem. A well-crafted SNIP includes both the technical specifications of the change and the reasons behind it. If you’re proposing a SNIP, it’s your job to rally community support and document any objections (more details here). Once a SNIP is approved, it becomes a part of the Starknet protocol. All the SNIPs can be found in this repository.
SNIPs serve three crucial roles:
-
They are the main avenue for proposing new features or changes.
-
They act as a platform for technical discussions within the community.
-
They document the decision-making process, offering a historical view of how Starknet has evolved.
Because SNIPs are stored as text files in a version-controlled repository, you can easily track changes and understand the history of proposals.
For those who are building on Starknet, SNIPs aren’t just suggestions—they’re a roadmap. It’s beneficial for implementers to keep a list of the SNIPs they’ve executed. This transparency helps users gauge the state of a particular implementation or software library.
Getting Started
Starknet is a scalable layer 2 solution on Ethereum. This guide will walk you through the process of deploying and interacting with your first Starknet smart contract using the Cairo programming language, a general-purpose programming language for creating proofs of validity using Starknet. For experienced developers looking to understand the basics and gain hands-on experience, this guide provides step-by-step instructions and essential details.
We will use the Starknet Remix Plugin to compile, deploy, and interact with our smart contract. It's a great tool for getting started with Starknet development because you don't need to install anything on your computer.
- Visit the Remix IDE website with the Starknet plugin enabled.
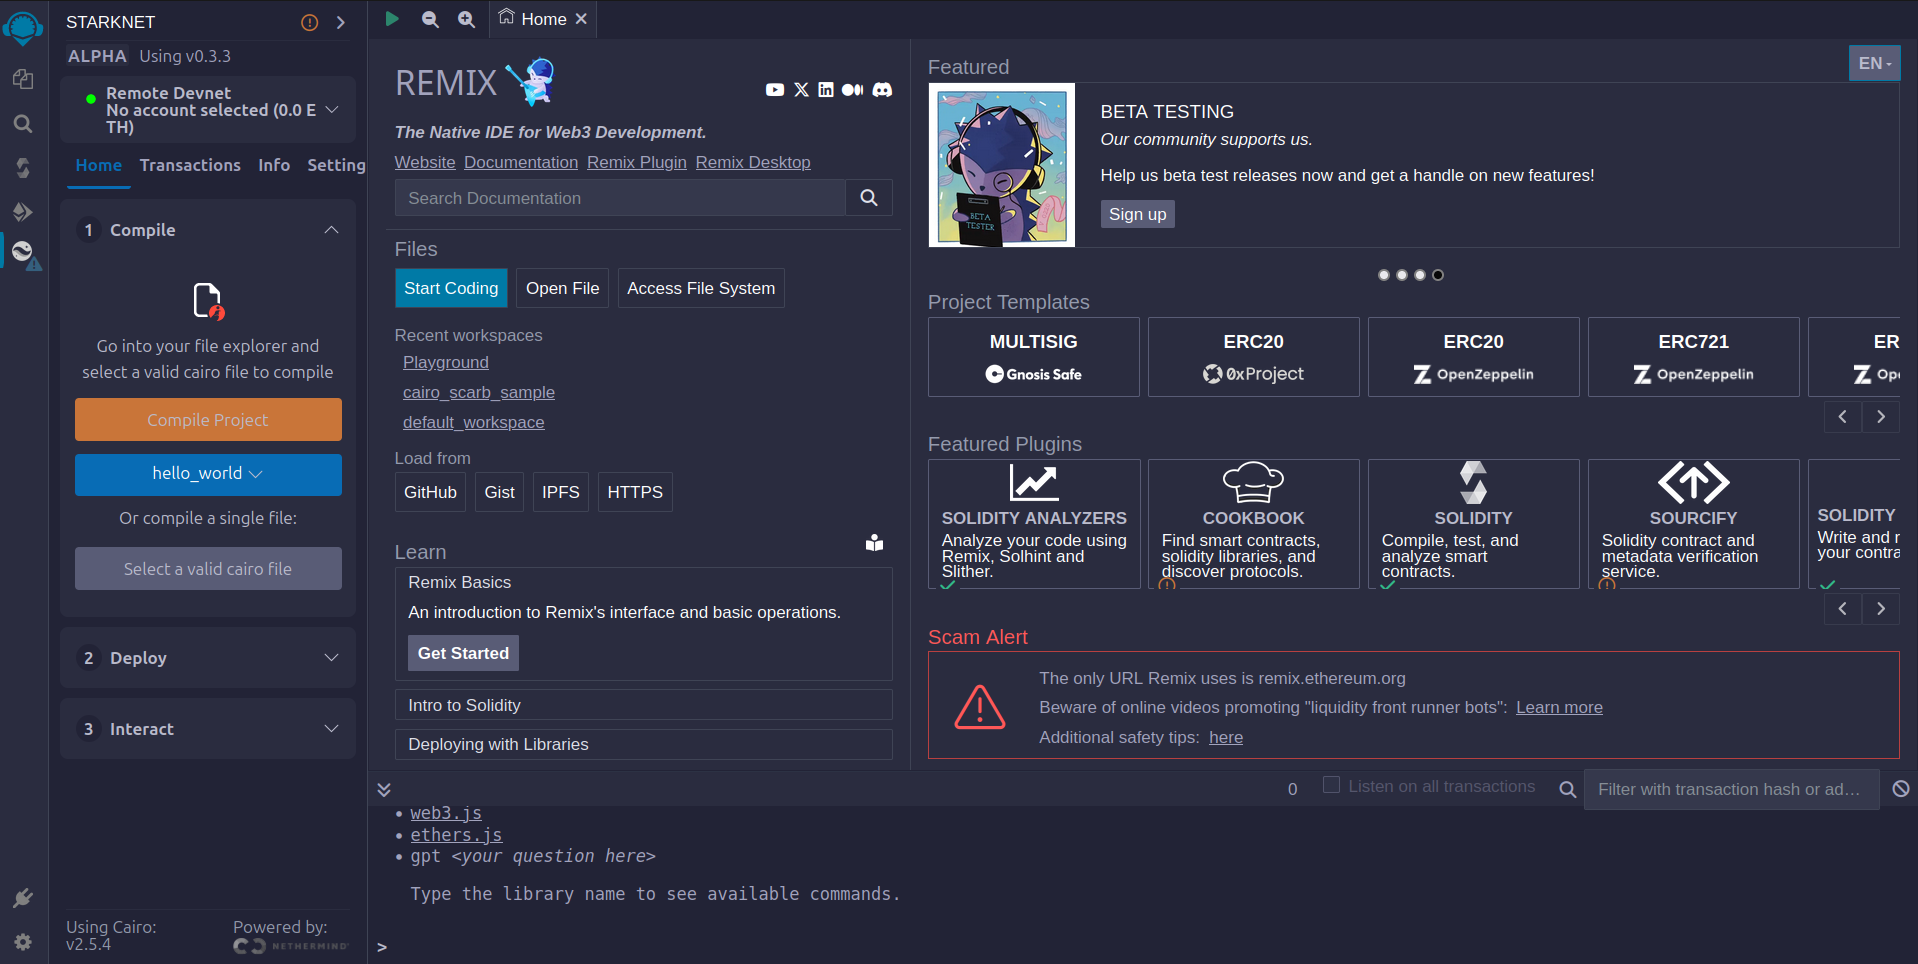
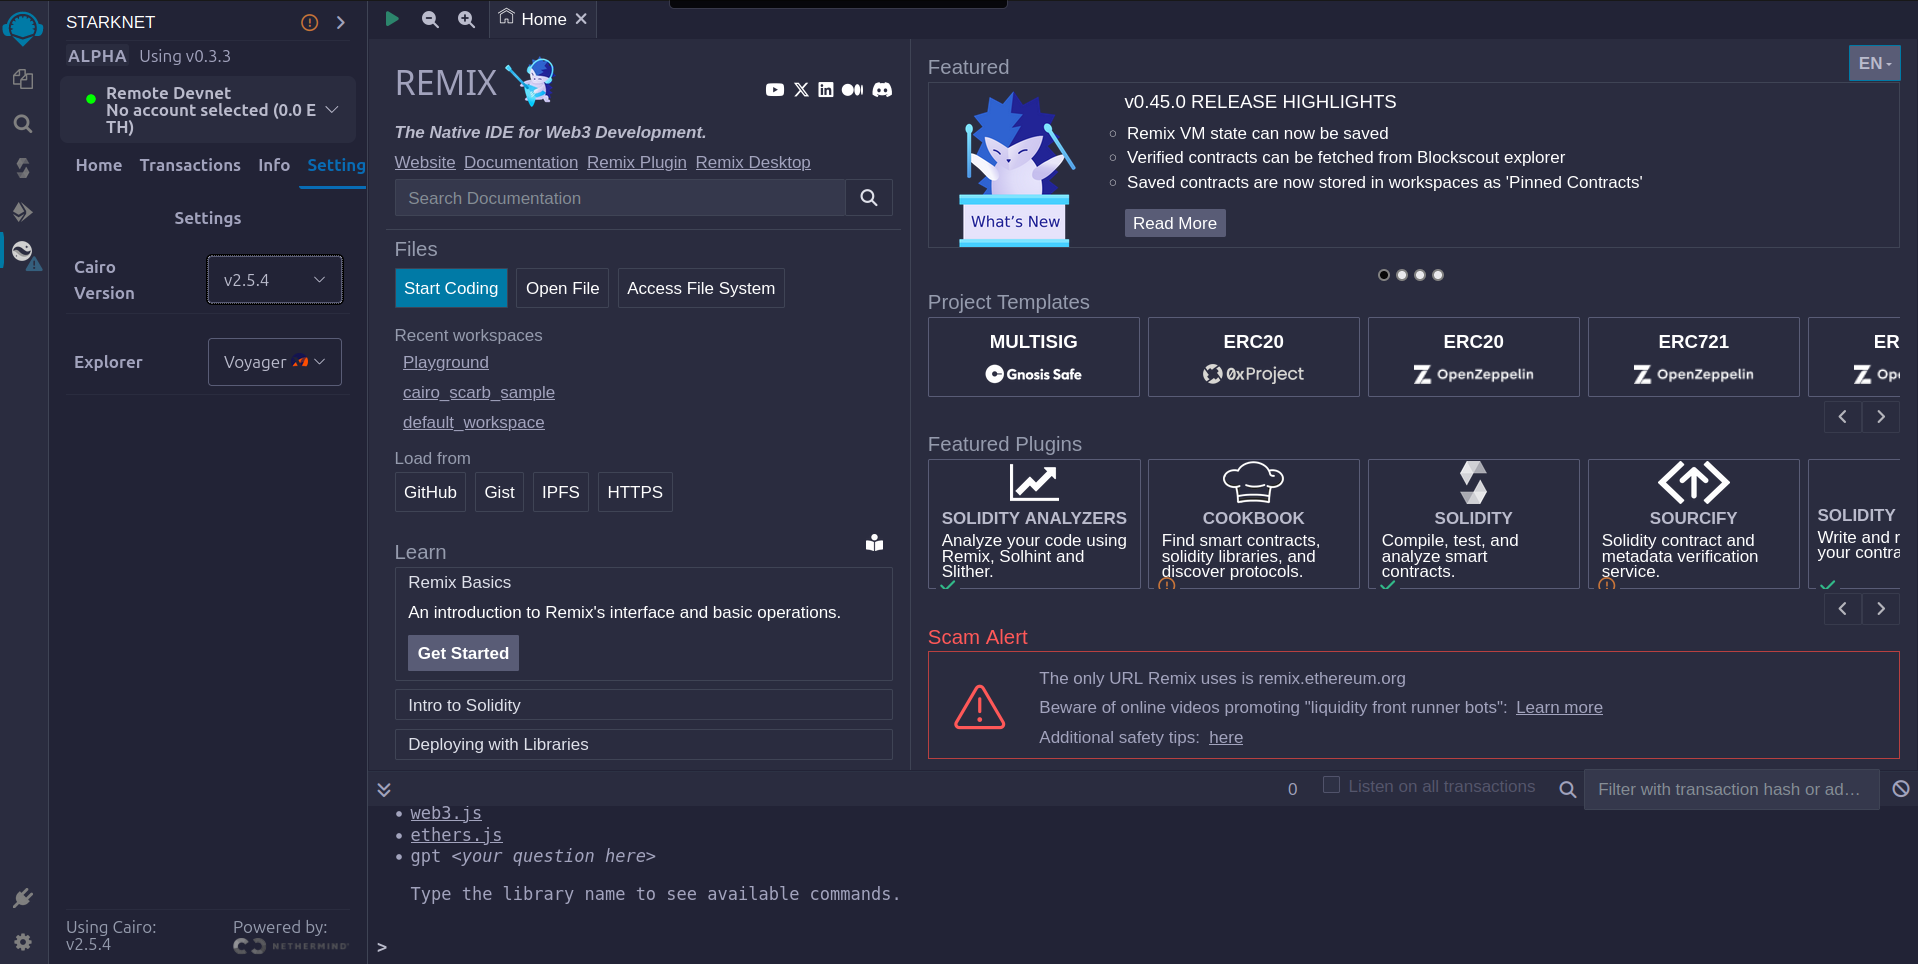
- Then go to settings option and choose the Cairo version as shown in the image below. The latest version available in Remix is
v2.5.4.
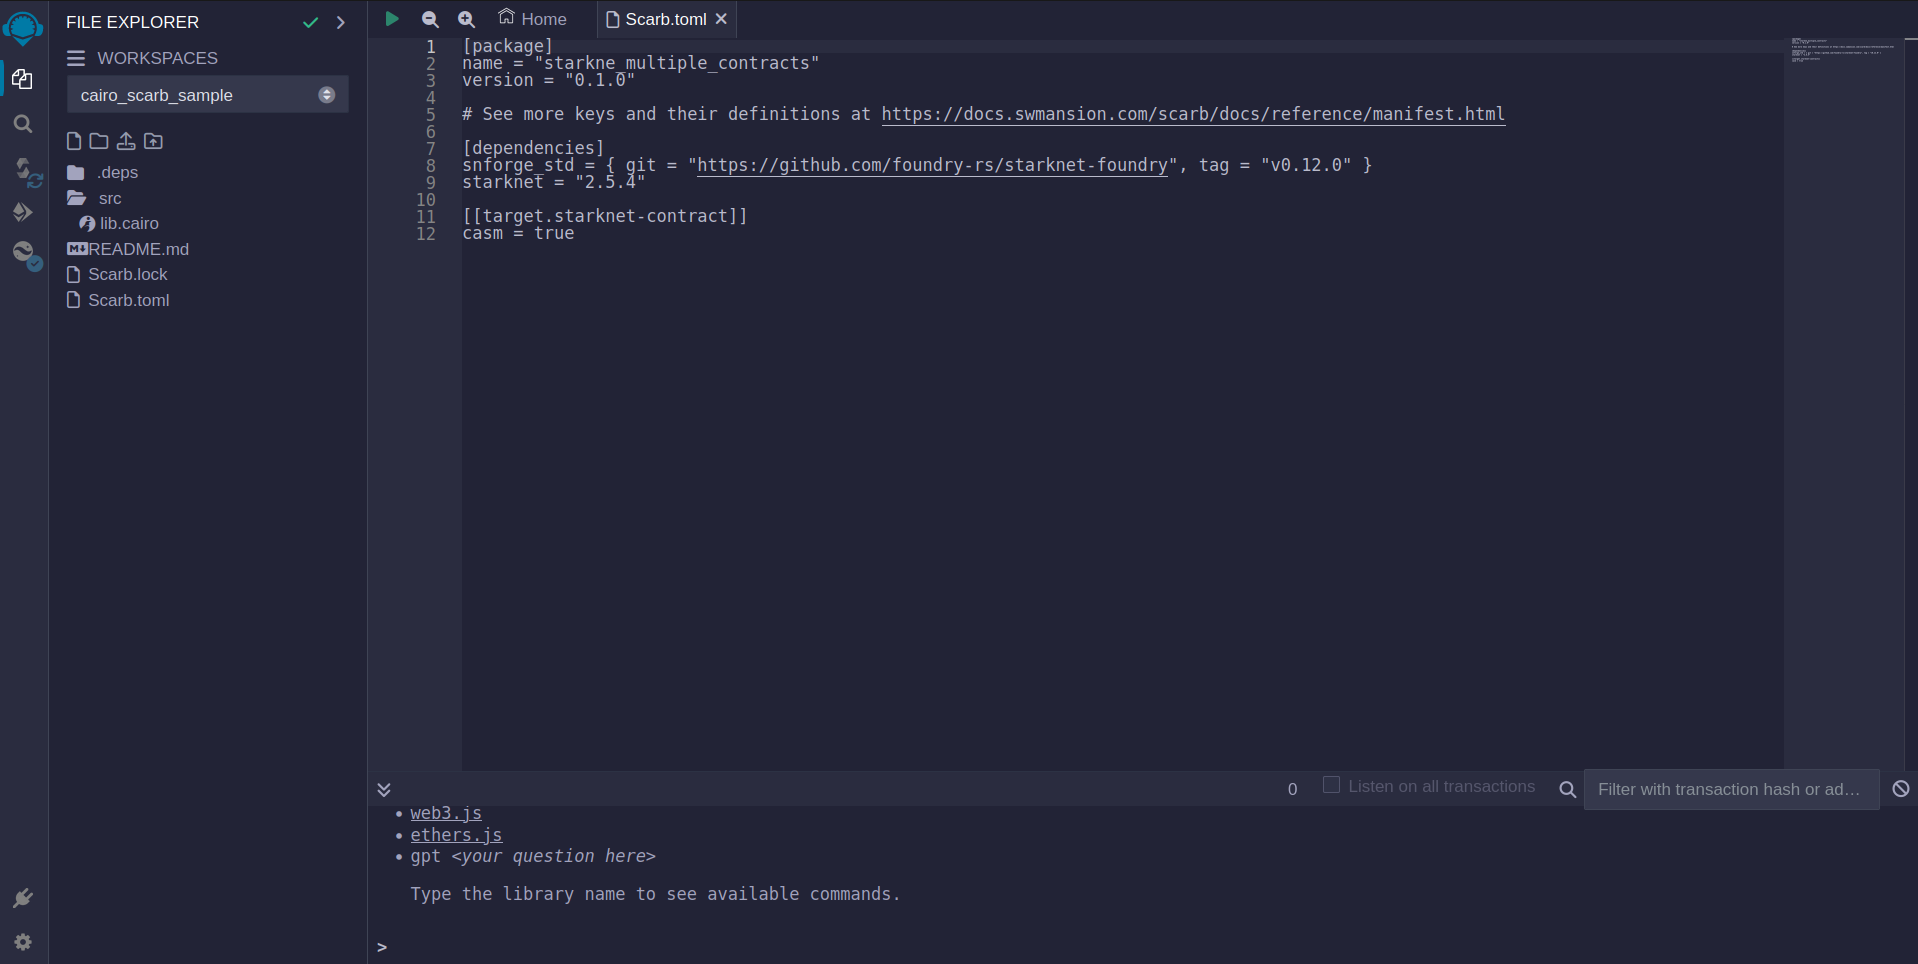
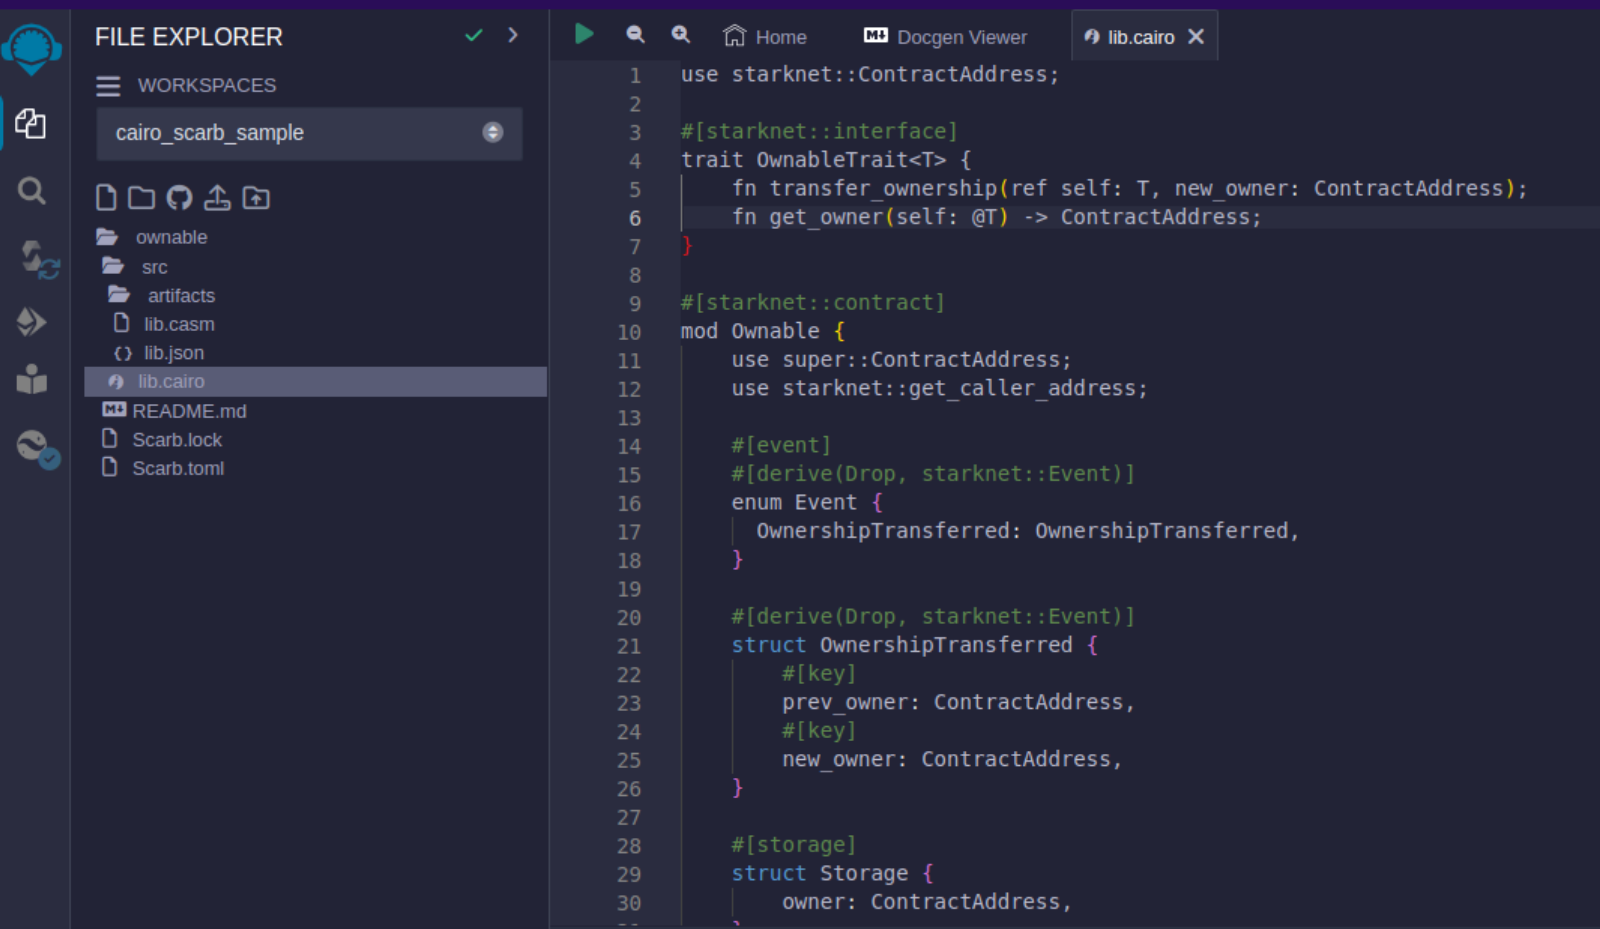
- Now click on the
file explorertab to check the sample project details. On theScarb.tomlfile you can find the version of this sample project. Since we want to use version 2.5.4 for this project, we have to verify that it matches in ourScarb.toml, otherwise modify to the correct version,starknet = "2.5.4".
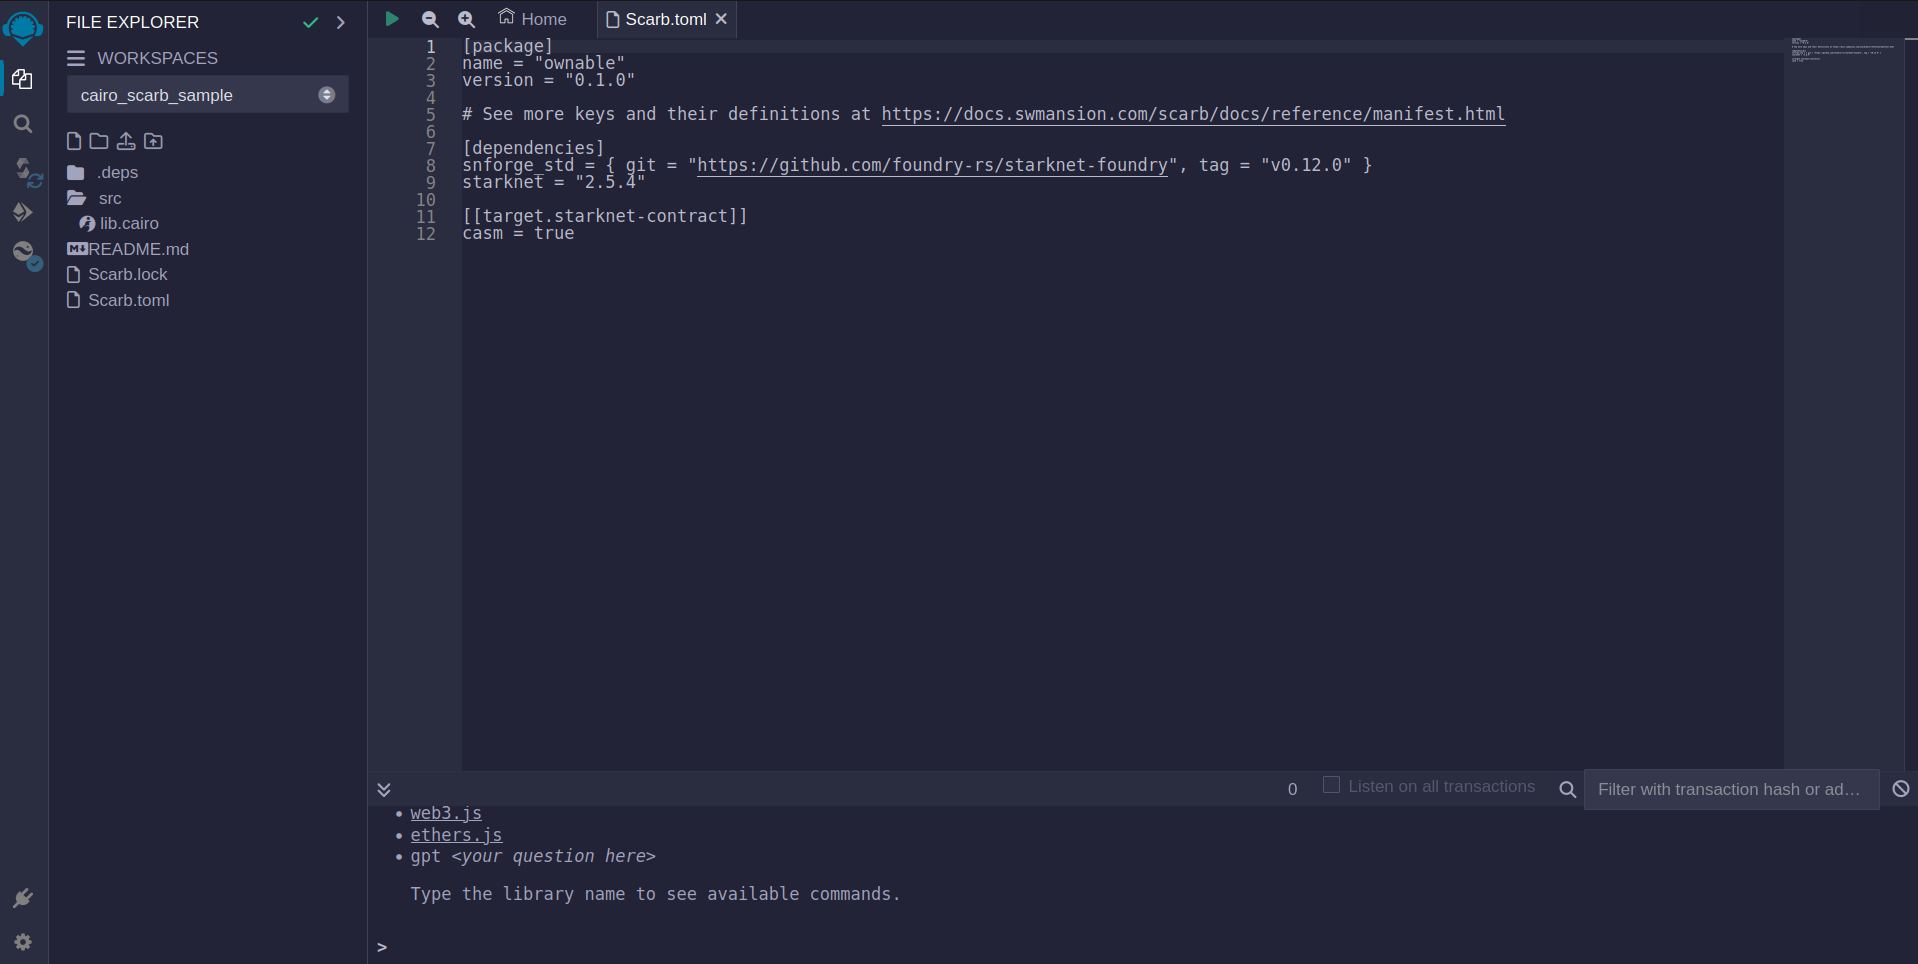
Clean your sample project
By default we got a sample project, however on this tutorial, we plan to show the Ownable contract example. To acomplish this we have to edit and delete some files and directories.
- Rename the root directory to
ownable. Go to yourScarb.toml, on [package] section, setnametoownable. - Delete
balance.cairoandforty_two.cairofiles, if present. - Go to
lib.cairoand remove all the content there. It should be empty.
At the end, your new project should look something like this.
Introduction to Starknet Smart Contracts
The script below is a simple Ownable contract pattern written in Cairo for Starknet. It features:
- An ownership system.
- A method to transfer ownership.
- A method to check the current owner.
- An event notification for ownership changes.
Cairo Example Contract
#![allow(unused)]
fn main() {
use starknet::ContractAddress;

#[starknet::interface]
trait OwnableTrait<T> {
    fn transfer_ownership(ref self: T, new_owner: ContractAddress);
    fn get_owner(self: @T) -> ContractAddress;
}

#[starknet::contract]
mod Ownable {
    use super::ContractAddress;
    use starknet::get_caller_address;

    #[event]
    #[derive(Drop, starknet::Event)]
    enum Event {
      OwnershipTransferred: OwnershipTransferred,
    }

    #[derive(Drop, starknet::Event)]
    struct OwnershipTransferred {
        #[key]
        prev_owner: ContractAddress,
        #[key]
        new_owner: ContractAddress,
    }

    #[storage]
    struct Storage {
        owner: ContractAddress,
    }

    #[constructor]
    fn constructor(ref self: ContractState, init_owner: ContractAddress) {
        self.owner.write(init_owner);
    }

    #[abi(embed_v0)]
    impl OwnableImpl of super::OwnableTrait<ContractState> {
        fn transfer_ownership(ref self: ContractState, new_owner: ContractAddress) {
            self.only_owner();
            let prev_owner = self.owner.read();
            self.owner.write(new_owner);
            self.emit(Event::OwnershipTransferred(OwnershipTransferred {
                prev_owner: prev_owner,
                new_owner: new_owner,
            }));
        }

        fn get_owner(self: @ContractState) -> ContractAddress {
            self.owner.read()
        }
    }

    #[generate_trait]
    impl PrivateMethods of PrivateMethodsTrait {
        fn only_owner(self: @ContractState) {
            let caller = get_caller_address();
            assert(caller == self.owner.read(), 'Caller is not the owner');
        }
    }
}
}
Components Breakdown
The following is a brief description of the components in the contract. We will get into more details when we get deeper into Cairo so feel free to skip this section for now if you are not familiar with smart contract development.
- Dependencies and Interface:
starknet::ContractAddress: Represents a Starknet contract address.OwnableTrait: Specifies functions for transferring and getting ownership.
- Events:
OwnershipTransferred: Indicates ownership change with previous and new owner details.
- Storage:
Storage: Holds the contract's state with the current owner's address.
- Constructor:
- Initializes the contract with a starting owner.
- External Functions:
- Functions for transferring ownership and retrieving the current owner's details.
- Private Methods:
only_owner: Validates if the caller is the current owner.
Compilation Process
To compile using Remix:
-
File Creation
- Navigate to the "File Explorer" tab in Remix.
- Go to file named
lib.cairoand paste the previous code into it.
-
Compilation
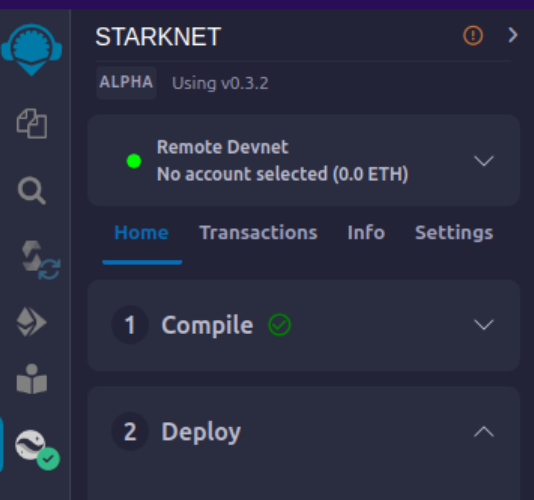
- Navigate to the "Starknet" tab in Remix and click on
Home. - In the
1 Compilesection choosecompile a single file.
- Navigate to the "Starknet" tab in Remix and click on

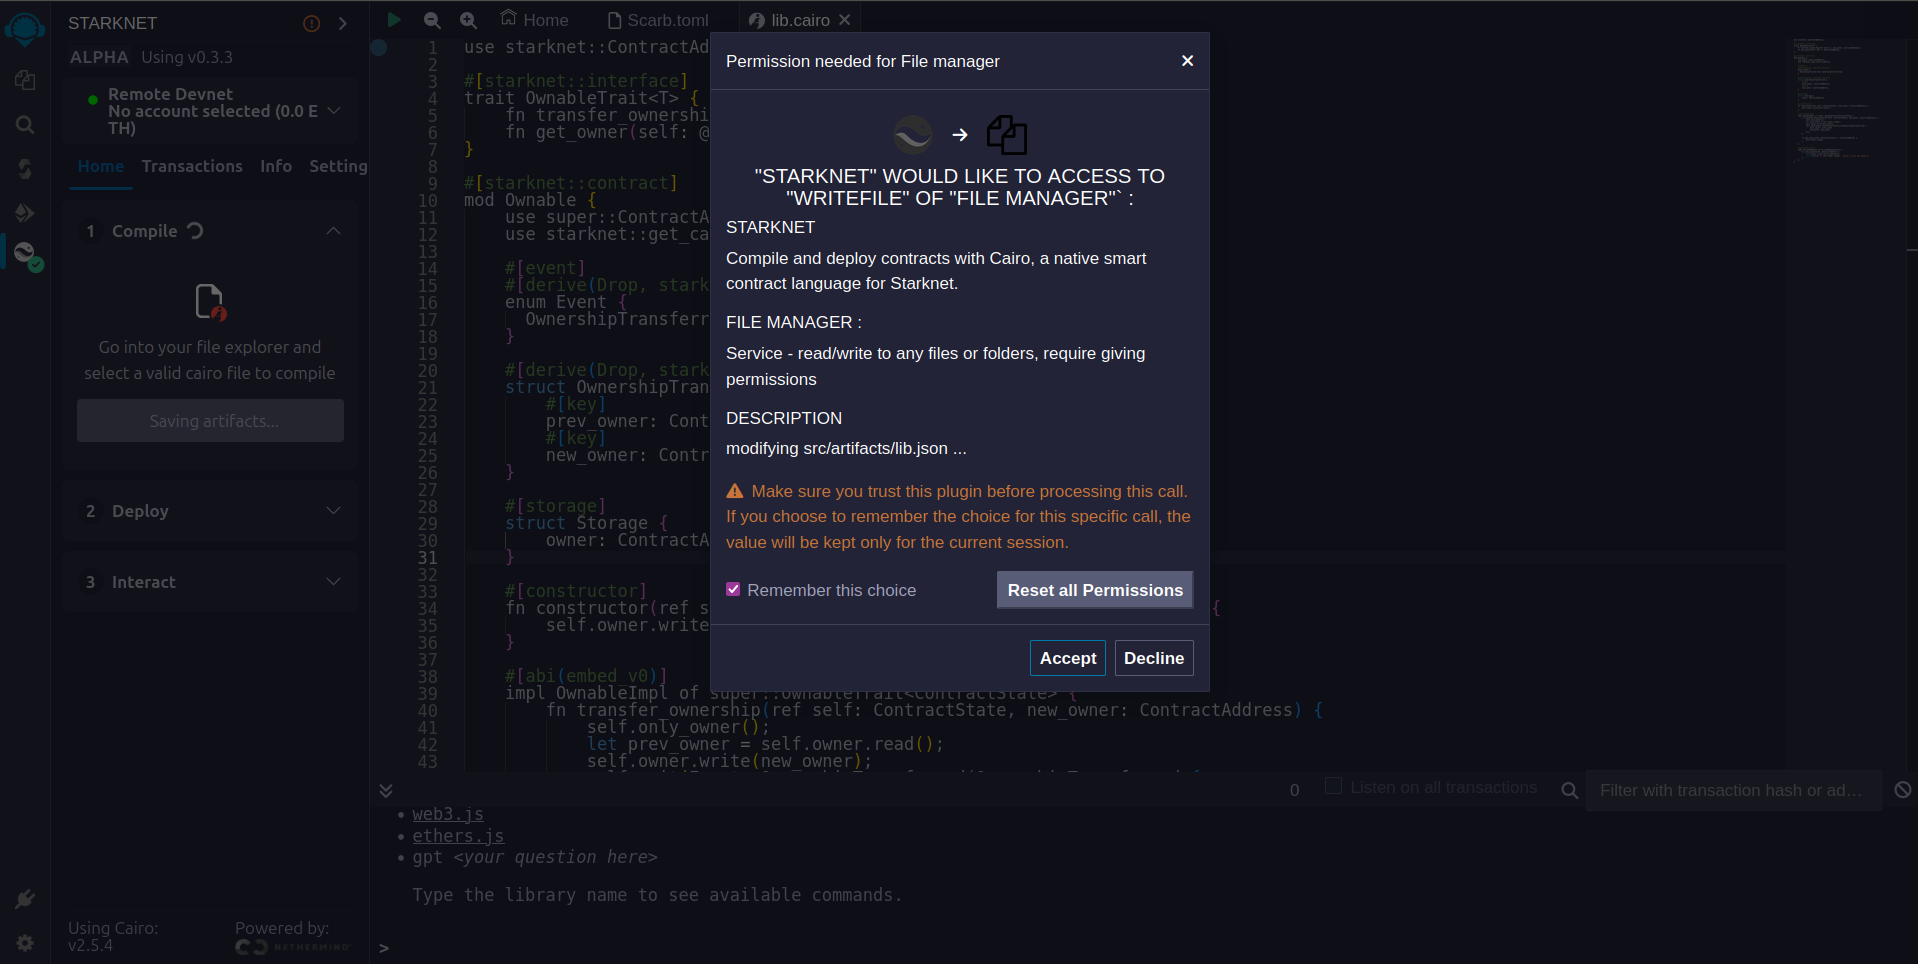
- Accept the permissions. Click
Remember my choiceto avoid this step in the future.
- Click on
Compile lib.cairo.

- Post-compilation, an "artifacts" folder emerges containing the compiled contract in two distinct formats: Sierra (JSON file) and CASM. For Starknet deployment, Remix will use the Sierra file. Do not worry about this process for now; we will cover it in detail in a later chapter. For now, Remix will handle the compilation and deployment for us.
Artifacts folder after compilation
Deployment on the Development Network
To set your smart contract in motion, an initial owner must be defined. The Constructor function needs this information.
Here's a step-by-step guide to deploying your smart contract on the development network:
-
Select the Appropriate Network
- In the Starknet tab, click on the top button
Remote Devnet.
- In the Starknet tab, click on the top button
-
Choose a Devnet Account
- Under "Devnet account selection", a list of accounts specific to the chosen devnet is presented.
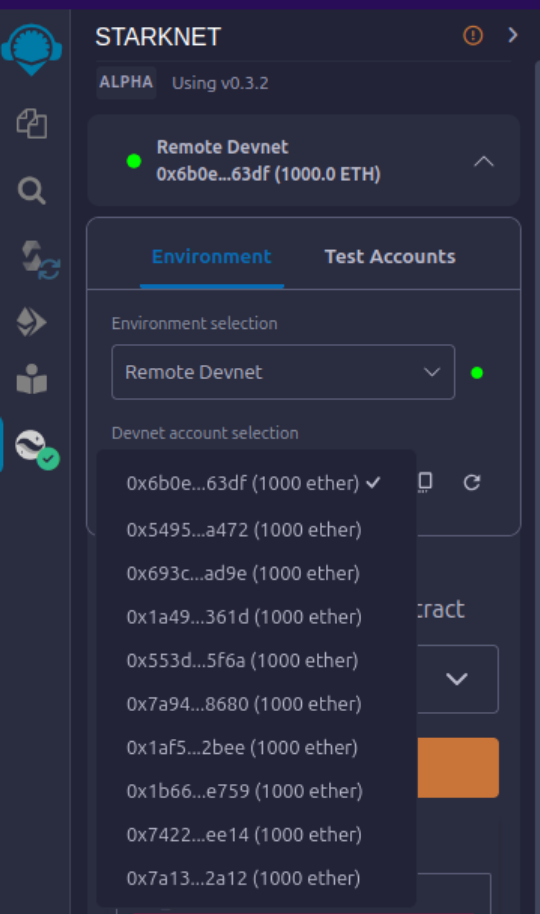
- Pick any account and copy its address.
-
Declare
- Click on "Declare lib.cairo"
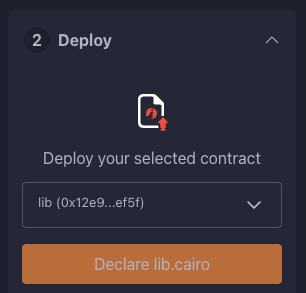
- Post-declared, Remix's terminal will send various logs. These logs provide crucial details, including:
transaction_hash: The unique hash of the transaction. This hash can be used to track the transaction's status.class_hash: The class hash is like the id of the definition of the smart contract.
------------------------ Declaring contract: ownable_Ownable ------------------------
{
  "transaction_hash": "0x36dabf43f4962c97cf67ba132fb520091f268e7e33477d77d01747eeb0d7b43",
  "class_hash": "0x540779cd109ad20f46cb36d8de1ce30c75469862b4dc75f2f29d1b4d1454f60"
}
---------------------- End Declaring contract: ownable_Ownable ----------------------
...
-
Initiating Deployment
- Input the copied address into the
init_ownervariable.
- Click on "Deploy".
- Input the copied address into the
Post-deployment, Remix's terminal will send various logs. These logs provide crucial details, including:
transaction_hash: The unique hash of the transaction. This hash can be used to track the transaction's status.contract_address: The address of the deployed contract. Use this address to interact with your contract.data: Contains theinit_owneraddress fed to the constructor.
{
  "transaction_hash": "0x624f5b9f57e53f6b5b62e588f0f949442172b3ad5d04f0827928b4d12c2fa58",
  "contract_address": [
    "0x699952dc736661d0ed573cd2b0956c80a1602169e034fdaa3515bfbc36d6410"
  ]
    ...
  "data": [
        "0x6b0ee6f418e47408cf56c6f98261c1c5693276943be12db9597b933d363df",
         ...
      ]
    ...
}
By following the above process, you will successfully deploy your smart contract on the development network.
Interaction with the Contract
With the contract now active on the development network, interaction becomes possible. Here's a guide to effectively interact with your contract on Starknet:
-
Initiating Interaction
- Navigate to the "Starknet" plugin tab.
- Select the "Interact" option.
-
Calling the
get_ownerFunction- Choose the
get_ownerfunction. Since this function doesn't require arguments, the calldata field remains blank. (This is a read function, hence calling it is termed as a "call".)
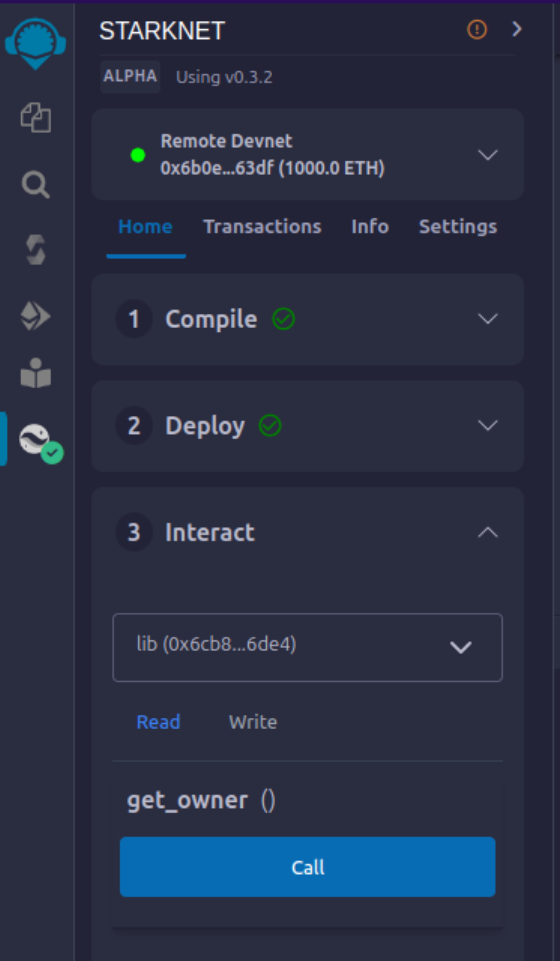
- Press the "Call" button. Your terminal will display the result, revealing the owner's address provided during the contract's deployment as calldata for the constructor:
- Choose the
{
  "resp": {
    "result": [
      "0x6b0ee6f418e47408cf56c6f98261c1c5693276943be12db9597b933d363df"
    ]
  },
  "contract": "lib.cairo",
  "function": "get_owner"
}
This call currently doesn't spend gas because the function does not change the state of the contract.
- Invoking the
transfer_ownershipFunction
- Choose the "Write" in the interaction area. Here you can see the functions that alter the contract's state.
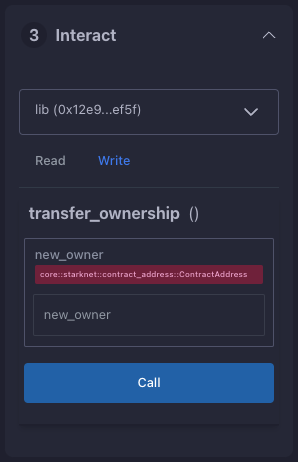
- In this case
transfer_ownershipfunction, which requires the new owner's address as input. - Enter this address into the
new_ownerfield. (For this, use any address from the "Devnet account selection" listed in the Environment tab.) - Click the "Call" button. The terminal then showcases the transaction hash indicating the contract's state alteration. Since we are altering the contract's state this type of interaction is called an "invoke" and needs to be signed by the account that is calling the function.
For these transactions, the terminal logs will exhibit a "status" variable, indicating the transaction's fate. If the status is "ACCEPTED_ON_L2", it means the Sequencer, the component that receives and processes transactions, has accepted the transaction, which is now awaiting inclusion in an upcoming block. However, a "REJECTED" status signifies the Sequencer's disapproval, and the transaction won't feature in the upcoming block. More often than not, this transaction gains acceptance, leading to a contract state modification. See this chapter for more on Starknet's architecture and the Sequencer. On calling the get_owner function again we get this:
{
  "resp": {
    "result": [
      "0x5495d56633745aa3b97bdb89c255d522e98fd2cb481974efe898560839aa472"
    ]
  },
  "contract": "lib.cairo",
  "function": "get_owner"
}
You've now adeptly compiled, deployed, and interacted with your inaugural Starknet smart contract. Well done!
Deploying on Starknet Testnet
After testing your smart contract on a development network, it's time to deploy it to the Starknet Testnet. Starknet Testnet is a public platform available for everyone, ideal for testing smart contracts and collaborating with fellow developers.
First, you need to create a Starknet account.
Smart Wallet Setup
Before deploying your smart contract to Starknet, you must handle the transaction cost. While deploying to the Starknet Goerli Testnet is free, a smart wallet account is essential. You can set up a smart wallet using either:
Both are reliable Starknet wallets offering enhanced security and accessibility features thanks to the possibilities that the Cairo VM brings, such as Account Abstraction (keep reading the Book for more on this).
- Install the recommended chrome/brave extension for your chosen wallet.
- Follow your wallet provider's instructions to deploy your account.
- Use the Starknet Faucet to fund your account.
- Deploy the account to the network. This usually takes around 10 seconds.
Once set up, you're ready to deploy your smart contracts to the Starknet Testnet.
Deployment and Interaction
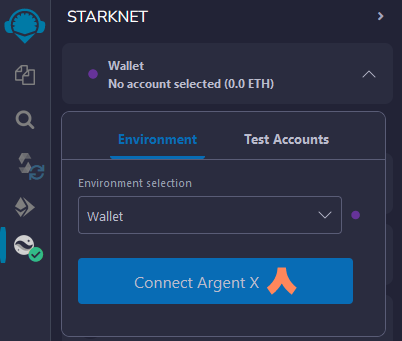
- Follow the previous deployment steps.
- In the 'Environment selection' tab, choose 'Wallet'.
- Select your Starknet account and continue with deploying and interacting with your contract.
You can monitor transaction hashes and addresses using any Starknet block explorers like:
These tools provide a visual representation of transactions and contract state alterations. Notably, when you alter the contract ownership using the transfer_ownership function, the event emitted by the contract appears in the block explorer. It's an effective method to track contract events.
Your Next Steps
Decide your direction from the following choices:
-
Deepen Your Starknet Knowledge: For an extensive grasp of Starknet's inner workings and potential use cases, delve into Chapter 3 of the Starknet Book. This chapter details Starknet’s architectural nuances. Then go ahead from there.
-
Dive into Cairo: If you're more attuned to coding and wish to craft Starknet contracts, then Cairo is essential. It stands as Starknet's core contract language. Begin with Chapters 1-6 of the Cairo Book, ranging from basics in Getting Started to more advanced aspects such as Enums and Pattern Matching. Conclude by navigating to the Starknet Smart Contracts chapter, ensuring you have a well-rounded understanding.
Starknet Tooling
To make the most of this chapter, a basic grasp of the Cairo programming language is advised. We suggest reading chapters 1-6 of the Cairo Book, covering topics from Getting Started to Enums and Pattern Matching. Follow this by studying the Starknet Smart Contracts chapter in the same book. With this background, you’ll be well-equipped to understand the examples presented here.
Today, Starknet provides all essential tools for building decentralized applications (dApps), compatible with multiple languages like JavaScript, Rust, and Python. You can use the Starknet SDK for development. Front-end developers can use Starknet.js with React, while Rust and Python work well for back-end tasks.
We welcome contributors to enhance existing tools or develop new solutions.
In this chapter, you’ll explore:
-
Frameworks: Build using Starknet-Foundry
-
SDKs: Discover multi-language support through Starknet.js, Starknet-rs, Starknet_py, and Cairo
-
Front-end Development: Use Starknet.js and React
-
Testing: Understand testing methods with Starknet-Foundry and the Devnet
By chapter’s end, you’ll have a complete grasp of Starknet’s toolset, enabling efficient dApp development.
Here’s a quick rundown of the tools that could be used for Starknet development and that we’ll cover in this chapter:
-
Scarb: A package manager that compiles your contracts.
-
Starkli: A CLI tool for interacting with the Starknet network.
-
Starknet Foundry: For contract testing.
-
Katana: Creates a local test node.
-
SDKs: starknet.js, Starknet.py, and starknet.rs interface with Starknet using common programming languages.
-
Starknet-react: Builds front-end apps using React.
Installation
This chapter walks you through setting up your Starknet development tools.
Essential tools to install:
-
Starkli - A CLI tool for interacting with Starknet. More tools are discussed in Chapter 2.
-
Scarb - Cairo’s package manager that compiles code to Sierra, a mid-level language between Cairo and CASM.
-
Katana - Katana is a Starknet node, built for local development.
For support or queries, visit our GitHub Issues or contact espejelomar on Telegram.
Starkli Installation
Easily install Starkli using Starkliup, an installer invoked through the command line.
curl https://get.starkli.sh | sh
starkliup
Restart your terminal and confirm installation:
starkli --version
To upgrade Starkli, simply repeat the steps.
Scarb Package Manager Installation
Scarb is also Cairo's package manager and is heavily inspired by Cargo, Rust’s build system and package manager.
Scarb handles a lot of tasks for you, such as building your code (either pure Cairo or Starknet contracts), downloading the libraries your code depends on, building those libraries.
Requirements
Scarb requires a Git executable to be available in the PATH environment variable.
Installation
To install Scarb, please refer to the installation instructions. We strongly recommend that you install Scarb via asdf, a CLI tool that can manage multiple language runtime versions on a per-project basis. This will ensure that the version of Scarb you use to work on a project always matches the one defined in the project settings, avoiding problems related to version mismatches.
Please refer to the asdf documentation to install all prerequisites.
Once you have asdf installed locally, you can download Scarb plugin with the following command:
asdf plugin add scarb
This will allow you to download specific versions:
asdf install scarb 2.5.4
and set a global version:
asdf global scarb 2.5.4
Otherwise, you can simply run the following command in your terminal, and follow the onscreen instructions. This will install the latest stable release of Scarb.
curl --proto '=https' --tlsv1.2 -sSf https://docs.swmansion.com/scarb/install.sh | sh
- In both cases, you can verify installation by running the following command in a new terminal session, it should print both Scarb and Cairo language versions, e.g:
scarb --version
scarb 2.5.4 (28dee92c8 2024-02-14)
cairo: 2.5.4 (https://crates.io/crates/cairo-lang-compiler/2.5.4)
sierra: 1.4.0
For Windows, follow manual setup in the Scarb documentation.
Katana Node Installation
To install Katana, use the dojoup installer from the command line:
curl -L https://install.dojoengine.org | bash
dojoup
After restarting your terminal, verify the installation with:
katana --version
To upgrade Katana, rerun the installation command.
You are now set to code in Cairo and deploy to Starknet.
Introduction to Starkli, Scarb and Katana
In this chapter, you’ll learn how to compile, deploy, and interact with a Starknet smart contract written in Cairo using starkli, scarb and katana.
First, confirm that the following commands work on your system. If they don’t, refer to Basic Installation in this chapter.
    scarb --version  # For Cairo code compilation
    starkli --version  # To interact with Starknet
    katana --version # To declare and deploy on local development
Crafting a Starknet Smart Contract
Important: Before we proceed with this example, please ensure that the versions of both katana and starkli match the specified versions provided below.
    katana --version  # 0.6.0-alpha.7
    starkli --version  # 0.2.8 (f59724e)
If this is not your case, you have to install them like this:
    dojoup -v 0.6.0-alpha.7
    starkliup -v 0.2.8
Now begin by initiating a Scarb project:
scarb new my_contract
Configure Environment Variables and the Scarb.toml File
Review the my_contract project. Its structure appears as:
    src/
      lib.cairo
    .gitignore
    Scarb.toml
Amend the Scarb.toml file to integrate the starknet dependency and introduce the starknet-contract target:
    [dependencies]
    starknet = ">=2.5.4"

    [[target.starknet-contract]]
For streamlined Starkli command execution, establish environment variables. Two primary variables are essential:
- One for your account, a pre-funded account on the local development network
- Another for designating the network, specifically the local katana devnet
In the src/ directory, create a .env file with the following:
export STARKNET_ACCOUNT=katana-0
export STARKNET_RPC=http://0.0.0.0:5050
These settings streamline Starkli command operations.
Declaring Smart Contracts in Starknet
Deploying a Starknet smart contract requires two primary steps:
- Declare the contract's code.
- Deploy an instance of that declared code.
Begin with the src/lib.cairo file, which provides a foundational template. Remove its contents and insert the following:
#![allow(unused)]
fn main() {
#[starknet::interface]
trait IHello<T> {
    fn get_name(self: @T) -> felt252;
    fn set_name(ref self: T, name: felt252);
}

#[starknet::contract]
mod hello {
    #[storage]
    struct Storage {
        name: felt252,
    }

    #[constructor]
    fn constructor(ref self: ContractState, name: felt252) {
        self.name.write(name);
    }

    #[abi(embed_v0)]
    impl HelloImpl of super::IHello<ContractState> {
        fn get_name(self: @ContractState) -> felt252 {
            self.name.read()
        }

        fn set_name(ref self: ContractState, name: felt252) {
            self.name.write(name);
        }
    }
}
}
This rudimentary smart contract serves as a starting point.
Compile the contract with the Scarb compiler. If Scarb isn't installed, consult the Installation section.
scarb build
The above command results in a compiled contract under target/dev/, named "my_contract_hello.contract_class.json" (check Scarb's subchapter for more details).
Having compiled the smart contract, it's time to declare it with Starkli and katana. First, ensure your project acknowledges the environmental variables:
source .env
Next, launch Katana. In a separate terminal, run (more details in the Katan subchapter):
katana
To declare your contract, execute:
starkli declare target/dev/my_contract_hello.contract_class.json
Facing an "Error: Invalid contract class"? It indicates a version mismatch between Scarb's compiler and Starkli. Refer to the earlier steps to sync the versions. Typically, Starkli supports compiler versions approved by mainnet, even if the most recent Scarb version isn't compatible.
Upon successful command execution, you'll obtain a contract class hash: This unique hash serves as the identifier for your contract class within Starknet. For example:
Class hash declared: 0x00bfb49ff80fd7ef5e84662d6d256d49daf75e0c5bd279b20a786f058ca21418
Consider this hash as the contract class's address.
If you try to declare an already existing contract class, don't fret. Just proceed. You might see:
Not declaring class as its already declared. Class hash:
0x00bfb49ff80fd7ef5e84662d6d256d49daf75e0c5bd279b20a786f058ca21418
Deploying Starknet Smart Contracts
To deploy a smart contract on the katana local devnet, use the following command. It primarily requires:
- Your contract's class hash.
- Constructor arguments your contract needs (in our example, a name of type
felt252).
Here's the command structure:
    starkli deploy \
        <CLASS_HASH> \
        <CONSTRUCTOR_INPUTS>
Notice the constructor inputs are in felt format. So we need to convert a short string to a felt252 format. We can use the to-cairo-string command for this:
starkli to-cairo-string <STRING>
In this case, we'll use the string "starknetbook" as the name:
starkli to-cairo-string starknetbook
The output:
0x737461726b6e6574626f6f6b
Now deploy using a class hash and constructor input:
    starkli deploy \
        0x00bfb49ff80fd7ef5e84662d6d256d49daf75e0c5bd279b20a786f058ca21418 \
        0x737461726b6e6574626f6f6b
After running, expect an output similar to:
    Deploying class 0x00bfb49ff80fd7ef5e84662d6d256d49daf75e0c5bd279b20a786f058ca21418 with salt 0x054645c0d1e766ddd927b3bde150c0a3dc0081af7fb82160c1582e05f6018794...
    The contract will be deployed at address 0x07cdd583619462c2b14532eddb2b169b8f8d94b63bfb5271dae6090f95147a44
    Contract deployment transaction: 0x00413d9638fecb75eb07593b5c76d13a68e4af7962c368c5c2e810e7a310d54c
    Contract deployed: 0x07cdd583619462c2b14532eddb2b169b8f8d94b63bfb5271dae6090f95147a44
Interacting with Starknet Contracts
Using Starkli, you can interact with smart contracts through two primary methods:
call: For read-only functions.invoke: For functions that alter the state.
Reading Data with call
The call command let's you query contract functions without transacting. For instance, if you want to determine the current contract owner using the get_name function, which
requires no arguments:
    starkli call \
        <CONTRACT_ADDRESS> \
        get_name
Replace <CONTRACT_ADDRESS> with the address of your contract. The
command will return the owner’s address, which was initially set during
the contract’s deployment:
    [
        "0x0000000000000000000000000000000000000000737461726b6e6574626f6f6b"
    ]
But what is this lengthy output? In Starknet, we use the felt252 data type to represent strings. This can be decoded into its string representation:
starkli parse-cairo-string 0x737461726b6e6574626f6f6b
The result:
starknetbook
Modifying Contract State with invoke
To alter the contract's state, use the invoke command. For instance, if you want to update the name field in the storage, utilize the set_name function:
    starkli invoke \
        <CONTRACT_ADDRESS> \
        set_name \
        <felt252>
Where:
<CONTRACT_ADDRESS>is the address of your contract.<felt252>is the new value for thenamefield, in felt252 format.
For example, to update the name to "Omar", first convert the string "Omar" to its felt252 representation:
starkli to-cairo-string Omar
This will return:
0x4f6d6172
Now, proceed with the invoke command:
starkli invoke 0x07cdd583619462c2b14532eddb2b169b8f8d94b63bfb5271dae6090f95147a44 set_name 0x4f6d6172
Bravo! You've adeptly modified and interfaced with your Starknet contract.
Scarb: The Package Manager
To make the most of this chapter, a basic grasp of the Cairo programming language is advised. We suggest reading chapters 1-6 of the Cairo Book, covering topics from Getting Started to Enums and Pattern Matching. Follow this by studying the Starknet Smart Contracts chapter in the same book. With this background, you’ll be well-equipped to understand the examples presented here.
Scarb is Cairo’s package manager designed for both Cairo and Starknet projects. It handles dependencies, compiles projects, and integrates with tools like Foundry. It is built by the same team that created Foundry for Starknet.
Scarb Workflow
Follow these steps to develop a Starknet contract using Scarb:
-
Initialize: Use
scarb newto set up a new project, generating aScarb.tomlfile and initialsrc/lib.cairo. -
Code: Add your Cairo code in the
srcdirectory. -
Dependencies: Add external libraries using
scarb add. -
Compile: Execute
scarb buildto convert your contract into Sierra code.
Scarb simplifies your development workflow, making it efficient and streamlined.
Installation
Scarb is cross-platform, supporting macOS, Linux, and Windows. For installation, refer to the Basic installation guide.
Cairo Project Structure
Next, we’ll dive into the key components that make up a Cairo project.
Cairo Packages
Cairo packages, also referred to as "crates" in some contexts, are the building blocks of a Cairo project. Each package must follow several rules:
-
A package must include a
Scarb.tomlfile, which is Scarb’s manifest file. It contains the dependencies for your package. -
A package must include a
src/lib.cairofile, which is the root of the package tree. It allows you to define functions and declare used modules.
Package structures might look like the following case where we have a
package named my_package, which includes a src directory with the
lib.cairo file inside, a snips directory which in itself a package
we can use, and a Scarb.toml file in the top-level directory.
my_package/
├── src/
│   ├── module1.cairo
│   ├── module2.cairo
│   └── lib.cairo
├── snips/
│   ├── src/
│   │   ├── lib.cairo
│   ├── Scarb.toml
└── Scarb.toml
Within the Scarb.toml file, you might have:
[package]
name = "my_package"
version = "0.1.0"

[dependencies]
starknet = ">=2.0.1"
snips = { path = "snips" }
Here starknet and snips are the dependencies of the package. The
starknet dependency is hosted on the Scarb registry (we do not need to
download it), while the snips dependency is located in the snips
directory.
Setting Up a Project with Scarb
To create a new project using Scarb, navigate to your desired project directory and execute the following command:
$ scarb new hello_scarb
This command will create a new project directory named hello_scarb,
including a Scarb.toml file, a src directory with a lib.cairo file
inside, and initialize a new Git repository with a .gitignore file.
hello_scarb/
├── src/
│   └── lib.cairo
└── Scarb.toml
Upon opening Scarb.toml in a text editor, you should see something
similar to the code snippet below:
[package]
name = "hello_scarb"
version = "0.1.0"

# See more keys and their definitions at https://docs.swmansion.com/scarb/docs/reference/manifest.html
[dependencies]
# foo = { path = "vendor/foo" }
Building a Scarb Project
Clear all content in src/lib.cairo and replace with the following:
// src/lib.cairo
mod hello_scarb;
Next, create a new file titled src/hello_scarb.cairo and add the
following:
// src/hello_scarb.cairo
use debug::PrintTrait;
fn main() {
    'Hello, Scarb!'.print();
}
In this instance, the lib.cairo file contains a module declaration
referencing hello_scarb, which includes the hello_scarb.cairo
file’s implementation. For more on modules, imports, and the lib.cairo
file, please refer to the cairo-book on Managing Cairo Projects in Chapter
7.
Scarb mandates that your source files be located within the src
directory.
To build (compile) your project from your hello_scarb directory, use
the following command:
scarb build
This command compiles your project and produces the Sierra code in the
target/dev/hello_scarb.sierra.json file. Sierra serves as an intermediate
layer between high-level Cairo and compilation targets such as Cairo
Assembly (CASM). To understand more about Sierra, check out this
article.
To remove the build artifacts and delete the target directory, use the
scarb clean command.
Adding Dependencies
Scarb facilitates the seamless management of dependencies for your Cairo packages. Here are two methods to add dependencies to your project:
- Edit Scarb.toml File
Open the Scarb.toml file in your project directory and locate the
[dependencies] section. If it doesn’t exist, add it. To include a
dependency hosted on a Git repository, use the following format:
[dependencies]
alexandria_math = { git = "https://github.com/keep-starknet-strange/alexandria.git" }
For consistency, it’s recommended to pin Git dependencies to specific
commits. This can be done by adding the rev field with the commit
hash:
[dependencies]
alexandria_math = { git = "https://github.com/keep-starknet-strange/alexandria.git", rev = "81bb93c" }
After adding the dependency, remember to save the file.
- Use the scarb add Command
Alternatively, you can use the scarb add command to add dependencies
to your project. Open your terminal and execute the following command:
$ scarb add alexandria_math --git https://github.com/keep-starknet-strange/alexandria.git
This command will add the alexandria_math dependency from the specified Git repository to your project.
To remove a dependency, you can use the scarb rm command.
Once a dependency is added, the Scarb.toml file will be automatically updated with the new dependency information.
Using Dependencies in Your Code
After dependencies are added to your project, you can start utilizing them in your Cairo code.
For example, let’s assume you have added the alexandria_math
dependency. Now, you can import and utilize functions from the
alexandria_math library in your src/hello_scarb.cairo file:
// src/hello_scarb.cairo
use alexandria_math::fibonacci;

fn main() -> felt252 {
    fibonacci::fib(0, 1, 10)
}
In the above example, we import the fibonacci function from the alexandria_math library and utilize it in the main function.
Scarb Cheat Sheet
Here’s a quick cheat sheet of some of the most commonly used Scarb commands:
-
scarb new <project_name>: Initialize a new project with the given project name. -
scarb build: Compile your Cairo code into Sierra code. -
scarb add <dependency> --git <repository>: Add a dependency to your project from a specified Git repository. -
scarb rm <dependency>: Remove a dependency from your project. -
scarb run <script>: Run a custom script defined in yourScarb.tomlfile.
What is new since version 2.3.0
- JSON containing Sierra code of Starknet contract class becomes:
contract.contract_class.json. - JSON containing CASM code of Starknet contract class becomes:
contract.compiled_contract_class.json. - Now cairo supports
Components. They are modular add-ons encapsulating reusable logic, storage, and events that can be incorporated into multiple contracts. They can be used to extend a contract's functionality, without having to reimplement the same logic over and over again.
Project using Components
One of the most important features since scarb 2.3.0 version is Components. Think of components as Lego blocks. They allow you to enrich your contracts by plugging in a module that you or someone else wrote.
Lets see and example. Recover our project from Testnet Deployment section. We used the Ownable-Starknet example to interact with the blockchain, now we are going to use the same project, but we will refactor the code in order to use components
This is how our smart contract looks now
#![allow(unused)]
fn main() {
// ...rest of the code

#[starknet::component]
mod ownable_component {
    use super::{ContractAddress, IOwnable};
    use starknet::get_caller_address;

    #[storage]
    struct Storage {
        owner: ContractAddress
    }

    #[event]
    #[derive(Drop, starknet::Event)]
    enum Event {
        OwnershipTransferred: OwnershipTransferred
    }

    #[derive(Drop, starknet::Event)]
    struct OwnershipTransferred {
        previous_owner: ContractAddress,
        new_owner: ContractAddress,
    }

    #[embeddable_as(Ownable)]
    impl OwnableImpl<
        TContractState, +HasComponent<TContractState>
    > of IOwnable<ComponentState<TContractState>> {
        fn transfer_ownership(
            ref self: ComponentState<TContractState>, new_owner: ContractAddress
        ) {
            self.only_owner();
            self._transfer_ownership(new_owner);
        }
        fn owner(self: @ComponentState<TContractState>) -> ContractAddress {
            self.owner.read()
        }
    }

    #[generate_trait]
    impl InternalImpl<
        TContractState, +HasComponent<TContractState>
    > of InternalTrait<TContractState> {
        fn only_owner(self: @ComponentState<TContractState>) {
            let owner: ContractAddress = self.owner.read();
            let caller: ContractAddress = get_caller_address();
            assert(!caller.is_zero(), 'ZERO_ADDRESS_CALLER');
            assert(caller == owner, 'NOT_OWNER');
        }

        fn _transfer_ownership(
            ref self: ComponentState<TContractState>, new_owner: ContractAddress
        ) {
            let previous_owner: ContractAddress = self.owner.read();
            self.owner.write(new_owner);
            self
                .emit(
                    OwnershipTransferred { previous_owner: previous_owner, new_owner: new_owner }
                );
        }
    }
}

#[starknet::contract]
mod ownable_contract {
    use ownable_project::ownable_component;
    use super::{ContractAddress, IData};

    component!(path: ownable_component, storage: ownable, event: OwnableEvent);

    #[abi(embed_v0)]
    impl OwnableImpl = ownable_component::Ownable<ContractState>;

    impl OwnableInternalImpl = ownable_component::InternalImpl<ContractState>;

    #[storage]
    struct Storage {
        data: felt252,
        #[substorage(v0)]
        ownable: ownable_component::Storage
    }

    #[event]
    #[derive(Drop, starknet::Event)]
    enum Event {
        OwnableEvent: ownable_component::Event
    }

    #[constructor]
    fn constructor(ref self: ContractState, initial_owner: ContractAddress) {
        self.ownable.owner.write(initial_owner);
        self.data.write(1);
    }
    #[external(v0)]
    impl OwnableDataImpl of IData<ContractState> {
        fn get_data(self: @ContractState) -> felt252 {
            self.data.read()
        }
        fn set_data(ref self: ContractState, new_value: felt252) {
            self.ownable.only_owner();
            self.data.write(new_value);
        }
    }
}
}
Basically we decided to apply components on the section related to ownership and created a separated module ownable_component. Then we kept the data section in our main module ownable_contract.
To get the full implementation of this project, navigate to the src/ directory in the examples/Ownable-Components directory of the Starknet Book repo. The src/lib.cairo file contains the contract to practice with.
After you get the full code on your machine, open your terminal, input scarb build to compile it, deploy your contract and call functions.
You can learn more about components in Chapter 16 of The Cairo Book.
Scarb is a versatile tool, and this is just the beginning of what you can achieve with it. As you gain more experience in the Cairo language and the Starknet platform, you’ll discover how much more you can do with Scarb.
To stay updated on Scarb and its features, be sure to check the official Scarb documentation regularly. Happy coding!
The Book is a community-driven effort created for the community.
-
If you’ve learned something, or not, please take a moment to provide feedback through this 3-question survey.
-
If you discover any errors or have additional suggestions, don’t hesitate to open an issue on our GitHub repository.
Katana: A Local Node
Katana is designed to aid in local development.
This creation by the Dojo
team
enables you to perform all Starknet-related activities in a local
environment, thus serving as an efficient platform for development and
testing.
We suggest employing either katana or starknet-devnet for testing
your contracts, with the latter discussed in another
subchapter. The starknet-devnet is a public testnet, maintained by the
Shard Labs team. Both
these tools offer an effective environment for development and testing.
For an example of how to use katana to deploy and interact with a
contract, see the introduction subchapter of this Chapter or a voting contract example in The Cairo Book.
Understanding RPC in Starknet
Remote Procedure Call (RPC) establishes the communication between nodes in the Starknet network. Essentially, it allows us to interact with a node in the Starknet network. The RPC server is responsible for receiving these calls.
RPC can be obtained from various sources: . To support the
decentralization of the Network, you can use your own local Starknet
node. For ease of access, consider using a provider such as
Infura or
Alchemy to get an RPC client. For
development and testing, a temporary local node such as katana can be
used.
Getting Started with Katana
To install Katana, use the dojoup installer from the command line:
curl -L https://install.dojoengine.org | bash
dojoup
After restarting your terminal, verify the installation with:
katana --version
To upgrade Katana, rerun the installation command.
To initialize a local Starknet node, execute the following command:
katana --accounts 3 --seed 0
The --accounts flag determines the number of accounts to be created,
while the --seed flag sets the seed for the private keys of these
accounts. This ensures that initializing the node with the same seed
will always yield the same accounts.
Running the command produces output similar to this:
██╗  ██╗ █████╗ ████████╗ █████╗ ███╗   ██╗ █████╗
██║ ██╔╝██╔══██╗╚══██╔══╝██╔══██╗████╗  ██║██╔══██╗
█████╔╝ ███████║   ██║   ███████║██╔██╗ ██║███████║
██╔═██╗ ██╔══██║   ██║   ██╔══██║██║╚██╗██║██╔══██║
██║  ██╗██║  ██║   ██║   ██║  ██║██║ ╚████║██║  ██║
╚═╝  ╚═╝╚═╝  ╚═╝   ╚═╝   ╚═╝  ╚═╝╚═╝  ╚═══╝╚═╝  ╚═╝

PREDEPLOYED CONTRACTS
==================

| Contract        | Fee Token
| Address         | 0x49d36570d4e46f48e99674bd3fcc84644ddd6b96f7c741b1562b82f9e004dc7
| Class Hash      | 0x02a8846878b6ad1f54f6ba46f5f40e11cee755c677f130b2c4b60566c9003f1f

| Contract        | Universal Deployer
| Address         | 0x41a78e741e5af2fec34b695679bc6891742439f7afb8484ecd7766661ad02bf
| Class Hash      | 0x07b3e05f48f0c69e4a65ce5e076a66271a527aff2c34ce1083ec6e1526997a69

| Contract        | Account Contract
| Class Hash      | 0x05400e90f7e0ae78bd02c77cd75527280470e2fe19c54970dd79dc37a9d3645c

PREFUNDED ACCOUNTS
==================

| Account address |  0x2d71e9c974539bb3ffb4b115e66a23d0f62a641ea66c4016e903454c8753bbc
| Private key     |  0x33003003001800009900180300d206308b0070db00121318d17b5e6262150b
| Public key      |  0x4c0f884b8e5b4f00d97a3aad26b2e5de0c0c76a555060c837da2e287403c01d

| Account address |  0x6162896d1d7ab204c7ccac6dd5f8e9e7c25ecd5ae4fcb4ad32e57786bb46e03
| Private key     |  0x1800000000300000180000000000030000000000003006001800006600
| Public key      |  0x2b191c2f3ecf685a91af7cf72a43e7b90e2e41220175de5c4f7498981b10053

| Account address |  0x6b86e40118f29ebe393a75469b4d926c7a44c2e2681b6d319520b7c1156d114
| Private key     |  0x1c9053c053edf324aec366a34c6901b1095b07af69495bffec7d7fe21effb1b
| Public key      |  0x4c339f18b9d1b95b64a6d378abd1480b2e0d5d5bd33cd0828cbce4d65c27284

ACCOUNTS SEED
=============
0

🚀 JSON-RPC server started: http://0.0.0.0:5050
The output includes the addresses, private keys, and public keys of the created accounts. It also contains the seed used to generate the accounts. This seed can be reused to create identical accounts in future runs. Additionally, the output provides the URL of the JSON-RPC server. This URL can be used to establish a connection to the local Starknet node.
To stop the local Starknet node, simply press Ctrl+C.
The local Starknet node does not persist data. Hence, once it’s stopped, all data will be erased.
For a practical demonstration of katana to deploy and interact with a
contract, see Introduction: Starkli, Scarb and Katana.
Testnet Deployment
This chapter guides developers through the process of compiling, deploying, and interacting with a Starknet smart contract written in Cairo on the testnet. Earlier, the focus was on deploying contracts using a local node, Katana. This time, the deployment and interaction target the Starknet testnet.
Ensure the following commands run successfully on your system. If not, see the Basic Installation section:
    scarb --version  # For Cairo code compilation
    starkli --version  # To interact with Starknet
Smart Wallet Setup
A smart wallet comprises a Signer and an Account Descriptor. The Signer is a smart contract with a private key for signing transactions, while the Account Descriptor is a JSON file detailing the wallet’s address and public key.
In order for an account to be used as a signer it must be deployed to the appropriate network, Starknet Sepolia or mainnet, and funded. For this example we are going to use Sepolia Testnet. To deploy your wallet, visit Smart Wallet Setup. Now you’re ready to interact with Starknet smart contracts.
Creating a Signer
The Signer is an essential smart contract capable of signing transactions in Starknet. You’ll need the private key from your smart wallet to create one, from which the public key can be derived.
Starkli enables secure storage of your private key through a keystore file. This encrypted file can be accessed using a password and is generally stored in the default Starkli directory.
First, create the default directory:
mkdir -p ~/.starkli-wallets/deployer
Then generate the keystore file. The signer command contains subcommands
for creating a keystore file from a private key or completely create a
new one. In this tutorial, we’ll use the private key option which is the
most common use case. You need to provide the path to the keystore file
you want to create. You can give any name to the keystore file, you will
likely have several wallets. In this tutorial, we will use the name
my_keystore_1.json.
    starkli signer keystore from-key ~/.starkli-wallets/deployer/my_keystore_1.json
    Enter private key:
    Enter password:
In the private key prompt, paste the private key of your smart wallet. In the password prompt, enter a password of your choice. You will need this password to sign transactions using Starkli.
How to get the private key?
Export the private key from your Braavos or Argent wallet. For Argent X, you can find it in the "Settings" section → Select your Account → "Export Private Key". For Braavos, you can find it in the "Settings" section → "Privacy and Security" → "Export Private Key".
While knowing the private key of a smart wallet is necessary to sign transactions, it’s not sufficient. We also need to inform Starkli about the signing mechanism employed by our smart wallet created by Braavos or Argent X. Does it use an elliptic curve? If yes, which one? This is the reason why we need an account descriptor file.
[OPTIONAL] The Architecture of the Starknet Signer
This section is optional and is intended for those who want to learn more about the Starknet Signer. If you are not interested in the details, you can skip it.
The Starknet Signer plays an instrumental role in securing your transactions. Let’s demystify what goes on under the hood.
Key Components:
-
Private Key: A 256-bit/32-byte/64-character (ignoring the 0x prefix) hexadecimal key that is the cornerstone of your wallet’s security.
-
Public Key: Derived from the private key, it’s also a 256-bit/32-byte/64-character hexadecimal key.
-
Smart Wallet Address: Unlike Ethereum, the address here is influenced by the public key, class hash, and a salt. Learn more in Starknet Documentation.
To view the details of the previously created keystore file:
cat ~/.starkli-wallets/deployer/my_keystore_1.json
Anatomy of the keystore.json File:
{
  "crypto": {
    "cipher": "aes-128-ctr",
    "cipherparams": {
      "iv": "dba5f9a67456b121f3f486aa18e24db7"
    },
    "ciphertext": "b3cda3df39563e3dd61064149d6ed8c9ab5f07fbcd6347625e081fb695ddf36c",
    "kdf": "scrypt",
    "kdfparams": {
      "dklen": 32,
      "n": 8192,
      "p": 1,
      "r": 8,
      "salt": "6dd5b06b1077ba25a7bf511510ea0c608424c6657dd3ab51b93029244537dffb"
    },
    "mac": "55e1616d9ddd052864a1ae4207824baac58a6c88798bf28585167a5986585ce6"
  },
  "id": "afbb9007-8f61-4e62-bf14-e491c30fd09a",
  "version": 3
}
-
version: The version of the smart wallet implementation. -
id: A randomly generated identification string. -
crypto: Houses all encryption details.
Inside crypto:
-
cipher: Specifies the encryption algorithm used, which in this case is AES-128-CTR.-
AES (Advanced Encryption Standard): A globally accepted encryption standard.
-
128: Refers to the key size in bits, making it a 128-bit key.
-
CTR (Counter Mode): A specific mode of operation for the AES cipher.
-
-
cipherparams: Contains an Initialization Vector (IV), which ensures that encrypting the same plaintext with the same key will produce different ciphertexts.iv(Initialization Vector): A 16-byte hex string that serves as a random and unique starting point for each encryption operation.
-
ciphertext: This is the private key after encryption, securely stored so that only the correct password can reveal it. -
kdfandkdfparams: KDF stands for Key Derivation Function. This adds a layer of security by requiring computational work, making brute-force attacks harder.-
dklen: The length (in bytes) of the derived key. Typically 32 bytes. -
n: A cost factor representing CPU/memory usage. A higher value means more computational work is needed, thus increasing security. -
p: Parallelization factor, affecting the computational complexity. -
r: Block size for the hash function, again affecting computational requirements. -
salt: A random value that is combined with the password to deter dictionary attacks.
-
-
mac(Message Authentication Code): This is a cryptographic code that ensures the integrity of the message (the encrypted private key in this case). It is generated using a hash of both the ciphertext and a portion of the derived key.
Before to continue, we have to choose a rpc provider
Choosing an RPC Provider
There are three main options for RPC providers, sorted by ease of use:
-
Infura or Alchemy: A step up in complexity. You’ll need to set up an API key and choose an endpoint. For Infura, it would look like
https://starknet-sepolia.infura.io/v3/<API_KEY>. Learn more in the Infura documentation. -
Your Own Node: For those who want full control. It’s the most complex but offers the most freedom. Check out Chapter 3 of the Starknet Book or Kasar for setup guides.
-
Free RPC vendor: These 2 networks are eligible for free RPC vendors: mainnet and sepolia. You can choose Blast or Nethermind
Creating an Account Descriptor
An Account Descriptor informs Starkli about your smart wallet’s unique
features, such as its signing mechanism. You can generate this
descriptor using Starkli’s fetch subcommand under the account
command. The fetch subcommand takes your on-chain wallet address as
input and generates the account descriptor file. The account descriptor
file is a JSON file that contains the details of your smart wallet. We also have to pass the rpc provider here.
starkli account fetch <SMART_WALLET_ADDRESS> --output ~/.starkli-wallets/deployer/my_account_1.json --rpc https://starknet-sepolia.public.blastapi.io/rpc/v0_7
Note: Here we used the Public RPC Endpoint v0.7 Starknet (Sepolia) Testnet from Blast. If you don't specify the rpc provider, Starkli will use Blast Sepolia endpoint anyway.
⚠️ Contract not found?
In case you face an error like this:
Error: ContractNotFound🟩 Solution:
It means you probably just created a new wallet and it has not been deployed yet. To accomplish this you have to fund your wallet with tokens and transfer tokens to a different wallet address. For Sepolia tokens you can check this faucet. For more ways to get Sepolia tokens, a detailed instructions can be found in the Get Sepolia Tokens section.
Still doesn't work?
Check if your wallet's testnet network isn't yet set with Sepolia, try again with your blast rpc url.
starknet account fetch ... --rpc https://starknet-sepolia.public.blastapi.io
After this process, search your wallet address on the Starknet explorer. To see the details, go back to Smart Wallet Setup.
After running the command, you’ll see a message like the one below. We’re using a Braavos wallet as an example, but the steps are the same for an Argent wallet.
    Account contract type identified as: Braavos
    Description: Braavos official proxy account
    Downloaded new account config file: ~/.starkli-wallets/deployer/my_account_1.json
After the acount descriptor file is generated, you can see its details, run:
cat ~/.starkli-wallets/deployer/my_account_1.json
Here’s what a typical descriptor might look like:
{
  "version": 1,
  "variant": {
    "type": "braavos",
    "version": 1,
    "implementation": "0x5dec330eebf36c8672b60db4a718d44762d3ae6d1333e553197acb47ee5a062",
    "multisig": {
      "status": "off"
    },
    "signers": [
      {
        "type": "stark",
        "public_key": "0x49759ed6197d0d385a96f9d8e7af350848b07777e901f5570b3dc2d9744a25e"
      }
    ]
  },
  "deployment": {
    "status": "deployed",
    "class_hash": "0x3131fa018d520a037686ce3efddeab8f28895662f019ca3ca18a626650f7d1e",
    "address": "0x6dcb489c1a93069f469746ef35312d6a3b9e56ccad7f21f0b69eb799d6d2821"
  }
}
Note: The structure will differ if you use an Argent wallet.
Setting up Environment Variables
To simplify Starkli commands, you can set environment variables. Two key variables are crucial: one for the Signer’s keystore file location and another for the Account Descriptor file.
    export STARKNET_ACCOUNT=~/.starkli-wallets/deployer/my_account_1.json
    export STARKNET_KEYSTORE=~/.starkli-wallets/deployer/my_keystore_1.json
    export STARKNET_RPC=https://starknet-sepolia.public.blastapi.io/rpc/v0_7
Setting these variables makes running Starkli commands easier and more efficient.
Declaring Smart Contracts in Starknet
Deploying a smart contract on Starknet involves two steps:
- Declare your contract’s code.
- Deploy an instance of the declared code.
To get started, navigate to the src/ directory in the examples/Ownable-Starknet directory
of the Starknet Book repo. The src/lib.cairo file contains a basic
contract to practice with.
First, compile the contract using the Scarb compiler. If you haven’t installed Scarb, follow the installation guide in the basic installation section.
scarb build
This creates a compiled contract in target/dev/ as
ownable_starknet_ownable.compiled_contract_class.json (in Chapter 2 of the book we will learn
more details about Scarb).
Declaring Your Contract
Run this command to declare your contract using the default Starknet Sequencer’s Gateway:
starkli declare ./target/dev/ownable_starknet_ownable.contract_class.json
According to the STARKNET_RPC url, starkli can recognize the target
blockchain network, in this case "sepolia", so it is not necessary
explicitly specify it.
Unless you’re working with custom networks where it’s infeasible for
Starkli to detect the right compiler version, you shouldn’t need to
manually choose a version with --network and --compiler-version.
If you encounter an "Error: Invalid contract class," it likely means your Scarb’s compiler version is incompatible with Starkli. Follow the steps above to align the versions. Starkli usually supports compiler versions accepted by mainnet, even if Scarb’s latest version is not yet compatible.
After running the command, you’ll receive a contract class hash. This unique hash serves as the identifier for your contract class within Starknet. For example:
Class hash declared: 0x04c70a75f0246e572aa2e1e1ec4fffbe95fa196c60db8d5677a5c3a3b5b6a1a8
You can think of this hash as the contract class’s address. Use a block explorer like StarkScan to verify this hash on the blockchain.
If the contract class you’re attempting to declare already exists, it is ok we can continue. You’ll receive a message like:
    Not declaring class as its already declared. Class hash:
    0x04c70a75f0246e572aa2e1e1ec4fffbe95fa196c60db8d5677a5c3a3b5b6a1a8
Deploying Smart Contracts on Starknet
To deploy a smart contract, you’ll need to instantiate it on Starknet’s testnet. This process involves executing a command that requires two main components:
-
The class hash of your smart contract.
-
Any constructor arguments that the contract expects.
In our example, the constructor expects an owner address. You can learn more about constructors in Chapter 13 of The Cairo Book.
The command would look like this:
    starkli deploy \
        <CLASS_HASH> \
        <CONSTRUCTOR_INPUTS>
Here’s a specific example with an actual class hash and constructor inputs (as the owner address use the address of your smart wallet so you can invoke the transfer_ownership function later):
    starkli deploy \
        0x04c70a75f0246e572aa2e1e1ec4fffbe95fa196c60db8d5677a5c3a3b5b6a1a8 \
        0x02cdAb749380950e7a7c0deFf5ea8eDD716fEb3a2952aDd4E5659655077B8510
After executing the command and entering your password, you should see output like the following:
    Deploying class 0x04c70a75f0246e572aa2e1e1ec4fffbe95fa196c60db8d5677a5c3a3b5b6a1a8 with salt 0x065034b27a199cbb2a5b97b78a8a6a6c6edd027c7e398b18e5c0e5c0c65246b7...
    The contract will be deployed at address 0x02a83c32d4b417d3c22f665acbc10e9a1062033b9ab5b2c3358952541bc6c012
    Contract deployment transaction: 0x0743de1e233d38c4f3e9fb13f1794276f7d4bf44af9eac66e22944ad1fa85f14
    Contract deployed:
    0x02a83c32d4b417d3c22f665acbc10e9a1062033b9ab5b2c3358952541bc6c012
The contract is now live on the Starknet testnet. You can verify its status using a block explorer like StarkScan. On the "Read/Write Contract" tab, you’ll see the contract’s external functions.
Interacting with the Starknet Contract
Starkli enables interaction with smart contracts via two primary
methods: call for read-only functions and invoke for write functions
that modify the state.
Calling a Read Function
The call command enables you to query a smart contract function
without sending a transaction. For instance, to find out who the current
owner of the contract is, you can use the get_owner function, which
requires no arguments.
    starkli call \
        <CONTRACT_ADDRESS> \
        owner
Replace <CONTRACT_ADDRESS> with the address of your recently deployed contract. The command will return the owner’s address, which was initially set during
the contract’s deployment:
    [
        "0x02cdab749380950e7a7c0deff5ea8edd716feb3a2952add4e5659655077b8510"
    ]
Invoking a Write Function
You can modify the contract’s state using the invoke command. For
example, let’s transfer the contract’s ownership with the
transfer_ownership function.
    starkli invoke \
        <CONTRACT_ADDRESS> \
        transfer_ownership \
        <NEW_OWNER_ADDRESS>
Replace <CONTRACT_ADDRESS> with the address of the contract and
<NEW_OWNER_ADDRESS> with the address you want to transfer ownership
to. If the smart wallet you’re using isn’t the contract’s owner, an
error will appear. Note that the initial owner was set when deploying
the contract:
Execution was reverted; failure reason: [0x43616c6c6572206973206e6f7420746865206f776e6572].
The failure reason is encoded as a felt. o decode it, use the starkli’s
parse-cairo-string command.
starkli parse-cairo-string <ENCODED_ERROR>
For example, if you see
0x43616c6c6572206973206e6f7420746865206f776e6572, decoding it will
yield "Caller is not the owner."
After a successful transaction on L2, use a block explorer like
StarkScan or Voyager to confirm the transaction status using the hash
provided by the invoke command.
To verify that the ownership has successfully transferred, you can call
the get_owner function again:
    starkli call \
        <CONTRACT_ADDRESS> \
        owner
If the function returns the new owner’s address, the transfer was successful.
Congratulations! You’ve successfully deployed and interacted with a Starknet contract.
Get started with Sepolia - Get ETH and deploy your wallet
Overview
The easiest way to get L2 Sepolia ETH on starknet is to use Starknet Faucet. This faucet is a simple web application that allows you to request $ETH for the Starknet testnet.
There is another way of acquiring SEPOLIA tokens, it involves obtaining them on the Ethereum Sepolia testnet and then transferring them to the Starknet Sepolia testnet. This process is more complex and requires the use of a bridge contract. We suggest using the Starknet Faucet.
Bridge Contract Method
Step 1: Obtain SEPOLIA Tokens on the Ethereum Sepolia Testnet
To acquire $ETH on the Ethereum Sepolia testnet, you can use:
The process is simple: log in, paste your Ethereum Sepolia testnet address, and click the "Send me $ETH" button.
Step 2: Transfer Your $ETH to the Starknet Sepolia Testnet
This step is slightly more complex. You will need to navigate to the Bridge Contract.
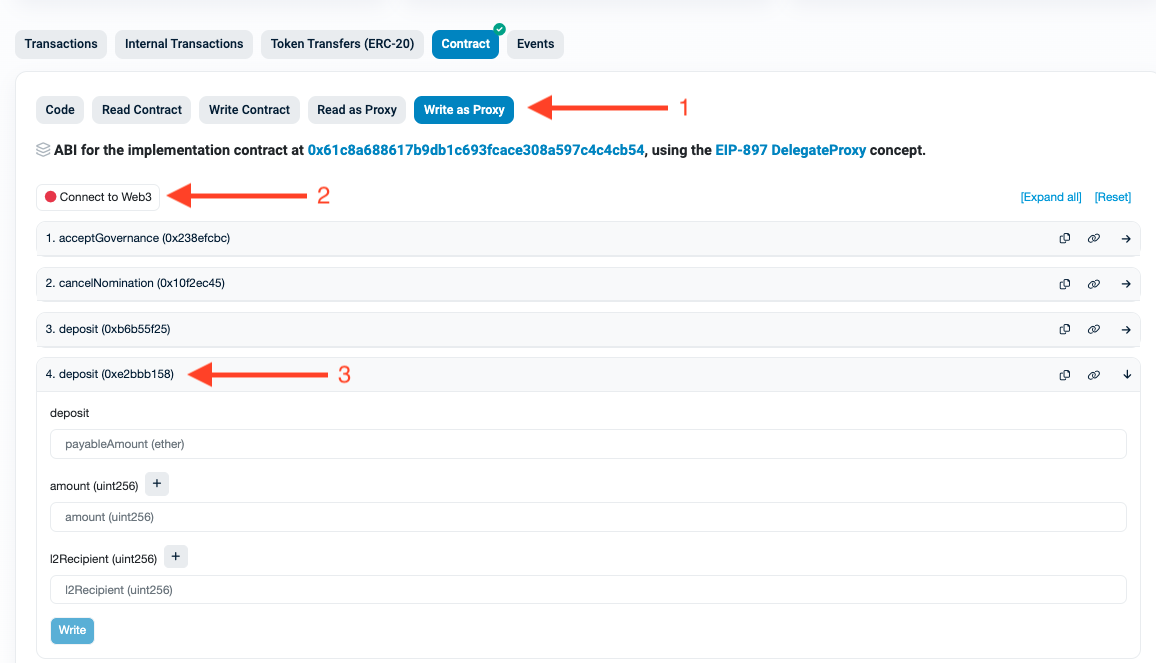
Connect the wallet containing your $ETH and then open function number 4 deposit (0xe2bbb158).
Parameter Specification
For the fields, specify:
deposit: The amount of ETH to deposit plus a small amount for gas. For example,x + 0.001 ETH. (Ex: 0.031)amount: The amount of $ETH you want to transfer to Starknet in uint256 format. In this case,0.03 ETHwould be30000000000000000(16 decimals).
1 ETH = 1000000000000000000 (18 decimals)
l2Recipient: The address of your Starknet Sepolia testnet account.
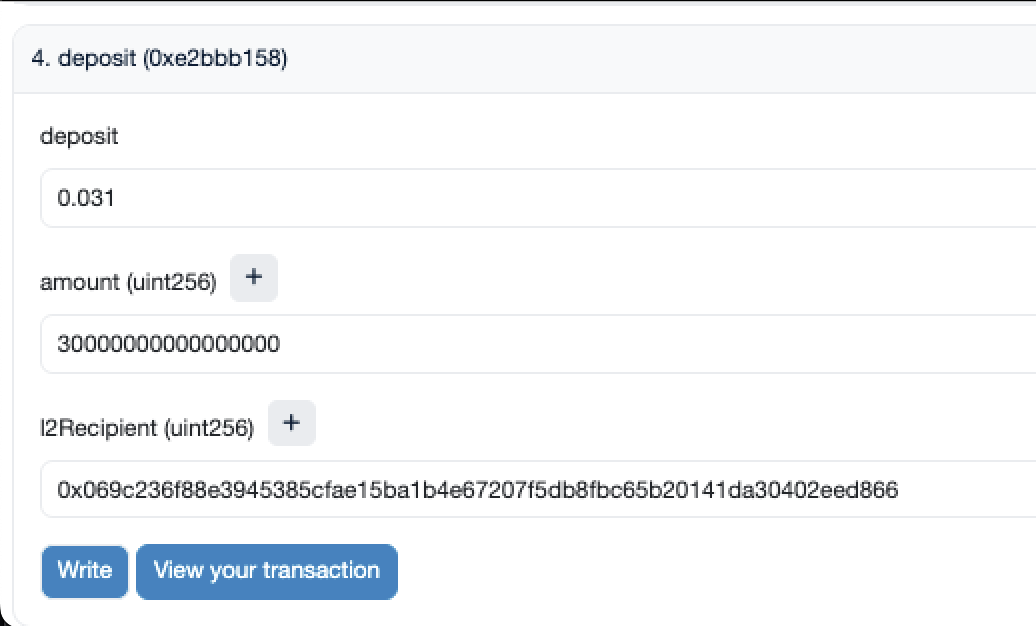
Click the "Write" button and confirm the transaction in your wallet.
[Optional] Wallet Deployment
If this is your first time using your wallet on the Starknet Sepolia testnet, go to your ArgentX or Braavos wallet and send some of the ETH you transferred to another starknet wallet. This will automatically deploy your wallet.
Starkli: Querying Starknet
Starkli is a Command Line Interface (CLI) tool designed for Starknet interaction, utilizing the capabilities of starknet-rs. This tool simplifies querying and executing transactions on Starknet.
NOTE: Before continuing with this chapter, make sure you have completed the Basic Installation subchapter of Chapter 2. This includes the installation of Starkli.
In the next subchapter we will create a short Bash script using Starkli to query Starknet. It's just an example, however, creating your own Bash scripts to interact with Starknet would be very useful in practice.
Basic Setup
To ensure a smooth start with Starkli, execute the following command on your system. If you encounter any issues, refer to the Basic Installation guide for assistance:
starkli --version # Verifies Starkli installation and interacts with Starknet
Connect to Starknet with Providers
Starkli primarily operates with a JSON-RPC provider. To access a JSON-RPC endpoint, you have several options:
- Use services like Infura or Alchemy for an RPC client.
- Employ a temporary local node like
katanafor development and testing purposes. - Setup your own node.
Interacting with Katana
To start Katana, open a terminal and execute:
katana
To retrieve the chain id from the Katana JSON-RPC endpoint, use the following command:
starkli chain-id --rpc http://0.0.0.0:5050
This command will output:
0x4b4154414e41 (KATANA)
To obtain the latest block number on Katana, run:
starkli block-number --rpc http://0.0.0.0:5050
The output will be:
0
Since katana is a temporary local node and its state is ephemeral, the block number is initially 0. Refer to Introduction to Starkli, Scarb and Katana for further details on changing the state of Katana and observing the block number after commands like starkli declare and starkli deploy.
To declare a contract, execute:
starkli declare target/dev/my_contract_hello.contract_class.json
After declaring, the output will be:
Class hash declared: 0x00bfb49ff80fd7ef5e84662d6d256d49daf75e0c5bd279b20a786f058ca21418
Retrieving the latest block number on Katana again:
starkli block-number
Will result in:
1
Katana logs also reflect these changes:
2023-11-03T04:38:48.712332Z DEBUG server: method="starknet_chainId"
2023-11-03T04:38:48.725133Z DEBUG server: method="starknet_getClass"
2023-11-03T04:38:48.726668Z DEBUG server: method="starknet_chainId"
2023-11-03T04:38:48.741588Z DEBUG server: method="starknet_getNonce"
2023-11-03T04:38:48.744718Z DEBUG server: method="starknet_estimateFee"
2023-11-03T04:38:48.766843Z DEBUG server: method="starknet_getNonce"
2023-11-03T04:38:48.770236Z DEBUG server: method="starknet_addDeclareTransaction"
2023-11-03T04:38:48.779714Z  INFO txpool: Transaction received | Hash: 0x352f04ad496761c73806f92c64c267746afcbc16406bd0041ac6efa70b01a51
2023-11-03T04:38:48.782100Z TRACE executor: Transaction resource usage: Steps: 2854 | ECDSA: 1 | L1 Gas: 3672 | Pedersen: 15 | Range Checks: 63
2023-11-03T04:38:48.782112Z TRACE executor: Event emitted keys=[0x99cd8bde557814842a3121e8ddfd433a539b8c9f14bf31ebf108d12e6196e9]
2023-11-03T04:38:48.782399Z  INFO backend: ⛏️ Block 1 mined with 1 transactions
These logs indicate the receipt of a transaction, gas usage, and the mining of a new block, explaining the increment in block number to 1.
Before deploying a contract, note that Starkli supports argument resolution, simplifying the input process. For instance, constructor inputs in felt format can be easily passed as str:<String-value>:
    starkli deploy \
        0x00bfb49ff80fd7ef5e84662d6d256d49daf75e0c5bd279b20a786f058ca21418 \
        str:starknet-book
This command deploys the contract without requiring to-cairo-string, and a new block is mined as a result.
Interacting with Testnet
To interact with the Testnet, use a third-party JSON-RPC API provider like Infura or Alchemy. With your provider URL, execute the following command to get the latest block number:
starkli block-number --rpc https://starknet-goerli.g.alchemy.com/v2/V0WI...
This command will return a response like:
896360
You can confirm this result by checking Starkscan, where you'll find matching data.
Starkli also streamlines the process of invoking commands. For instance, to transfer 1000 Wei of ETH to address 0x1234, first set up your environment variables:
export STARKNET_ACCOUNT=~/.starkli-wallets/deployer/my_account_1.json
export STARKNET_KEYSTORE=~/.starkli-wallets/deployer/my_keystore_1.json
Then, use the following command for the transfer:
starkli invoke eth transfer <YOUR-ACCOUNT-ADDRESS> u256:1000
You can create your own script to connect to Starknet using Starkli. In the next subchapter we will create a short Bash script.
Example - Starknet Connection Script
This section provides step-by-step instructions to create and run custom bash scripts for Starknet interactions.
Katana Local Node
Description: This script connects to the local StarkNet devnet through Katana, retrieves the current chain ID, the latest block number, and the balance of a specified account.
First, ensure that Katana is running (in terminal 1):
katana
Then, create a file named script_devnet (in terminal 2):
touch script_devnet
Edit this file with your preferred text editor and insert the following script:
#!/bin/bash
chain=$(starkli chain-id --rpc http://0.0.0.0:5050)
echo "Connected to the Starknet local devnet with chain id: $chain"

block=$(starkli block-number --rpc http://0.0.0.0:5050)
echo "The latest block number on Katana is: $block"

account1="0x517ececd29116499f4a1b64b094da79ba08dfd54a3edaa316134c41f8160973"
balance=$(starkli balance $account1 --rpc http://0.0.0.0:5050)
echo "The balance of account $account1 is: $balance ETH"
Execute the script with:
bash script_devnet
You will see output details from the devnet.
Goerli Testnet
Description: This script connects to the Goerli testnet, reads the latest block number, and retrieves the transaction receipt for a specific transaction hash.
For Goerli testnet interactions, create a file named script_testnet:
touch script_testnet
Edit the file and paste in this script:
echo "Input your testnet API URL: "
read url
chain=$(starkli chain-id --rpc $url)
echo "Connected to the Starknet testnet with chain id: $chain"

block=$(starkli block-number --rpc $url)
echo "The latest block number on Goerli is: $block"

echo "Input your transaction hash: "
read hash
receipt=$(starkli receipt $hash --rpc $url)
echo "The receipt of transaction $hash is: $receipt"
Run the script:
bash script_testnet
You will need to input a testnet API URL and a transaction hash. Example hash: 0x2dd73eb1802aef84e8d73334ce0e5856b18df6626fe1a67bb247fcaaccaac8c.
These are brief examples but you get the idea. You can create custom Bash scripts to customize your interactions with Starknet.
Starknet Devnet
Starknet Devnet is a development network (devnet) implemented in Rust, similar to the Python-based starknet-devnet.
Installation
starknet devnet rs can be installed in two ways: using Docker or manually by cloning the repository and running it with Cargo.
Using Docker
To install using Docker, follow the instructions provided here.
Manual Installation (Cloning the Repo)
Prerequisites:
- Rust installation (Rust Install Guide)
Procedure:
- Create a new folder for the project.
- Clone the repository:
git clone https://github.com/0xSpaceShard/starknet-devnet-rs.git
Running
After installation, run Starknet Devnet with the following command:
cargo run
On successful execution, you'll see outputs like predeployed contract addresses, account information, and seed details.
Predeployed FeeToken
Address: 0x49D36570D4E46F48E99674BD3FCC84644DDD6B96F7C741B1562B82F9E004DC7
Class Hash: 0x6A22BF63C7BC07EFFA39A25DFBD21523D211DB0100A0AFD054D172B81840EAF

Predeployed UDC
Address: 0x41A78E741E5AF2FEC34B695679BC6891742439F7AFB8484ECD7766661AD02BF
Class Hash: 0x7B3E05F48F0C69E4A65CE5E076A66271A527AFF2C34CE1083EC6E1526997A69

| Account address |  0x1d11***221c
| Private key     |  0xb7***8ee25
| Public key      |  0x5d46***76bf10

.
.
.

Predeployed accounts using class with hash: 0x4d07e40e93398ed3c76981e72dd1fd22557a78ce36c0515f679e27f0bb5bc5f
Initial balance of each account: 1000000000000000000000 WEI
Seed to replicate this account sequence: 912753742
Running Options
Using a Seed
The Starknet devnet provides a Seed to replicate this account sequence feature. This allows you to use a specific seed to access previously used accounts. This functionality is particularly useful when employing tools like sncast or starkli for contract interactions, as it eliminates the need to change account information.
To load old accounts using a specific seed, execute the following command:
cargo run -- --seed <SEED>
Example (add any number you prefer):
cargo run -- --seed 912753742
Dumping and Loading Data
The process of dumping and loading data facilitates resuming work from where you left off.
- Dumping Data:
- Data can be dumped either on
exitor after atransaction. - In this example, dumping is done on exit into a specified directory. Ensure the directory exists, but not the file.
cargo run -- --dump-on exit --dump-path ./dumps/contract_1
- Loading Data:
- To load data, use the command below. Note that both the directory and the file created by the
dumpcommand must exist. Also, pass in the seed to avoid issues like 'low account balance'.
cargo run -- --dump-path ./dumps/contract_1 --seed 912753742
Additional options
Options:
      --accounts <ACCOUNTS>
          Specify the number of accounts to be predeployed; [default: 10]
      --account-class <ACCOUNT_CLASS>
          Specify the class used by predeployed accounts; [default: cairo0] [possible values: cairo0, cairo1]
      --account-class-custom <PATH>
          Specify the path to a Cairo Sierra artifact to be used by predeployed accounts;
  -e, --initial-balance <DECIMAL_VALUE>
          Specify the initial balance in WEI of accounts to be predeployed; [default: 1000000000000000000000]
      --seed <SEED>
          Specify the seed for randomness of accounts to be predeployed; if not provided, it is randomly generated
      --host <HOST>
          Specify the address to listen at; [default: 127.0.0.1]
      --port <PORT>
          Specify the port to listen at; [default: 5050]
      --timeout <TIMEOUT>
          Specify the server timeout in seconds; [default: 120]
      --gas-price <GAS_PRICE>
          Specify the gas price in wei per gas unit; [default: 100000000000]
      --chain-id <CHAIN_ID>
          Specify the chain ID; [default: TESTNET] [possible values: MAINNET, TESTNET]
      --dump-on <WHEN>
          Specify when to dump the state of Devnet; [possible values: exit, transaction]
      --dump-path <DUMP_PATH>
          Specify the path to dump to;
  -h, --help
          Print help
  -V, --version
          Print version
However, the main difference for the Rust version is the syntax for flags. For example, use
cargo run -- --port 5006orcargo run -- --dump-on exit ...for the Rust Devnet. Other flags can be used in the standard format.
Cross-Version Disclaimer
Be aware that the dumping and loading functionality might not be compatible across different versions of the Devnet. In other words, data dumped from one version of Devnet may not be loadable with another version.
Minting Tokens
To mint tokens, either to an existing address or a new one, use the following command:
curl -d '{"amount":8646000000000, "address":"0x6e...eadf"}' -H "Content-Type: application/json" -X POST http://localhost:5050/mint
Commands compatible with the
sncastandstarklisubchapters are also applicable in the Rust Devnet.
Next
In the next subchapter we will use the sncast tool to interact with the Starknet Devnet in a real world example.
Foundry Cast: Starknet CLI Interaction
Starknet Foundry is a tool designed for testing and developing Starknet contracts. It is an adaptation of the Ethereum Foundry for Starknet, aiming to expedite the development process.
The project consists of two primary components:
- Forge: A testing tool specifically for Cairo contracts. This tool acts as a test runner and boasts features designed to enhance your testing process. Tests are written directly in Cairo, eliminating the need for other programming languages. Additionally, the Forge implementation uses Rust, mirroring Ethereum Foundry's choice of language.
- Cast: This serves as a DevOps tool for Starknet, initially supporting a series of commands to interface with Starknet. In the future, Cast aims to offer deployment scripts for contracts and other DevOps functions.
Cast
Cast provides the Command Line Interface (CLI) for starknet, while Forge addresses testing. Written in Rust, Cast utilizes starknet Rust and integrates with Scarb. This integration allows for argument specification in Scarb.toml, streamlining the process.
sncast simplifies interaction with smart contracts, reducing the number of necessary commands compared to using starkli alone.
In this section, we'll delve into sncast.
Requirements
# scarb --version
scarb 2.4.3
cairo: 2.4.3
sierra: 1.4.0

# snforge --version
snforge 0.14.0

# sncast --version
sncast 0.14.0
The Rust Devnet
Step 1: Sample Smart Contract
The following code sample is sourced from starknet foundry(You can find the source of the example here).
If yo desire to get the files you can do it from Foundry Example Code
#![allow(unused)]
fn main() {
#[starknet::interface]
trait IHelloStarknet<TContractState> {
    fn increase_balance(ref self: TContractState, amount: felt252);
    fn get_balance(self: @TContractState) -> felt252;
}

#[starknet::contract]
mod HelloStarknet {
    #[storage]
    struct Storage {
        balance: felt252,
    }

    #[abi(embed_v0)]
    impl HelloStarknetImpl of super::IHelloStarknet<ContractState> {
        // Increases the balance by the given amount.
        fn increase_balance(ref self: ContractState, amount: felt252) {
            self.balance.write(self.balance.read() + amount);
        }

        // Gets the balance.
        fn get_balance(self: @ContractState) -> felt252 {
            self.balance.read()
        }
    }
}
}
Before interacting with this sample smart contract, it's crucial to test its functionality using snforge to ensure its integrity.
Here are the associated tests:
Take a keen look onto the imports ie
#![allow(unused)]
fn main() {
use casttest::{IHelloStarknetDispatcherTrait, IHelloStarknetDispatcher}
}
casttest from the above line is the name of the project as given in the scarb.toml file
#![allow(unused)]
fn main() {
#[cfg(test)]
mod tests {
    use casttest::{IHelloStarknetDispatcherTrait, IHelloStarknetDispatcher};
    use snforge_std::{declare, ContractClassTrait};

    #[test]
    fn call_and_invoke() {
        // Declare and deploy a contract
        let contract = declare('HelloStarknet');
        let contract_address = contract.deploy(@ArrayTrait::new()).unwrap();

        // Create a Dispatcher object for interaction with the deployed contract
        let dispatcher = IHelloStarknetDispatcher { contract_address };

        // Query a contract view function
        let balance = dispatcher.get_balance();
        assert(balance == 0, 'balance == 0');

        // Invoke a contract function to mutate state
        dispatcher.increase_balance(100);

        // Verify the transaction's effect
        let balance = dispatcher.get_balance();
        assert(balance == 100, 'balance == 100');
    }
}
}
If needed, copy the provided code snippets into the lib.cairo file of your new scarb project.
To execute tests, follow the steps below:
- Ensure
snforgeis listed as a dependency in yourScarb.tomlfile, positioned beneath thestarknetdependency. Your dependencies section should appear as (make sure to use the latest version ofsnforgeandstarknet):
starknet = "2.4.1"
snforge_std = { git = "https://github.com/foundry-rs/starknet-foundry.git", tag = "v0.14.0" }
- Run the command:
snforge test
Note: Use
snforgefor testing instead of thescarb testcommand. The tests are set up to utilize functions fromsnforge_std. Runningscarb testwould cause errors.
Step 2: Setting Up Starknet Devnet
For this guide, the focus is on using Rust starknet devnet. If you've been using katana or pythonic devnet, please be cautious as there might be inconsistencies. If you haven't configured devnet, consider following the guide from Starknet devnet for a quick setup.
To launch starknet devnet, use the command:
cargo run
Upon successful startup, you should receive a response similar to:
Finished dev [unoptimized + debuginfo] target(s) in 0.21s
     Running `target/debug/starknet-devnet`
Predeployed FeeToken
Address: 0x49D36570D4E46F48E99674BD3FCC84644DDD6B96F7C741B1562B82F9E004DC7
Class Hash: 0x6A22BF63C7BC07EFFA39A25DFBD21523D211DB0100A0AFD054D172B81840EAF

Predeployed UDC
Address: 0x41A78E741E5AF2FEC34B695679BC6891742439F7AFB8484ECD7766661AD02BF
Class Hash: 0x7B3E05F48F0C69E4A65CE5E076A66271A527AFF2C34CE1083EC6E1526997A69

| Account address |  0x243a10223fa0a8276cb9bb48cbb2da26dd945d0d09162610d32365b1f8580e1
| Private key     |  0x41f7d13cf9a928319d39c06b328f76af
| Public key      |  0x21952db4ec4ca2f0ce5ea3bfe545ad853043b80c06ef44335908e883e5a8988

...
...
...
2023-11-23T17:06:48.221449Z  INFO starknet_devnet: Starknet Devnet listening on 127.0.0.1:5050
(Note: The abbreviated ... is just a placeholder for the detailed response. In your actual output, you'll see the full details.)
Now, you have written a smart contract, tested it, and successfully initiated starknet devnet.
Dive into sncast
Let's unpack sncast.
As a multifunctional tool, the quickest way to discover its capabilities is via the command:
sncast --help
In the output, you'll notice distinct categories: commands and options. Each option offers both a concise (short) and a descriptive (long) variant.
Tip: While both option variants are useful, we'll prioritize the long form in this guide. This choice aids clarity, especially when constructing intricate commands.
Delving deeper, to understand specific commands such as account, you can run:
sncast account help
Each account subcommand like add, create, and deploy can be further explored. For instance:
sncast account add --help
The layered structure of sncast provides a wealth of information right at your fingertips. It's like having dynamic documentation. Make it a habit to explore, and you'll always stay informed.
Step 3: Using sncast for Account Management
Let's delve into how to use sncast for interacting with the contract.
By default, starknet devnet offers several predeployed accounts. These are accounts already registered with the node, loaded with test tokens (for gas fees and various transactions). Developers can use them directly with any contract on the local node (i.e., starknet devnet).
How to Utilize Predeployed Accounts
To employ a predeployed account with the smart contract, execute the account add command as shown below:
sncast [SNCAST_MAIN_OPTIONS] account add [SUBCOMMAND_OPTIONS] --name <NAME> --address <ADDRESS> --private-key <PRIVATE_KEY>
Although several options can accompany the add command (e.g., --name, --address, --class-hash, --deployed, --private-key, --public-key, --salt, --add-profile), we'll focus on a select few for this illustration.
Choose an account from the starknet-devnet, for demonstration, we'll select account #0, and execute:
sncast --url http://localhost:5050/rpc account add --name account1 --address 0x5f...60ba --private-key 0xc...0acc --add-profile
Points to remember:
-name- Mandatory field.-address- Necessary account address.-private-key- Private key of the account.-add-profile- Though optional, it's pivotal. By enablingsncastto include the account in yourScarb.tomlfile, you can manage multiple accounts, facilitating transactions among them when working with your smart contract using sncast.
Now that we have familiarized ourselves with using a predeployed account, let's proceed to add a new account.
Creating and Deploying a New Account to Starknet Devnet
Creating a new account involves a few more steps than using an existing one, but it's straightforward when broken down. Here are the steps:
- Account Creation
To create a new account, use (you can use sncast account create --help to see the available options):
sncast --url http://localhost:5050/rpc account create --name new_account --class-hash 0x19...8dd6 --add-profile
Wondering where the --class-hash comes from? It's visible in the output from the starknet-devnet command under the Predeclared Starknet CLI account section. For example:
Predeclared Starknet CLI account:
Class hash: 0x195c984a44ae2b8ad5d49f48c0aaa0132c42521dcfc66513530203feca48dd6

- Funding the Account
To fund the new account, replace the address in the following command with your new one:
curl -d '{"amount":8646000000000, "address":"0x6e...eadf"}' -H "Content-Type: application/json" -X POST http://127.0.0.1:5050/mint
Note: The amount is specified in the previous command's output.
A successful fund addition will return:
{"new_balance":8646000000000,"tx_hash":"0x48...1919","unit":"wei"}
- Account Deployment
Deploy the account to the starknet devnet local node to register it with the chain:
sncast --url http://localhost:5050/rpc account deploy --name new_account --max-fee 0x64a7168300
A successful deployment provides a transaction hash. If it doesn't work, revisit your previous steps.
- Setting a Default Profile
You can define a default profile for your sncast actions. To set one, edit the Scarb.toml file. To make the new_account the default profile, find the section [tool.sncast.new_account] and change it to [tool.sncast]. This means sncast will default to using this profile unless instructed otherwise.
Step 4: Declaring and Deploying our Contract
By now, we've arrived at the crucial step of using sncast to declare and deploy our smart contracts.
Declaring the Contract
Recall that we drafted and tested the contract in Step 1. Here, we'll focus on two actions: building and declaring.
- Building the Contract
Execute the following to build the contract:
scarb build
If you've successfully run tests using snforge, the scarb build should operate without issues. After the build completes, a new target folder will appear at the root of your project.
Within the target folder, you'll find a dev sub-folder containing three files: *.casm.json, *.sierra.json, and *.starknet_artifacts.json.
If these files aren't present, it's likely due to missing configurations in your Scarb.toml file. To address this, append the following lines after dependencies:
[[target.starknet-contract]]
sierra = true
casm = true
These lines instruct the compiler to produce both sierra and casm outputs.
- Declaring the Contract
We will use the sncast declare command to declare the contract. Here's the format:
sncast declare [OPTIONS] --contract-name <CONTRACT>
Given this, the correct command would be:
sncast --profile account1 declare --contract-name HelloStarknet
Note:- that we've omitted the
--urloption. Why? When using--profile, as seen here withaccount1, it's not necessary. Remember, earlier in this guide, we discussed adding and creating new accounts. You can use eitheraccount1ornew_accountand achieve the desired result.
Hint: You can define a default profile for sncast actions. Modify the
Scarb.tomlfile to set a default. For example, to makenew_accountthe default, find[tool.sncast.new_account]and change it to[tool.sncast]. Then, there's no need to specify the profile for each call, simplifying your command to:
sncast declare --contract-name HelloStarknet
The output will resemble:
command: declare
class_hash: 0x20fe30f3990ecfb673d723944f28202db5acf107a359bfeef861b578c00f2a0
transaction_hash: 0x7fbdcca80e7c666f1b5c4522fdad986ad3b731107001f7d8df5f3cb1ce8fd11
Make sure to note the **class hash as it will be essential in the subsequent step.
Note: If you encounter an error stating Class hash already declared, simply move to the next step. Redeclaring an already-declared contract isn't permissible. Use the mentioned class hash for deployment.
Deploying the Contract
With the contract successfully declared and a class hash obtained, we're ready to proceed to contract deployment. This step is straightforward. Replace <class-hash> in the command below with your obtained class hash:
sncast deploy --class-hash 0x20fe30f3990ecfb673d723944f28202db5acf107a359bfeef861b578c00f2a0
Executing this will likely yield:
command: deploy
contract_address: 0x7e3fc427c2f085e7f8adeaec7501cacdfe6b350daef18d76755ddaa68b3b3f9
transaction_hash: 0x6bdf6cfc8080336d9315f9b4df7bca5fb90135817aba4412ade6f942e9dbe60
However, you may encounter some issues, such as:
Error: RPC url not passed nor found in Scarb.toml. This indicates the absence of a default profile in the Scarb.toml file. To remedy this:
- Add the
--profileoption, followed by the desired profile name, as per the ones you've established. - Alternatively, set a default profile as previously discussed in the "Declaring the Contract" section under "Hint" or as detailed in the "Adding, Creating, and Deploying Account" subsection.
You've successfully deployed your contract with sncast! Now, let's explore how to interact with it.
Interacting with the Contract
This section explains how to read and write information to the contract.
Invoking Contract Functions
To write to the contract, invoke its functions. Here's a basic overview of the command:
Usage: sncast invoke [OPTIONS] --contract-address <CONTRACT_ADDRESS> --function <FUNCTION>

Options:
  -a, --contract-address <CONTRACT_ADDRESS>  Address of the contract
  -f, --function <FUNCTION>                  Name of the function
  -c, --calldata <CALLDATA>                  Data for the function
  -m, --max-fee <MAX_FEE>                    Maximum transaction fee (auto-estimated if absent)
  -h, --help                                 Show help
To demonstrate, let's invoke the increase_balance method of our smart contract with a preset default profile. Not every option is always necessary; for instance, sometimes, including the --max-fee might be essential.
sncast invoke --contract-address 0x7e...b3f9 --function increase_balance --calldata 4
If successful, you'll receive a transaction hash like this:
command: invoke
transaction_hash: 0x33248e393d985a28826e9fbb143d2cf0bb3342f1da85483cf253b450973b638
Reading from the Contract
To retrieve data from the contract, use the sncast call command. Here's how it works:
sncast call --help
Executing the command displays:
Usage: sncast call [OPTIONS] --contract-address <CONTRACT_ADDRESS> --function <FUNCTION>

Options:
  -a, --contract-address <CONTRACT_ADDRESS>  Address of the contract (hex format)
  -f, --function <FUNCTION>                  Name of the function to call
  -c, --calldata <CALLDATA>                  Function arguments (list of hex values)
  -b, --block-id <BLOCK_ID>                  Block identifier for the call. Accepts: pending, latest, block hash (with a 0x prefix), or block number (u64). Default is 'pending'.
  -h, --help                                 Show help
For instance:
sncast call --contract-address 0x7e...b3f9 --function get_balance
While not all options are used in the example, you might need to include options like --calldata, specifying it as a list or array.
A successful call returns:
command: call
response: [0x4]
This indicates successful read and write operations on the contract.
sncast Multicall Guide
Use sncast multicall to simultaneously read and write to the contract. Let's explore how to effectively use this feature.
First, understand its basic usage:
sncast multicall --help
This command displays:
Execute multiple calls

Usage: sncast multicall <COMMAND>

Commands:
  run   Execute multicall using a .toml file
  new   Create a template for the multicall .toml file
  help  Display help for subcommand(s)

Options:
  -h, --help  Show help
To delve deeper, initiate the new subcommand:
Generate a template for the multicall .toml file

Usage: sncast multicall new [OPTIONS]

Options:
  -p, --output-path <OUTPUT_PATH>  File path for saving the template
  -o, --overwrite                  Overwrite file if it already exists at specified path
  -h, --help                       Display help
Generate a template called call1.toml:
sncast multicall new --output-path ./call1.toml --overwrite
This provides a basic template:
[[call]]
call_type = "deploy"
class_hash = ""
inputs = []
id = ""
unique = false

[[call]]
call_type = "invoke"
contract_address = ""
function = ""
inputs = []
Modify call1.toml to:
[[call]]
call_type = "invoke"
contract_address = "0x7e3fc427c2f085e7f8adeaec7501cacdfe6b350daef18d76755ddaa68b3b3f9"
function = "increase_balance"
inputs = ['0x4']

[[call]]
call_type = "invoke"
contract_address = "0x7e3fc427c2f085e7f8adeaec7501cacdfe6b350daef18d76755ddaa68b3b3f9"
function = "increase_balance"
inputs = ['0x1']
In multicalls, only deploy and invoke actions are allowed. For a detailed guide on these, refer to the earlier section.
Note: Ensure inputs are in hexadecimal format. Strings work normally, but numbers require this format for accurate results.
To execute the multicall, use:
sncast multicall run --path call1.toml
Upon success:
command: multicall run
transaction_hash: 0x1ae4122266f99a5ede495ff50fdbd927c31db27ec601eb9f3eaa938273d4d61
Check the balance:
sncast call --contract-address 0x7e...b3f9 --function get_balance
The response:
command: call
response: [0x9]
The expected balance, 0x9, is confirmed.
Conclusion
This guide detailed the use of sncast, a robust command-line tool tailored for starknet smart contracts. Its purpose is to make interactions with starknet's smart contracts effortless. Key functionalities include contract deployment, function invocation, and function calling.
Deployment Script Example
IMPORTANT: Ensure you have completed the Starknet Devnet subchapter before proceeding with this guide.
This guide provides a step-by-step process to set up a testing and deployment environment for Starknet smart contracts. The script provided here will initialize accounts, execute tests, and perform multicalls.
Please note that this is a basic example. You should adapt it to suit your specific needs and requirements.
Requirements
The script is compatible with the following versions or higher
# scarb --version
scarb 2.4.3
cairo: 2.4.3
sierra: 1.4.0

# snforge --version
snforge 0.14.0

# sncast --version
sncast 0.14.0
The Rust Devnet
Additional Tools
The script requires jq to run. You can install it with sudo apt install jq on Ubuntu or brew install jq on macOS. For more information, refer to the JQ Docs.
Script Preparation
1. Create the Script File
- In the root directory of your project, create a file named
script.sh. This file will contain the deployment script. - Modify the file permissions to make it executable:
chmod +x script.sh
⚠️ NOTE: The script file must be executable to run. The
chmod +xcommand changes the file permissions to allow execution.
2. Insert the Script
Below is the content for script.sh. It adheres to best practices for clarity, error management, and long-term support.
Security Note: Using environment variables is safer than hardcoding private keys in your scripts, but they're still accessible to any process on your machine and could potentially be leaked in logs or error messages.
On step 5 declaring, Uncomment according to local devnet you are using either the rust node or python node for declaration to work as expected.
#!/usr/bin/env bash

# Ensure the script stops on first error
set -e

# Global variables
file_path="$HOME/.starknet_accounts/starknet_open_zeppelin_accounts.json"
CONTRACT_NAME="HelloStarknet"
PROFILE_NAME="account1"
MULTICALL_FILE="multicall.toml"
FAILED_TESTS=false

# Addresses and Private keys as environment variables
ACCOUNT1_ADDRESS=${ACCOUNT1_ADDRESS:-"0x7f61fa3893ad0637b2ff76fed23ebbb91835aacd4f743c2347716f856438429"}
ACCOUNT2_ADDRESS=${ACCOUNT2_ADDRESS:-"0x53c615080d35defd55569488bc48c1a91d82f2d2ce6199463e095b4a4ead551"}
ACCOUNT1_PRIVATE_KEY=${ACCOUNT1_PRIVATE_KEY:-"CHANGE_ME"}
ACCOUNT2_PRIVATE_KEY=${ACCOUNT2_PRIVATE_KEY:-"CHANGE_ME"}

# Utility function to log messages
function log_message() {
    echo -e "\n$1"
}

# Step 1: Clean previous environment
if [ -e "$file_path" ]; then
    log_message "Removing existing accounts file..."
    rm -rf "$file_path"
fi

# Step 2: Define accounts for the smart contract
accounts_json=$(cat <<EOF
[
    {
        "name": "account1",
        "address": "$ACCOUNT1_ADDRESS",
        "private_key": "$ACCOUNT1_PRIVATE_KEY"
    },
    {
        "name": "account2",
        "address": "$ACCOUNT2_ADDRESS",
        "private_key": "$ACCOUNT2_PRIVATE_KEY"
    }
]
EOF
)

# Step 3: Run contract tests
echo -e "\nTesting the contract..."
testing_result=$(snforge test 2>&1)
if echo "$testing_result" | grep -q "Failure"; then
    echo -e "Tests failed!\n"
    snforge
    echo -e "\nEnsure that your tests are passing before proceeding.\n"
    FAILED_TESTS=true
fi

if [ "$FAILED_TESTS" != "true" ]; then
    echo "Tests passed successfully."

    # Step 4: Create new account(s)
    echo -e "\nCreating account(s)..."
    for row in $(echo "${accounts_json}" | jq -c '.[]'); do
        name=$(echo "${row}" | jq -r '.name')
        address=$(echo "${row}" | jq -r '.address')
        private_key=$(echo "${row}" | jq -r '.private_key')

        account_creation_result=$(sncast --url http://localhost:5050/rpc account add --name "$name" --address "$address" --private-key "$private_key" --add-profile 2>&1)
        if echo "$account_creation_result" | grep -q "error:"; then
            echo "Account $name already exists."
        else
            echo "Account $name created successfully."
        fi
    done

    # Step 5: Build, declare, and deploy the contract
    echo -e "\nBuilding the contract..."
    scarb build

    echo -e "\nDeclaring the contract..."
    declaration_output=$(sncast --profile "$PROFILE_NAME" --wait declare --contract-name "$CONTRACT_NAME" 2>&1)

    if echo "$declaration_output" | grep -q "error: Class with hash"; then
        echo "Class hash already declared."
        # CLASS_HASH=$(echo "$declaration_output" | sed -n 's/.*Class with hash \([^ ]*\).*/\1/p') ## Uncomment this for pythonic devnet
        CLASS_HASH=$(echo "$declaration_output" | sed -n 's/.*\(0x[0-9a-fA-F]*\).*/\1/p') ## Uncomment this for rust devnet
    else
        echo "New class hash declaration."
        CLASS_HASH=$(echo "$declaration_output" | grep -o 'class_hash: 0x[^ ]*' | sed 's/class_hash: //')
    fi

    echo "Class Hash: $CLASS_HASH"

    echo -e "\nDeploying the contract..."
    deployment_result=$(sncast --profile "$PROFILE_NAME" deploy --class-hash "$CLASS_HASH")
    CONTRACT_ADDRESS=$(echo "$deployment_result" | grep -o "contract_address: 0x[^ ]*" | awk '{print $2}')
    echo "Contract address: $CONTRACT_ADDRESS"

    # Step 6: Create and execute multicalls
    echo -e "\nSetting up multicall..."
    cat >"$MULTICALL_FILE" <<-EOM
[[call]]
call_type = 'invoke'
contract_address = '$CONTRACT_ADDRESS'
function = 'increase_balance'
inputs = ['0x1']

[[call]]
call_type = 'invoke'
contract_address = '$CONTRACT_ADDRESS'
function = 'increase_balance'
inputs = ['0x2']
EOM

    echo "Executing multicall..."
    sncast --profile "$PROFILE_NAME" multicall run --path "$MULTICALL_FILE"

    # Step 7: Query the contract state
    echo -e "\nChecking balance..."
    sncast --profile "$PROFILE_NAME" call --contract-address "$CONTRACT_ADDRESS" --function get_balance

    # Step 8: Clean up temporary files
    echo -e "\nCleaning up..."
    [ -e "$MULTICALL_FILE" ] && rm "$MULTICALL_FILE"

    echo -e "\nScript completed successfully.\n"
fi
3. [Optional]Adjust the Bash Path
The line #!/usr/bin/env bash indicates the path to the bash interpreter. If you require a different version or location of bash, determine its path using:
which bash
Then replace #!/usr/bin/env bash in the script with the resulting path, such as #!/path/to/your/bash.
Execution
When running the script, you'll need to provide the environment variables ACCOUNT1_PRIVATE_KEY and ACCOUNT2_PRIVATE_KEY.
Example:
ACCOUNT1_PRIVATE_KEY="0x259f4329e6f4590b" ACCOUNT2_PRIVATE_KEY="0xb4862b21fb97d" ./script.sh
Considerations
- The
set -edirective in the script ensures it exits if any command fails, enhancing the reliability of the deployment and testing process. - Always secure private keys and sensitive information. Keep them away from logs and visible outputs.
- For greater flexibility, consider moving hardcoded values like accounts or contract names to a configuration file. This approach simplifies updates and overall management.
Starknet-js: Javascript SDK
Starknet.js is a JavaScript/TypeScript library designed to connect your website or decentralized application (D-App) to Starknet. It aims to mimic the architecture of ethers.js, so if you are familiar with ethers, you should find Starknet.js easy to work with.
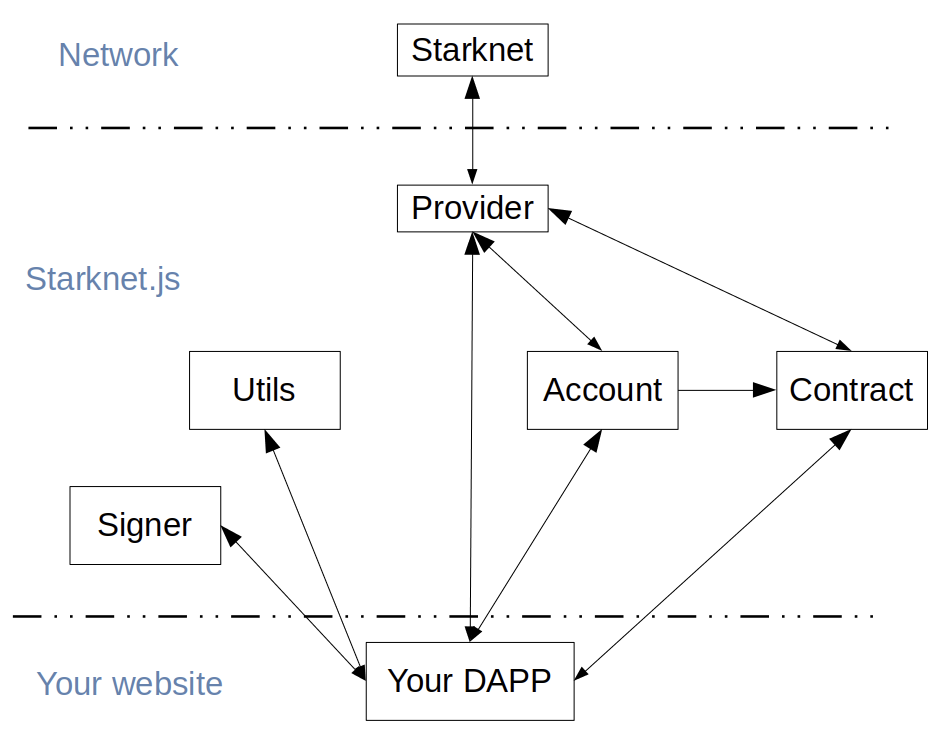
Starknet-js in your dapp
Installation
To install Starknet.js, follow these steps:
- For the latest official release (main branch):
npm install starknet
- To use the latest features (merges in develop branch):
npm install starknet@next
Getting Started
To build an app that users are able to connect to and interact with Starknet, we recommend adding the get-starknet library, which allows you to manage wallet connections.
With these tools ready, there are basically 3 main concepts to know on the frontend: Account, Provider, and Contracts.
Account
We can generally think of the account as the "end user" of a dapp, and some user interaction will be involved to gain access to it.
Think of a dapp where the user connects their browser extension wallet (such as ArgentX or Braavos) - if the user accepts the connection, that gives us access to the account and signer, which can sign transactions and messages.
Unlike Ethereum, where user accounts are Externally Owned Accounts, Starknet accounts are contracts. This might not necessarily impact your dapp’s frontend, but you should definitely be aware of this difference.
async function connectWallet() {
    const starknet = await connect();
    console.log(starknet.account);

    const nonce = await starknet.account.getNonce();
    const message = await starknet.account.signMessage(...)
}
The snippet above uses the connect function provided by get-starknet to establish a connection to the user wallet. Once connected, we are able to access account methods, such as signMessage or execute.
Provider
The provider allows you to interact with the Starknet network. You can think of it as a "read" connection to the blockchain, as it doesn’t allow signing transactions or messages. Just like in Ethereum, you can use a default provider, or use services such as Infura or Alchemy, both of which support Starknet, to create an RPC provider.
By default, the Provider is a sequencer provider.
export const provider = new Provider({
  sequencer: {
    network: "goerli-alpha",
  },
  // rpc: {
  //   nodeUrl: INFURA_ENDPOINT
  // }
});

const block = await provider.getBlock("latest"); // <- Get latest block
console.log(block.block_number);
Contracts
Your frontend will likely be interacting with deployed contracts. For each contract, there should be a counterpart on the frontend. To create these instances, you will need the contract’s address and ABI, and either a provider or signer.
const contract = new Contract(abi_erc20, contractAddress, starknet.account);

const balance = await contract.balanceOf(starknet.account.address);
const transfer = await contract.transfer(recipientAddress, amountFormatted);
//or: const transfer = await contract.invoke("transfer", [to, amountFormatted]);

console.log(`Tx hash: ${transfer.transaction_hash}`);
If you create a contract instance with a provider, you’ll be limited to
calling read functions on the contract - only with a signer can you
change the state of the blockchain. However, you are able to connect a
previously created Contract instance with a new account:
const contract = new Contract(abi_erc20, contractAddress, provider);

contract.connect(starknet.account);
In the snippet above, after
calling the connect method, it would be possible to call read
functions on the contract, but not before.
Units
If you have previous experience with web3, you know dealing with units requires care, and Starknet is no exception. Once again, the docs are very useful here, in particular this section on data transformation.
Very often you will need to convert Cairo structs (such as Uint256) that are returned from contracts into numbers:
// Uint256 shape:
// {
//    type: 'struct',
//    low: Uint256.low,
//    high: Uint256.high
//
// }
const balance = await contract.balanceOf(address); // <- uint256
const asBN = uint256.uint256ToBN(uint256); // <- uint256 into BN
const asString = asBN.toString(); //<- BN into string
And vice versa:
const amount = 1;

const amountFormatted = {
  type: "struct",
  ...uint256.bnToUint256(amount),
};
There are other helpful utils, besides bnToUint256 and uint256ToBN,
provided by Starknet.js.
We now have a solid foundation to build a Starknet dapp. However, there are framework specific tools that help us build Starknet dapps, which are covered in chapter 5.
With Starknet.js, you can also automate the process of deploying a smart contract to Starknet testnet / mainnet.
Deployment of Smart Contracts using Starknet.js
Starknet.js offers capabilities for deploying smart contracts. In this tutorial, we demonstrate this by deploying an account contract, which we previously developed in Chapter 4, through a scripted approach.
STEP 1: Initial Setup and Dependency Installation
To begin, set up your project environment for the account contract deployment. Within your project'sroot directory, start by initializing a Node.js environment:
npm init -y
This command generates a package.json file. Next, update this file to include the latest versions of the necessary dependencies:
"@tsconfig/node20": "^20.1.2",
"axios": "^1.6.0",
"chalk": "^5.3.0",
"dotenv": "^16.3.1",
"starknet": "^5.19.5",
"ts-node": "^10.9.1",
"typescript": "^5.2.2"
With the dependencies specified, install them using:
npm install
Configuration of TypeScript Environment
Create a tsconfig.json file in your project directory:
{
  "extends": "./node_modules/@tsconfig/node20/tsconfig.json",
  "include": ["scripts/**/*"]
}
Ensure your Node.js version aligns with v20 to match this configuration.
Furthermore, establish a .env file at the root of your project. This file should contain your RPC endpoint and the private key of your deployer account:
DEPLOYER_PRIVATE_KEY=<YOUR_WALLET_ADDRESS_PRIVATE_KEY>
RPC_ENDPOINT="<INFURA_STARKNET_GOERLI_API_KEY>"
Your environment is successfully set up.
Preparation of Deployment Scripts
To facilitate the deployment of the account contract, three key files are necessary:
utils.ts: This file will contain the functions and logic for deployment.deploy.ts: This is the main deployment script.l2-eth-abi.json: This file will hold the ABI (Application Binary Interface) for the account contract.
STEP 2: Import Required Modules and Functions
In the utils.ts file, import the necessary modules and functions from various packages. This includes functionality from Starknet, filesystem operations, path handling, and environment variable configuration:
import {
  Account,
  stark,
  ec,
  hash,
  CallData,
  RpcProvider,
  Contract,
  cairo,
} from "starknet";
import { promises as fs } from "fs";
import path from "path";
import readline from "readline";
import "dotenv/config";
STEP 3: Implementing the waitForEnter Function
To enhance user interaction during the deployment process, implement the waitForEnter function. This function prompts the user to press 'Enter' to proceed, ensuring an interactive session:
export async function waitForEnter(message: string): Promise<void> {
  return new Promise((resolve) => {
    const rl = readline.createInterface({
      input: process.stdin,
      output: process.stdout,
    });

    rl.question(message, (_) => {
      rl.close();
      resolve();
    });
  });
}
STEP 4: Styling Terminal Output Messages
Integrate the chalk module for styling terminal output messages. This enhances the readability and user experience in the command line interface:
export async function importChalk() {
  return import("chalk").then((m) => m.default);
}
STEP 5: Establishing Connection to the Starknet Network
Configure the RpcProvider object to connect to the Starknet network. This connection uses the RPC endpoint specified in the .env file, facilitating communication through the Infura client:
export function connectToStarknet() {
  return new RpcProvider({
    nodeUrl: process.env.RPC_ENDPOINT as string,
  });
}
STEP 6: Preparing the Deployer Account
Set up the deployer account for contract deployment.
Utilize the private key from the .env file and its respective pre-deployed address to create a new Account object:
export function getDeployerWallet(provider: RpcProvider) {
  const privateKey = process.env.DEPLOYER_PRIVATE_KEY as string;
  const address =
    "0x070a0122733c00716cb9f4ab5a77b8bcfc04b707756bbc27dc90973844a752d1";
  return new Account(provider, address, privateKey);
}
STEP 7: Generating a Key Pair for the Account Contract
The next step involves generating a key pair for the account contract using the stark object from Starknet.js. The key pair consists of a private key and a corresponding public key:
export function createKeyPair() {
  const privateKey = stark.randomAddress();
  const publicKey = ec.starkCurve.getStarkKey(privateKey);
  return {
    privateKey,
    publicKey,
  };
}
Note: If a specific private key is required, replace stark.randomAddress() with the desired private key.
STEP 8: Importing Compiled Account Contract Files
After compiling the account contract with scarb build, Sierra and Casm files are generated in the target/dev/directory:
- Sierra File:
<Project_File_Name>.contract_class.json - Casm File:
<Project_File_Name>.compiled_contract_class.json
To import these files into the deployment script, specify their absolute paths:
export async function getCompiledCode(filename: string) {
  const sierraFilePath = path.join(
    __dirname,
    `../target/dev/${filename}.contract_class.json`,
  );
  const casmFilePath = path.join(
    __dirname,
    `../target/dev/${filename}.compiled_contract_class.json`,
  );

  const code = [sierraFilePath, casmFilePath].map(async (filePath) => {
    const file = await fs.readFile(filePath);
    return JSON.parse(file.toString("ascii"));
  });

  const [sierraCode, casmCode] = await Promise.all(code);

  return {
    sierraCode,
    casmCode,
  };
}
We use fs method to read the file contents.
STEP 9: Declaration of the Account Contract
To declare the account contract's class, define an interface containing all necessary fields for the declaration, then use the declare() method:
interface DeclareAccountConfig {
  provider: RpcProvider;
  deployer: Account;
  sierraCode: any;
  casmCode: any;
}

export async function declareContract({
  provider,
  deployer,
  sierraCode,
  casmCode,
}: DeclareAccountConfig) {
  const declare = await deployer.declare({
    contract: sierraCode,
    casm: casmCode,
  });
  await provider.waitForTransaction(declare.transaction_hash);
}
STEP 10: Deploying the Account Contract
To deploy the account contract, calculate its address using the contract's class hash. After determining the address, fund it using the Starknet Faucet to cover gas fees during deployment:
interface DeployAccountConfig {
  privateKey: string;
  publicKey: string;
  classHash: string;
  provider: RpcProvider;
}

export async function deployAccount({
  privateKey,
  publicKey,
  classHash,
  provider,
}: DeployAccountConfig) {
  const chalk = await importChalk();

  const constructorArgs = CallData.compile({
    public_key: publicKey,
  });

  const myAccountAddress = hash.calculateContractAddressFromHash(
    publicKey,
    classHash,
    constructorArgs,
    0,
  );

  console.log(`Send ETH to contract address ${chalk.bold(myAccountAddress)}`);
  const message = "Press [Enter] when ready...";
  await waitForEnter(message);

  const account = new Account(provider, myAccountAddress, privateKey, "1");

  const deploy = await account.deployAccount({
    classHash: classHash,
    constructorCalldata: constructorArgs,
    addressSalt: publicKey,
  });

  await provider.waitForTransaction(deploy.transaction_hash);
  return deploy.contract_address;
}
STEP 11: Interacting with the Deployed Account Contract
Once the account contract is successfully deployed, we can test it by sending test Ethereum (ETH) to another address:
interface TransferEthConfig {
  provider: RpcProvider;
  account: Account;
}

export async function transferEth({ provider, account }: TransferEthConfig) {
  const L2EthAddress =
    "0x049d36570d4e46f48e99674bd3fcc84644ddd6b96f7c741b1562b82f9e004dc7";

  const L2EthAbiPath = path.join(__dirname, "./l2-eth-abi.json");
  const L2EthAbiFile = await fs.readFile(L2EthAbiPath);
  const L2ETHAbi = JSON.parse(L2EthAbiFile.toString("ascii"));

  const contract = new Contract(L2ETHAbi, L2EthAddress, provider);

  contract.connect(account);

  const recipient =
    "0x05feeb3a0611b8f1f602db065d36c0f70bb01032fc1f218bf9614f96c8f546a9";
  const amountInGwei = cairo.uint256(100);

  await contract.transfer(recipient, amountInGwei);
}

export async function isContractAlreadyDeclared(
  classHash: string,
  provider: RpcProvider,
) {
  try {
    await provider.getClassByHash(classHash);
    return true;
  } catch (error) {
    return false;
  }
}
With the necessary functions in place, we can now write the deployment script in deploy.ts, which orchestrates the deployment and verification process:
import { hash, LibraryError, Account } from "starknet";

import {
  importChalk,
  connectToStarknet,
  getDeployerWallet,
  createKeyPair,
  getCompiledCode,
  declareContract,
  deployAccount,
  transferEth,
  isContractAlreadyDeclared,
} from "./utils";

async function main() {
  const chalk = await importChalk();
  const provider = connectToStarknet();
  const deployer = getDeployerWallet(provider);
  const { privateKey, publicKey } = createKeyPair();

  console.log(chalk.yellow("Account Contract:"));
  console.log(`Private Key = ${privateKey}`);
  console.log(`Public Key = ${publicKey}`);

  let sierraCode, casmCode;
  try {
    ({ sierraCode, casmCode } = await getCompiledCode("aa_Account"));
  } catch (error: any) {
    console.log(chalk.red("Failed to read contract files"));
    process.exit(1);
  }

  const classHash = hash.computeContractClassHash(sierraCode);
  const isAlreadyDeclared = await isContractAlreadyDeclared(
    classHash,
    provider,
  );

  if (isAlreadyDeclared) {
    console.log(chalk.yellow("Contract class already declared"));
  } else {
    try {
      console.log("Declaring account contract...");
      await declareContract({ provider, deployer, sierraCode, casmCode });
      console.log(chalk.green("Account contract successfully declared"));
    } catch (error: any) {
      console.log(chalk.red("Declare transaction failed"));
      console.log(error);
      process.exit(1);
    }
  }

  console.log(`Class Hash = ${classHash}`);

  let address: string;
  try {
    console.log("Deploying account contract...");
    address = await deployAccount({
      privateKey,
      publicKey,
      classHash,
      provider,
    });
    console.log(
      chalk.green(`Account contract successfully deployed to Starknet testnet`),
    );
  } catch (error: any) {
    if (
      error instanceof LibraryError &&
      error.message.includes("balance is smaller")
    ) {
      console.log(chalk.red("Insufficient account balance for deployment"));
      process.exit(1);
    } else {
      console.log(chalk.red("Deploy account transaction failed"));
      process.exit(1);
    }
  }

  const account = new Account(provider, address, privateKey, "1");

  try {
    console.log("Testing account by transferring ETH...");
    await transferEth({ provider, account });
    console.log(chalk.green(`Account works!`));
  } catch (error) {
    console.log(chalk.red("Failed to transfer ETH"));
    process.exit(1);
  }
}

main();
The main function orchestrates the entire deployment process, from creating a key pair to declaring and deploying the account contract, and finally testing its functionality by executing a transfer transaction.
Conclusion
We have walked through the process of deploying an account contract using Starknet.js. Starting from setting up the environment, compiling the contract, and preparing the deployment scripts, to the final steps of declaring, deploying, and interacting with the contract, each phase has been covered in detail. This approach ensures that developers can easily deploy their account contracts on the Starknet network.
Counter Smart Contract UI Integration
This guide walks readers through integrating a simple counter smart contract with a frontend. By the end of this guide, readers will understand how to:
- Connect the frontend to a smart contract.
- Initiate transactions, such as incrementing or decrementing the counter.
- Read and display data, such as showing the counter value on the frontend.
For a visual walkthrough, do check out the Basecamp frontend session. This comprehensive session delves deeper into the nuances of the concepts we've touched upon, presenting a mix of theoretical explanations and hands-on demonstrations.
Tools Used
- Reactjs: A frontend building framework.
- @argent/get-starknet: A wrapper for starknet.js, aiding interaction with wallet extensions.
- Starknet: A JavaScript library for Starknet.
Setting Up the Environment
To begin, clone the project repository:
git clone https://github.com/Darlington02/basecamp-frontend-boilerplate
Then, navigate to the project directory and install necessary packages:
cd basecamp-frontend-boilerplate
npm install
To launch the project, run:
yarn start
In index.js, several key functions are provided:
// Connect to the blockchain via a wallet provider (argentX or Bravoos)
const connectWallet = async () => {};

// Terminate the connection
const disconnectWallet = async () => {};

// Trigger increment
const increaseCounter = async () => {};

// Trigger decrement
const decreaseCounter = async () => {};

// Retrieve current count
const getCounter = async () => {};
Managing Connection
connectWallet
The connectWallet function serves as the mechanism to establish a connection to the blockchain through specific wallet providers such as ArgentX or Braavos. It is asynchronous, allowing the use of await for handling asynchronous tasks.
const connectWallet = async() => {
    const connection = await connect({webWalletUrl: "https://web.argent.xyz"});
    if (connection && connection.isConnected) {
      setConnection(connection);
      setAccount(connection.account);
      setAddress(connection.selectedAddress);
    }
}
- Initiates the connection using the
connectmethod from the@argent/get-starknetlibrary, targeting Starknet. - Upon a successful connection, updates the React component's state with details of the
connection,account, andselectedAddress.
disconnectWallet
The disconnectWallet function is designed to sever the connection with the web wallet asynchronously. After disconnection, it updates the component's state, resetting connection details.
const disconnectWallet = async() => {
    await disconnect();
    setConnection(undefined);
    setAccount(undefined);
    setAddress('');
}
- It utilizes the
disconnectfunction, possibly from an external library, and handles the operation asynchronously withawait. - Post-disconnection, the state of the React component is updated:
setConnectionis set toundefined.setAccountis set toundefined.setAddressis cleared with an empty string.
EagerlyConnect
The EagerlyConnect mechanism leverages React's useEffect hook to initiate a connection to Starknet upon the component's mounting or initial rendering.
useEffect(() => {
  const connectToStarknet = async () => {
    const connection = await connect({
      modalMode: "neverAsk",
      webWalletUrl: "https://web.argent.xyz",
    });

    if (connection && connection.isConnected) {
      setConnection(connection);
      setAccount(connection.account);
      setAddress(connection.selectedAddress);
    }
  };
  connectToStarknet();
}, []);
- Inside the
useEffect, theconnectToStarknetfunction is defined, aiming to establish an asynchronous connection using theconnectfunction. Parameters likemodalModeandwebWalletUrlare passed to guide the connection process. - If successful in connecting (
connection && connection.isConnected), the state updates with details of the connection, the account, and the selected address usingsetConnection,setAccount, andsetAddress. - The
connectToStarknetfunction is executed immediately after its definition.
Important Refresher on Smart Contract Interactions
For effective interaction with a smart contract on the network, it's crucial to understand key components after establishing a connection. Among these are the contract address, ABI, Signer, and Provider.
ABI (Application Binary Interface)
ABI is a standardized bridge between two binary program modules. It is essential for:
- Interacting with smart contracts on the blockchain.
- Specifying the structure of functions, events, and variables for software applications.
- Enabling smooth communication with the smart contract, detailing function signatures, input/output types, event formats, and variable types.
- Facilitating invocation of functions and data retrieval from the contract.
Signer
The Signer plays a pivotal role in:
- Signing transactions.
- Authorizing actions on the blockchain.
- Bearing the fees associated with blockchain operations.
Signers are especially linked to write operations that change the state of the blockchain. These operations need cryptographic signing for security and validity.
Provider
The Provider acts as the medium for:
- Communication with the blockchain.
- Creating transactions.
- Fetching data from the blockchain.
To initiate a write transaction, the connected account (signer) must be provided. This signer then signs the transaction, bearing the necessary fee for execution.
Invoking the increment Function
const increaseCounter = async () => {
  try {
    const contract = new Contract(contractAbi, contractAddress, account);
    await contract.increment();
    alert("You successfully incremented the counter!");
  } catch (err) {
    alert(err.message);
  }
};
The increaseCounter function is crafted to interact with a smart contract and increment a specific counter. Here's a step-by-step breakdown:
- Establishes a new contract instance using the provided contract's ABI, its address, and the connected account. The account is essential since this write transaction alters the contract's state.
- Executes the contract's
incrementmethod. Theawaitkeyword ensures the program pauses until this action completes. - On successful execution, the user receives a confirmation alert indicating the counter's increment.
- In case of any errors during the process, an alert displays the corresponding error message to the user.
Invoking the decrement Function
const decreaseCounter = async () => {
  try {
    const contract = new Contract(contractAbi, contractAddress, account);
    await contract.decrement();
    alert("You successfully decremented the counter!");
  } catch (err) {
    alert(err.message);
  }
};
The decreaseCounter function is designed to interact with a smart contract and decrement a specific counter. Here's a succinct breakdown of its operation:
- Creates a new contract instance by utilizing the provided contract's ABI, its address, and the connected account. The account is vital as this write transaction modifies the contract's state.
- Initiates the contract's
decrementmethod. With the use of theawaitkeyword, the program ensures it waits for the decrement action to finalize. - Upon successful execution, the user is notified with an alert indicating the counter's decrement.
- Should any errors arise during the interaction, the user is promptly alerted with the pertinent error message.
Fetching the Current Count with get_current_count Function
const getCounter = async () => {
  const provider = new Provider({
    sequencer: { network: constants.NetworkName.SN_MAIN },
  });
  try {
    const mycontract = new Contract(contractAbi, contractAddress, provider);
    const num = await mycontract.get_current_count();
    setRetrievedValue(num.toString());
  } catch (err) {
    alert(err.message);
  }
};
The getCounter function is designed to retrieve the current count from a smart contract. Here's a breakdown of its operation:
- Establishes a provider instance, specifying the sequencer network – in this instance, it's set to the
mainnetthroughconstants.NetworkName.SN_MAIN. - With this provider, it then initiates a contract instance using the provided contract's ABI, its address, and the aforementioned provider.
- The function then invokes the
get_current_countmethod of the contract to fetch the current count. This is an asynchronous action, and the program waits for its completion with theawaitkeyword. - Once successfully retrieved, the count, which is presumably a number, is converted to a string and stored using the
setRetrievedValuefunction. - In the event of any errors during the process, an alert provides the user with the relevant error message.
It's essential to emphasize that while performing read operations, like fetching data from a blockchain network, the function uses the provider. Unlike write operations, which typically require a signer (or an account) for transaction signing, read operations don't mandate such authentication. Thus, in this function, only the provider is specified, and not the signer.
Wrapping It Up: Integrating a Frontend with a Counter Smart Contract
In this tutorial, we review the process of integrating a basic counter smart contract with a frontend application.
Here's a quick recap:
- Establishing Connection: With the
connectWalletfunction, we made seamless connections to the blockchain, paving the way for interactions with our smart contract. - Terminating Connection: The
disconnectWalletfunction ensures that users can safely terminate their active connections to the blockchain, maintaining security and control. - Interacting with the Smart Contract: Using the
increaseCounter,decreaseCounter, andgetCounterfunctions, we explored how to:- Initiate transactions
- Adjust the counter value (increment or decrement)
- Fetch data from the blockchain
For a visual walkthrough, do check out the Basecamp VII: S5 Frontend. This comprehensive session delves deeper into the nuances of the concepts we've touched upon, presenting a mix of theoretical explanations and hands-on demonstrations.

ERC-20 UI with Starknet-react and StarknetKit
In this section, we will be exploring how to build a web3 application with Starknet-react react library, StarknetKit, and an ERC-20 smart contract written in the Cairo language. This tutorial is similar to ERC-20 UI tutorial but with the addition of utilizing Starknet-react, StarknetKit and up to date versions of the tools and libraries.
Prerequisites
These are the main tools we will be using in this section
- Scarb v2.6.4 with Cairo v2.6.3
- Starkli v0.2.8
- Openzeppelin library v0.10.0
- @starknet-react/chains v0.1.0
- @starknet-react/core v2.3.0
- get-starknet-core v3.2.0
- starknet v5.29.0
- starknetkit v1.1.4
- NodeJS v18.19.1
- NextJS v14.0.2
- Visual Studio Code (or your favorite IDE!)
Before we start, this guide assumes the reader is familiar in the following:
- Cairo
- ReactJS/NextJS
- Declaring/deploying Starknet contracts
- Usage of blockchain explorers like Voyager
- Usage of Starknet wallets like Argent or any blockchain wallets
We will first start with building the contract.
[IMPORTANT] Before we start building the contract, make sure that you have your environment setup by clicking here and navigate to this github repo, clone it and follow the instruction on the README to setup the project. You also can find this repo on our local examples.
Building/Deploying the Contract
All the content will be under /erc20_new directory in the repo.
We will be using Openzeppelin's ERC20 contract
#![allow(unused)]
fn main() {
#[starknet::contract]
mod MyToken {
    use openzeppelin::token::erc20::ERC20Component;
    use starknet::ContractAddress;

    component!(path: ERC20Component, storage: erc20, event: ERC20Event);

    #[abi(embed_v0)]
    impl ERC20Impl = ERC20Component::ERC20Impl<ContractState>;
    #[abi(embed_v0)]
    impl ERC20MetadataImpl = ERC20Component::ERC20MetadataImpl<ContractState>;

    impl ERC20InternalImpl = ERC20Component::InternalImpl<ContractState>;

    #[storage]
    struct Storage {
        #[substorage(v0)]
        erc20: ERC20Component::Storage
    }

    #[event]
    #[derive(Drop, starknet::Event)]
    enum Event {
        #[flat]
        ERC20Event: ERC20Component::Event
    }

    #[constructor]
    fn constructor(ref self: ContractState, initial_supply: u256, recipient: ContractAddress) {
        let name = "ExampleToken";
        let symbol = "ETK";

        self.erc20.initializer(name, symbol);
        self.erc20._mint(recipient, initial_supply);
    }
}
}
Under the constructor attribute, define your own token name and symbol.
#![allow(unused)]
fn main() {
    #[constructor]
    fn constructor(ref self: ContractState, initial_supply: u256, recipient: ContractAddress) {
        let name = "ExampleToken";
        let symbol = "ETK";

        self.erc20.initializer(name, symbol);
        self.erc20._mint(recipient, initial_supply);
    }
    }
}
Make sure to build your contract by typing scarb build to make sure that it compiles without any errors
We will first declare our contract.
starkli declare PATH_TO_YOUR_CONTRACT_JSON --account YOUR_ACCOUNT --rpc YOUR_RPC_URL
ex.
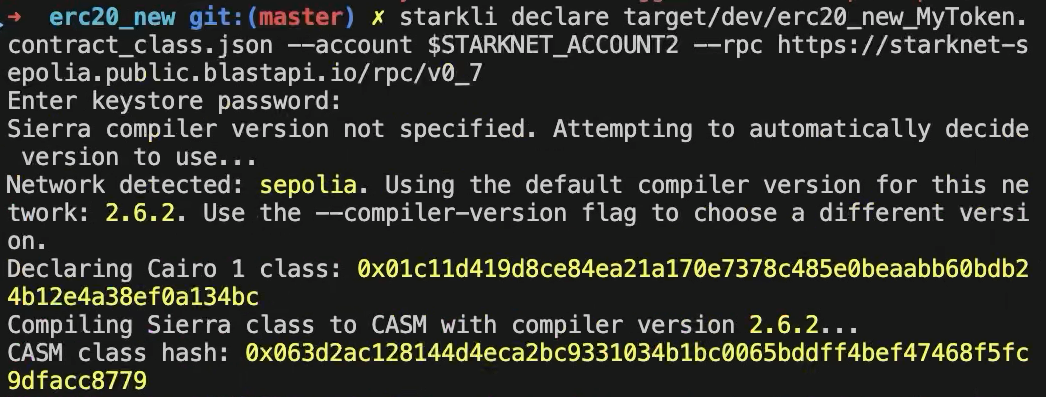
After, we will be deploying the contract. (First constructor argument is the initial supply of the token and the second constructor argument is the recipient of the token supply)
starkli deploy --account $STARKNET_ACCCOUNT --keystore $STARKNET_KEYSTORE
CONTRACT_CLASS_HASH constructor argument #1 constructor argument #2 --rpc YOUR_RPC_URL
ex.
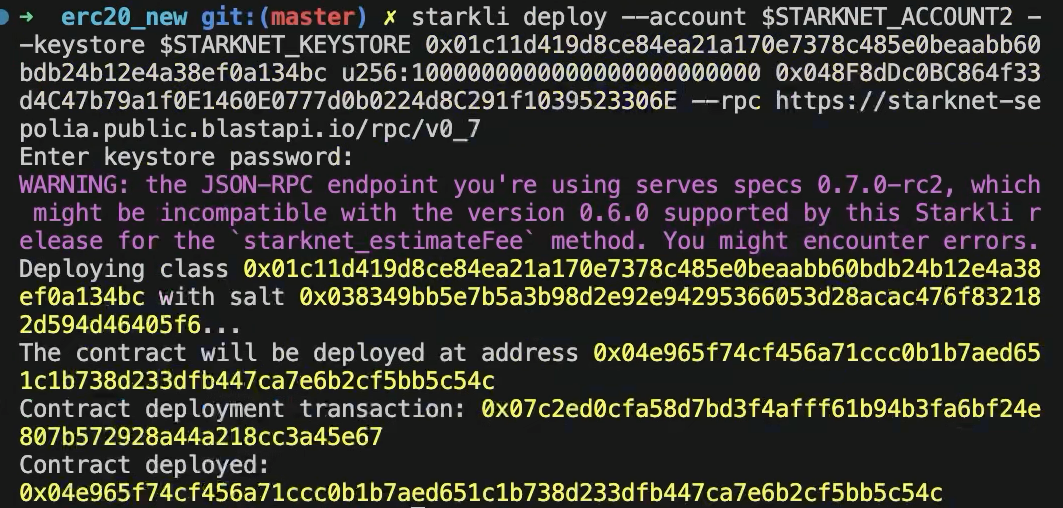
If everything goes well, you will be able to search your contract on explorers like Voyager
Make sure you select sepolia test network when searching your contract
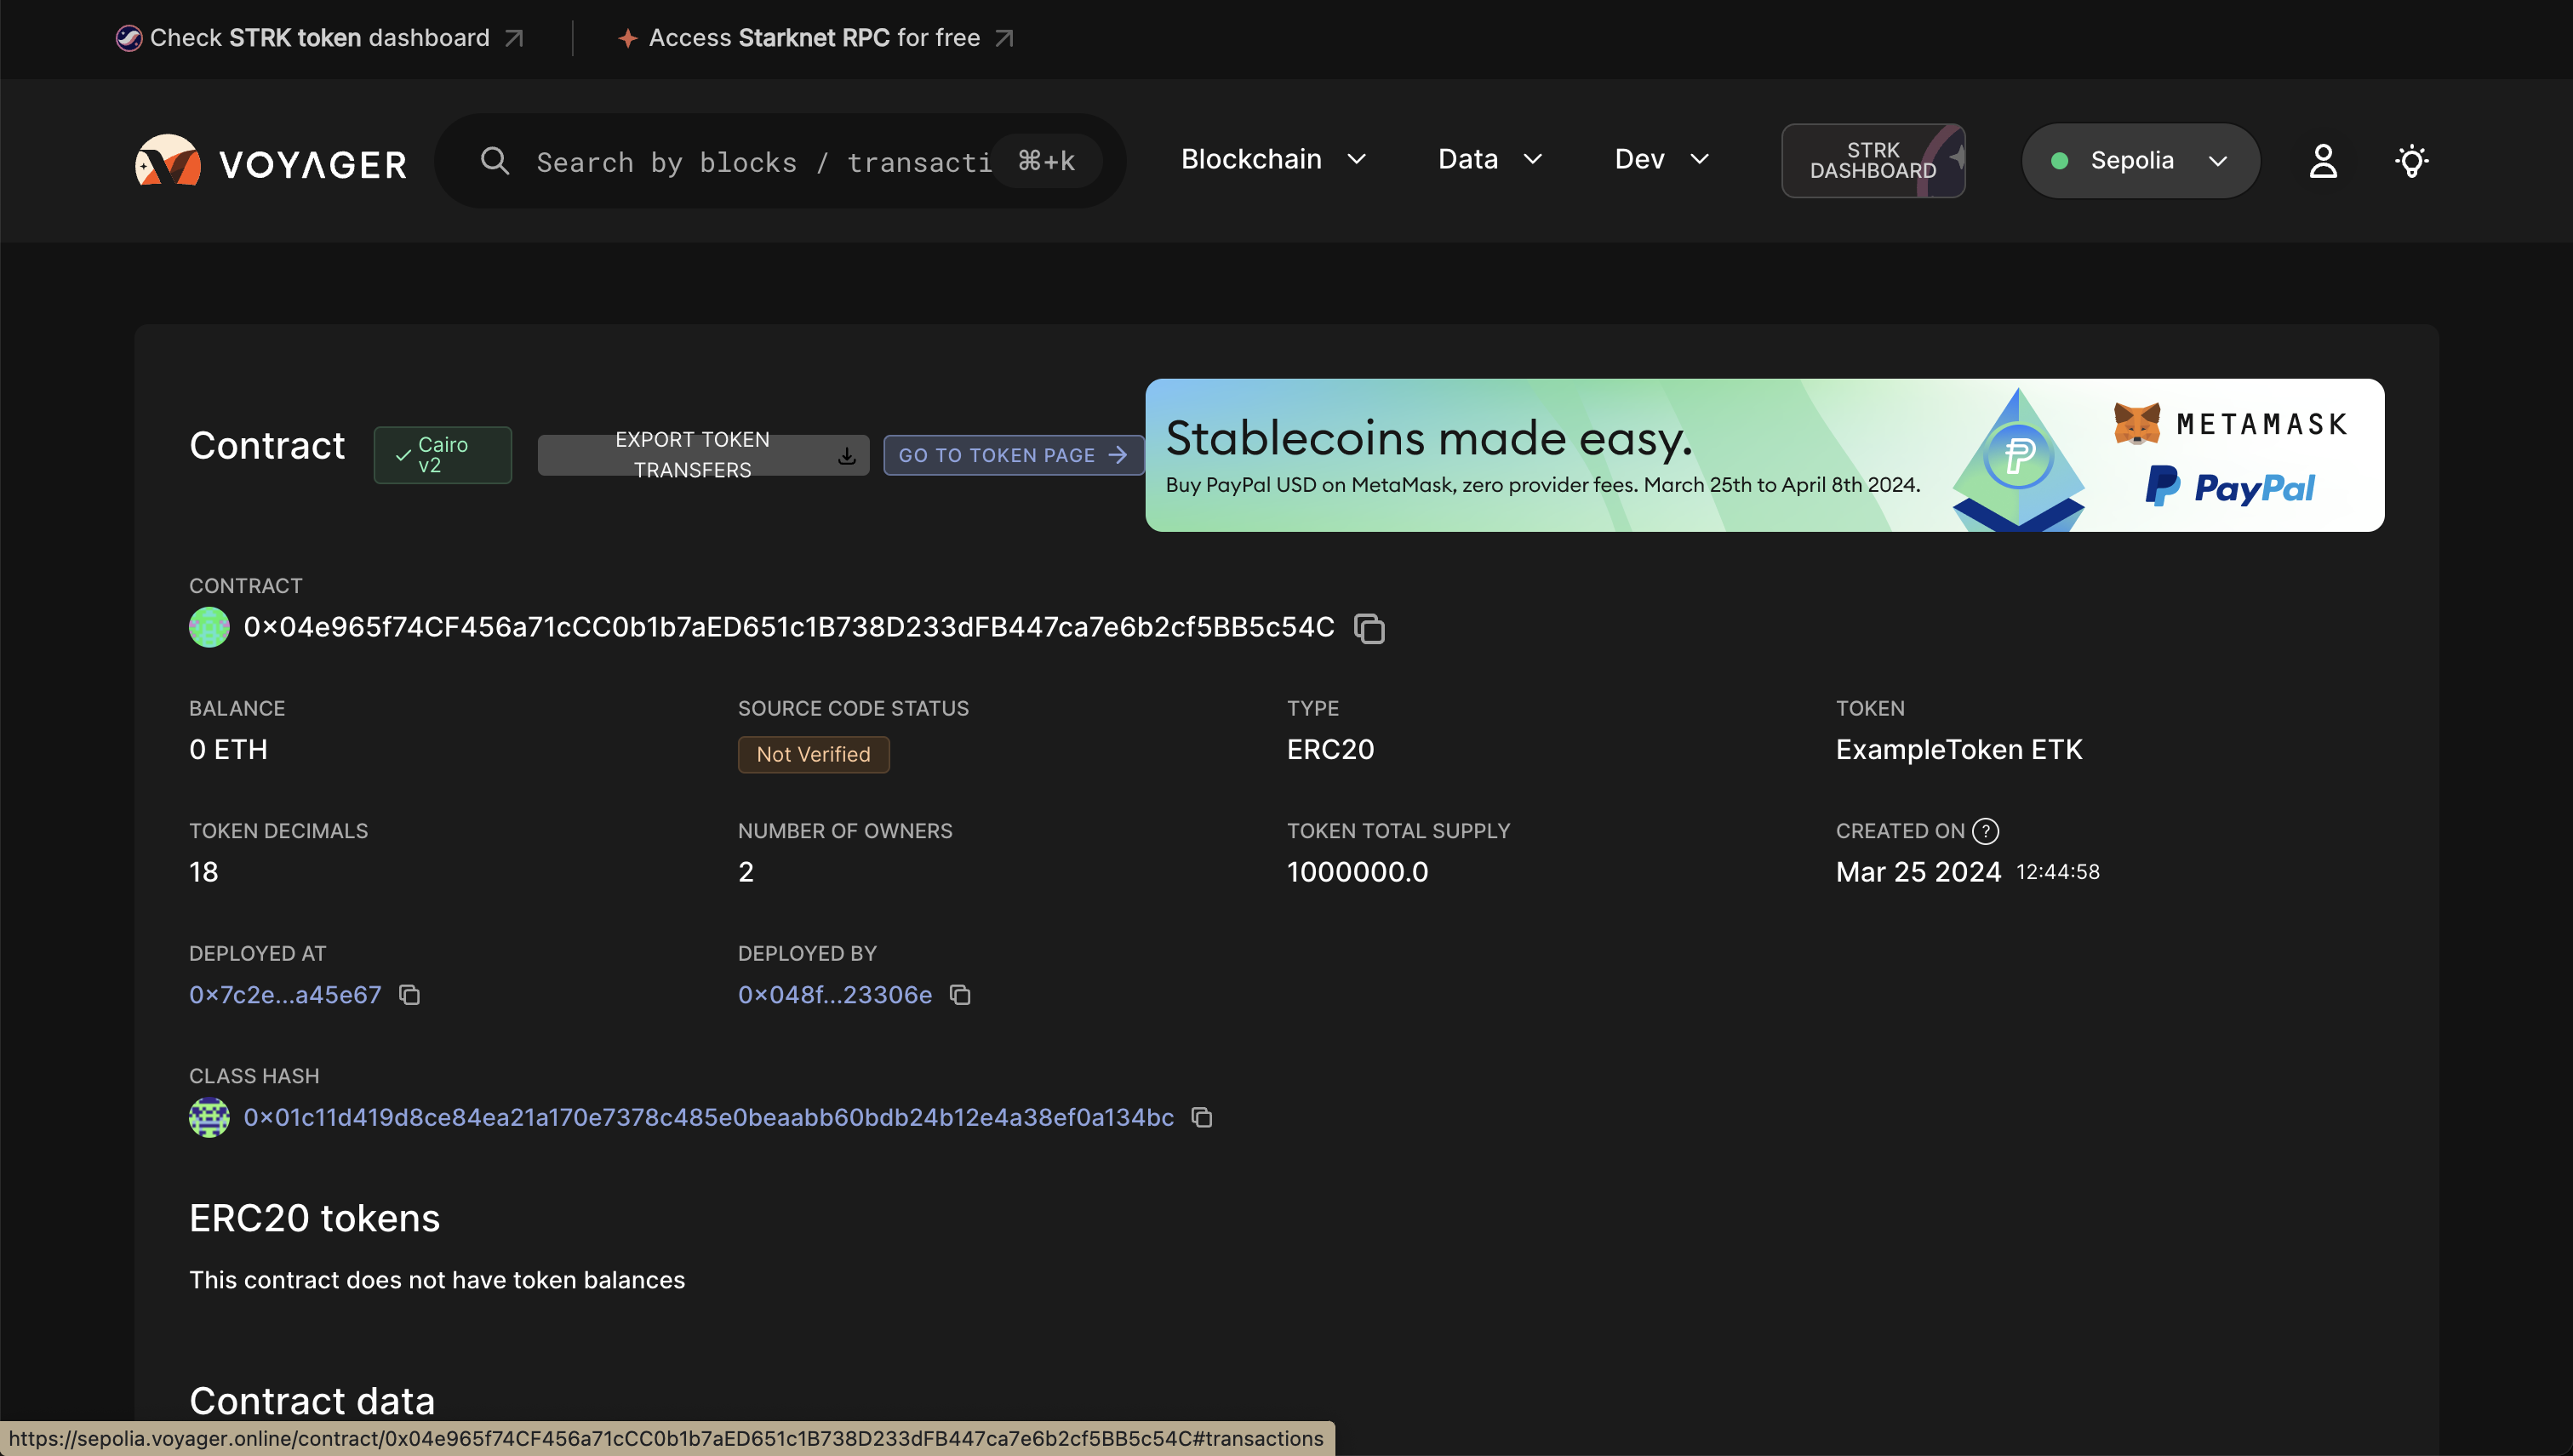
Next, we will be constructing our frontend so that users can interact with the contract that we just deployed.
Building the Frontend
For our frontend, we will be using NextJ, Starknet-react, and StarknetKit.
Configuring the repo for your contract
All the content will be under /erc20_cairo_react/src directory in the repo.
The following steps are mandatory to connect your deployed contract to the repo:
-
To utilize your deployed contract, you need to extract the ABI of your contract which can be found in the voyager explorer, example and replace your ABI in
abi.tswhich is undercomponents/lib/ -
Add your contract address in
src/app/page.tsxon line 22 -
Add your
contractAddressandDECIMALSincomponents/readBalance.tsxandcomponents/transfer.tsxon lines 4-5 and 7-8 respectively -
Make sure you have two wallets with enough eth/strk to pay for tx fees and to test the transfer functionality. (Faucet LINK)
Gentle Introduction to the Repo
starknet-provider.tsx
"use client";
import React from "react";
import { InjectedConnector } from "starknetkit/injected";
import { publicProvider, StarknetConfig } from "@starknet-react/core";
import { sepolia, mainnet } from "@starknet-react/chains";
import { voyager } from "@starknet-react/core";

export function StarknetProvider({children}: { children: React.ReactNode }) {

const chains = [mainnet, sepolia]
const provider = publicProvider()

  return (
    <StarknetConfig
      chains={chains}
      provider={provider}
      explorer={voyager}
    >
      {children}
    </StarknetConfig>
  );
}
layout.tsx
import type { Metadata } from "next";
import { Inter } from "next/font/google";
import { StarknetProvider } from "@/components/starknet-provider";
import "./globals.css";
import { Theme } from '@radix-ui/themes';

const inter = Inter({ subsets: ["latin"] });

export const metadata: Metadata = {
  title: "ERC20 UI",
  description: "Basic ERC20 UI on Sepolia",
};

export default function RootLayout({
  children,
}: {
  children: React.ReactNode;
}) {
  return (
    <html lang="en">
      <body className={inter.className}>
        <Theme>
        <StarknetProvider>
          {children}
        </StarknetProvider>
        </Theme>
      </body>
    </html>
  );
}
In starknet-provider.tsx, we are providing the StarknetConfig with the necessary fields such as chains, provider, and explorer.
By providing our StarknetConfig component in our layout.tsx, our web-app can reference the fields in our application.
Supported networks are sepolia and mainnet.
RPC provider is set to publicProvider by default provided by Lava network but you can use other providers shown on this page
Explorer is set to voyager by default but you can use other explorers shown on this page
connect-modal.tsx
"use client";
import { Button } from "./ui/Button"
import ReadBalance from "@/components/readBalance";
import Transfer from "@/components/transfer";
import { useStarknetkitConnectModal, connect, disconnect } from "starknetkit";
import { useConnect, useDisconnect, useAccount, useNetwork} from "@starknet-react/core";
import { Card } from '@radix-ui/themes';
import { InjectedConnector } from "starknetkit/injected"


function Connect() {

  const { connect } = useConnect();
  const { disconnect } = useDisconnect();
  const { account, address } = useAccount()
  const { chain } = useNetwork();
  const addressShort = address
    ? `${address.slice(0, 6)}...${address.slice(-4)}`
    : null;


  const connectWallet = async() => {

    const connectors = [
      new InjectedConnector({ options: {id: "argentX", name: "Argent X" }}),
      new InjectedConnector({ options: {id: "braavos", name: "Braavos" }})
    ]

    const { starknetkitConnectModal } = useStarknetkitConnectModal({
      connectors: connectors,
      dappName: "ERC20 UI",
      modalTheme: "system"

    })

    const { connector } = await starknetkitConnectModal()
    await connect({ connector })
  }


  return (
    <div>
      <Card className="max-w-[380px] mx-auto">
      <div className="max-w-[400px] mx-auto p-4 bg-white shadow-md rounded-lg">
        <div className="flex items-center gap-3">
          <div className="w-10 h-10 bg-gray-200 rounded-full flex justify-center items-center">
            <span>👛</span>
          </div>
          <div>
            <p className="text-lg font-semibold">Your Wallet</p>
            <p className="text-gray-600">
              {address
                ? `Connected as ${addressShort} on ${chain.name}`
                : "Connect wallet to get started"}
            </p>
          </div>
        </div>
      </div>
      </Card>
    <div className="relative h-screen">
        { !account ?
              <div>
                <Button onClick={connectWallet}>
                  Connect
                </Button>
              </div>
          :
        <div>
          <Button onClick={() => disconnect()}>Disconnect</Button>
          <div className="mt-8">Token Balance: <ReadBalance /> </div>
          <div className="mt-8">
            <Transfer/>
          </div>
        </div>
     }
    </div>
  </div>
  );
}

export default Connect
This component is responsible for managing the state of connecting and disconnecting the wallet as well as the UI for wallet pop-up and its current wallet connection status.
This component makes use of both starknet-react and starknetkit libraries.
Starknet-react is in charge of managing the wallet connection.
Starknetkit is in charge of the wallet-pop UI by utilizing its custom modal from useStarknetkitConnectModal hook. It also establishes the wallet connection by providingconnector field for the connect function from useConnect hook.
The connectors are provided by starknetkit and we imported to support two wallets: ArgentX and Braavos.
The Card from radix-ui displays the wallet connection status and the balance of the connected wallet is provied by readBalance component.
readBalance.tsx
"use client"
import { useAccount, useContractRead} from "@starknet-react/core";

const ContractAddress = "0x04e965f74CF456a71cCC0b1b7aED651c1B738D233dFB447ca7e6b2cf5BB5c54C";
const DECIMALS = 18;

// Credits to @PhilippeR26 for this function
function formatBalance(qty: bigint, decimals: number): string {
  const balance = String("0").repeat(decimals) + qty.toString();
  const rightCleaned = balance.slice(-decimals).replace(/(\d)0+$/gm, "$1");
  const leftCleaned = BigInt(balance.slice(0, balance.length - decimals)).toString();
  return leftCleaned + "." + rightCleaned;
}

export default function ReadBalance() {
  const { address } = useAccount();
  const { data, isError, isLoading, error } = useContractRead({
    abi: [
      {
        "name": "balance_of",
        "type": "function",
        "inputs": [
          {
            "name": "account",
            "type": "core::starknet::contract_address::ContractAddress"
          }
        ],
        "outputs": [
          {
            "type": "core::integer::u256"
          }
        ],
        "state_mutability": "view"
      }
    ],
    functionName: "balance_of",
    args: [address as string],
    address: ContractAddress,
    watch: true,
  });

  if (isLoading) return <div>Loading ...</div>;
  if (isError || !data ) return <div>{error?.message}</div>;
  //@ts-ignore
  return <div>{formatBalance(data, DECIMALS)}</div>

}
In this component, we are utilizing the useContractRead hook by starknet-react to read the balance of the user's wallet. The hook is used for read-only functions and this case, it is able to read the balance of the user's wallet by calling the balanceOf function from the contract through the provided ABI, contract address, and connected wallet address (through useAccount hook).
The final data is formatted by formatBalance function and displayed on the frontend.
transfer.tsx
import { useState, useMemo } from "react"
import contractABI from "@/components/lib/abi"
import { useAccount, useContract, useContractWrite } from "@starknet-react/core"
import { Uint256, cairo } from "starknet"
import { Button } from "./ui/Button"


const ContractAddress = "0x04e965f74cf456a71ccc0b1b7aed651c1b738d233dfb447ca7e6b2cf5bb5c54c";
const DECIMALS = 18;

export default function Transfer() {

  const { address } = useAccount();
  const [ recipient, setRecipient ] = useState('');
  const [ amount, setAmount ] = useState('')

  const { contract } = useContract({
    abi: contractABI,
    address: ContractAddress
});

  const newAmount: Uint256 = cairo.uint256((amount as any) * (10 ** DECIMALS))

  const calls = useMemo(() => {
    if ( !contract || !recipient || !address) return [];
    return contract.populateTransaction["transfer"]!(recipient, newAmount);
  }, [contract, address, recipient, newAmount])

  const {
    writeAsync,
    data,
    isPending,
  } = useContractWrite({
    calls,
  });

  return (
    <>
<div className="flex flex-col gap-4 items-center">
  <div className="flex items-center space-x-3 mr-3">
    <label className="text-lg font-medium text-gray-700">Recipient</label>
    <input
      type="text"
      value={recipient}
      onChange={e => setRecipient(e.target.value)}
      className="mt-1 px-4 py-2 w-64 bg-white border border-green-500 rounded-md shadow-sm focus:outline-none focus:ring-indigo-500 focus:border-indigo-500 sm:text-sm"
    />
  </div>
  <div className="flex items-center space-x-3">
    <label className="text-lg font-medium text-gray-700">Amount</label>
    <input
      type="number"
      value={amount}
      onChange={e => setAmount(e.target.value)}
      className="mt-1 px-3 py-2 w-64 bg-white border border-green-500 rounded-md shadow-sm focus:outline-none focus:ring-indigo-500 focus:border-indigo-500 sm:text-sm"
    />
  </div>
  <Button className="mt-6 px-6 py-3 text-lg w-full sm:w-auto" onClick={() => writeAsync()}>Transfer</Button>
  <p>status: {isPending && <div>Submitting...</div>}</p>
  <p>hash: {data?.transaction_hash}</p>
</div>
    </>
  );
}
This component deals with the transfer of tokens from one wallet to another. The user can input the recipient's wallet address and the amount of tokens to transfer. The useContractWrite hook by starknet-react is used to use functions in the contract that makes any state changes.
We package the call const that includes the following: contract,address, recipient, newAmount and we pass it to the useContractWrite hook.
The recipient and amount variables are updated upon user input in each text box.
The amount is converted to newAmount, a uint256 type adjusted to the number of decimals
Interacting with the Frontend
Read Balance
You first need to connect your wallet, it currently supports argent and braavos wallets.
If you have successfully deployed your contract, able to connected your wallet and received your tokens from your ERC20 contract, it will display the token balance of the token that you deployed.
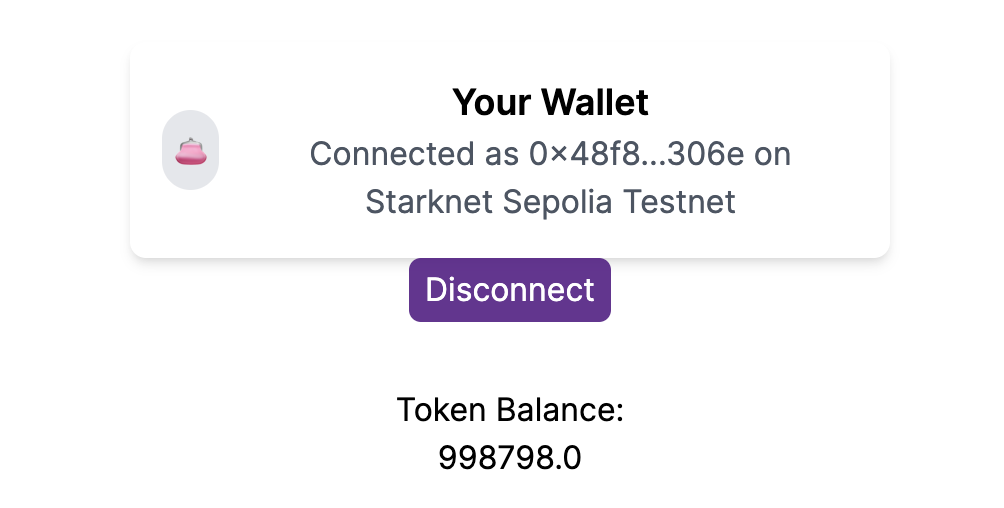
Wallet 1
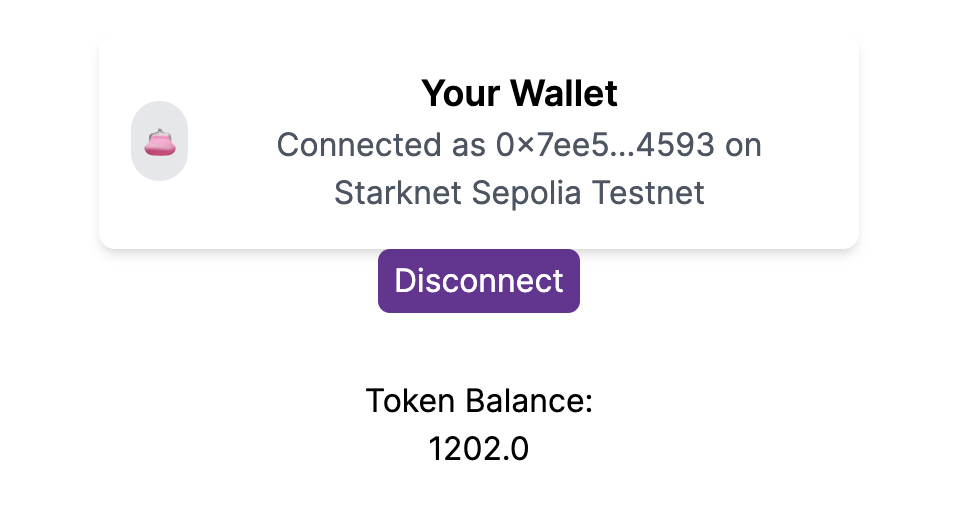
Wallet 2
Transfer
Enter the recipient of your token and the amount.
Click the transfer button and you will be able to see the transaction hash and the status of the transaction if the tx was executed successfully.
In our example, we will be sending 100 tokens to wallet 2.
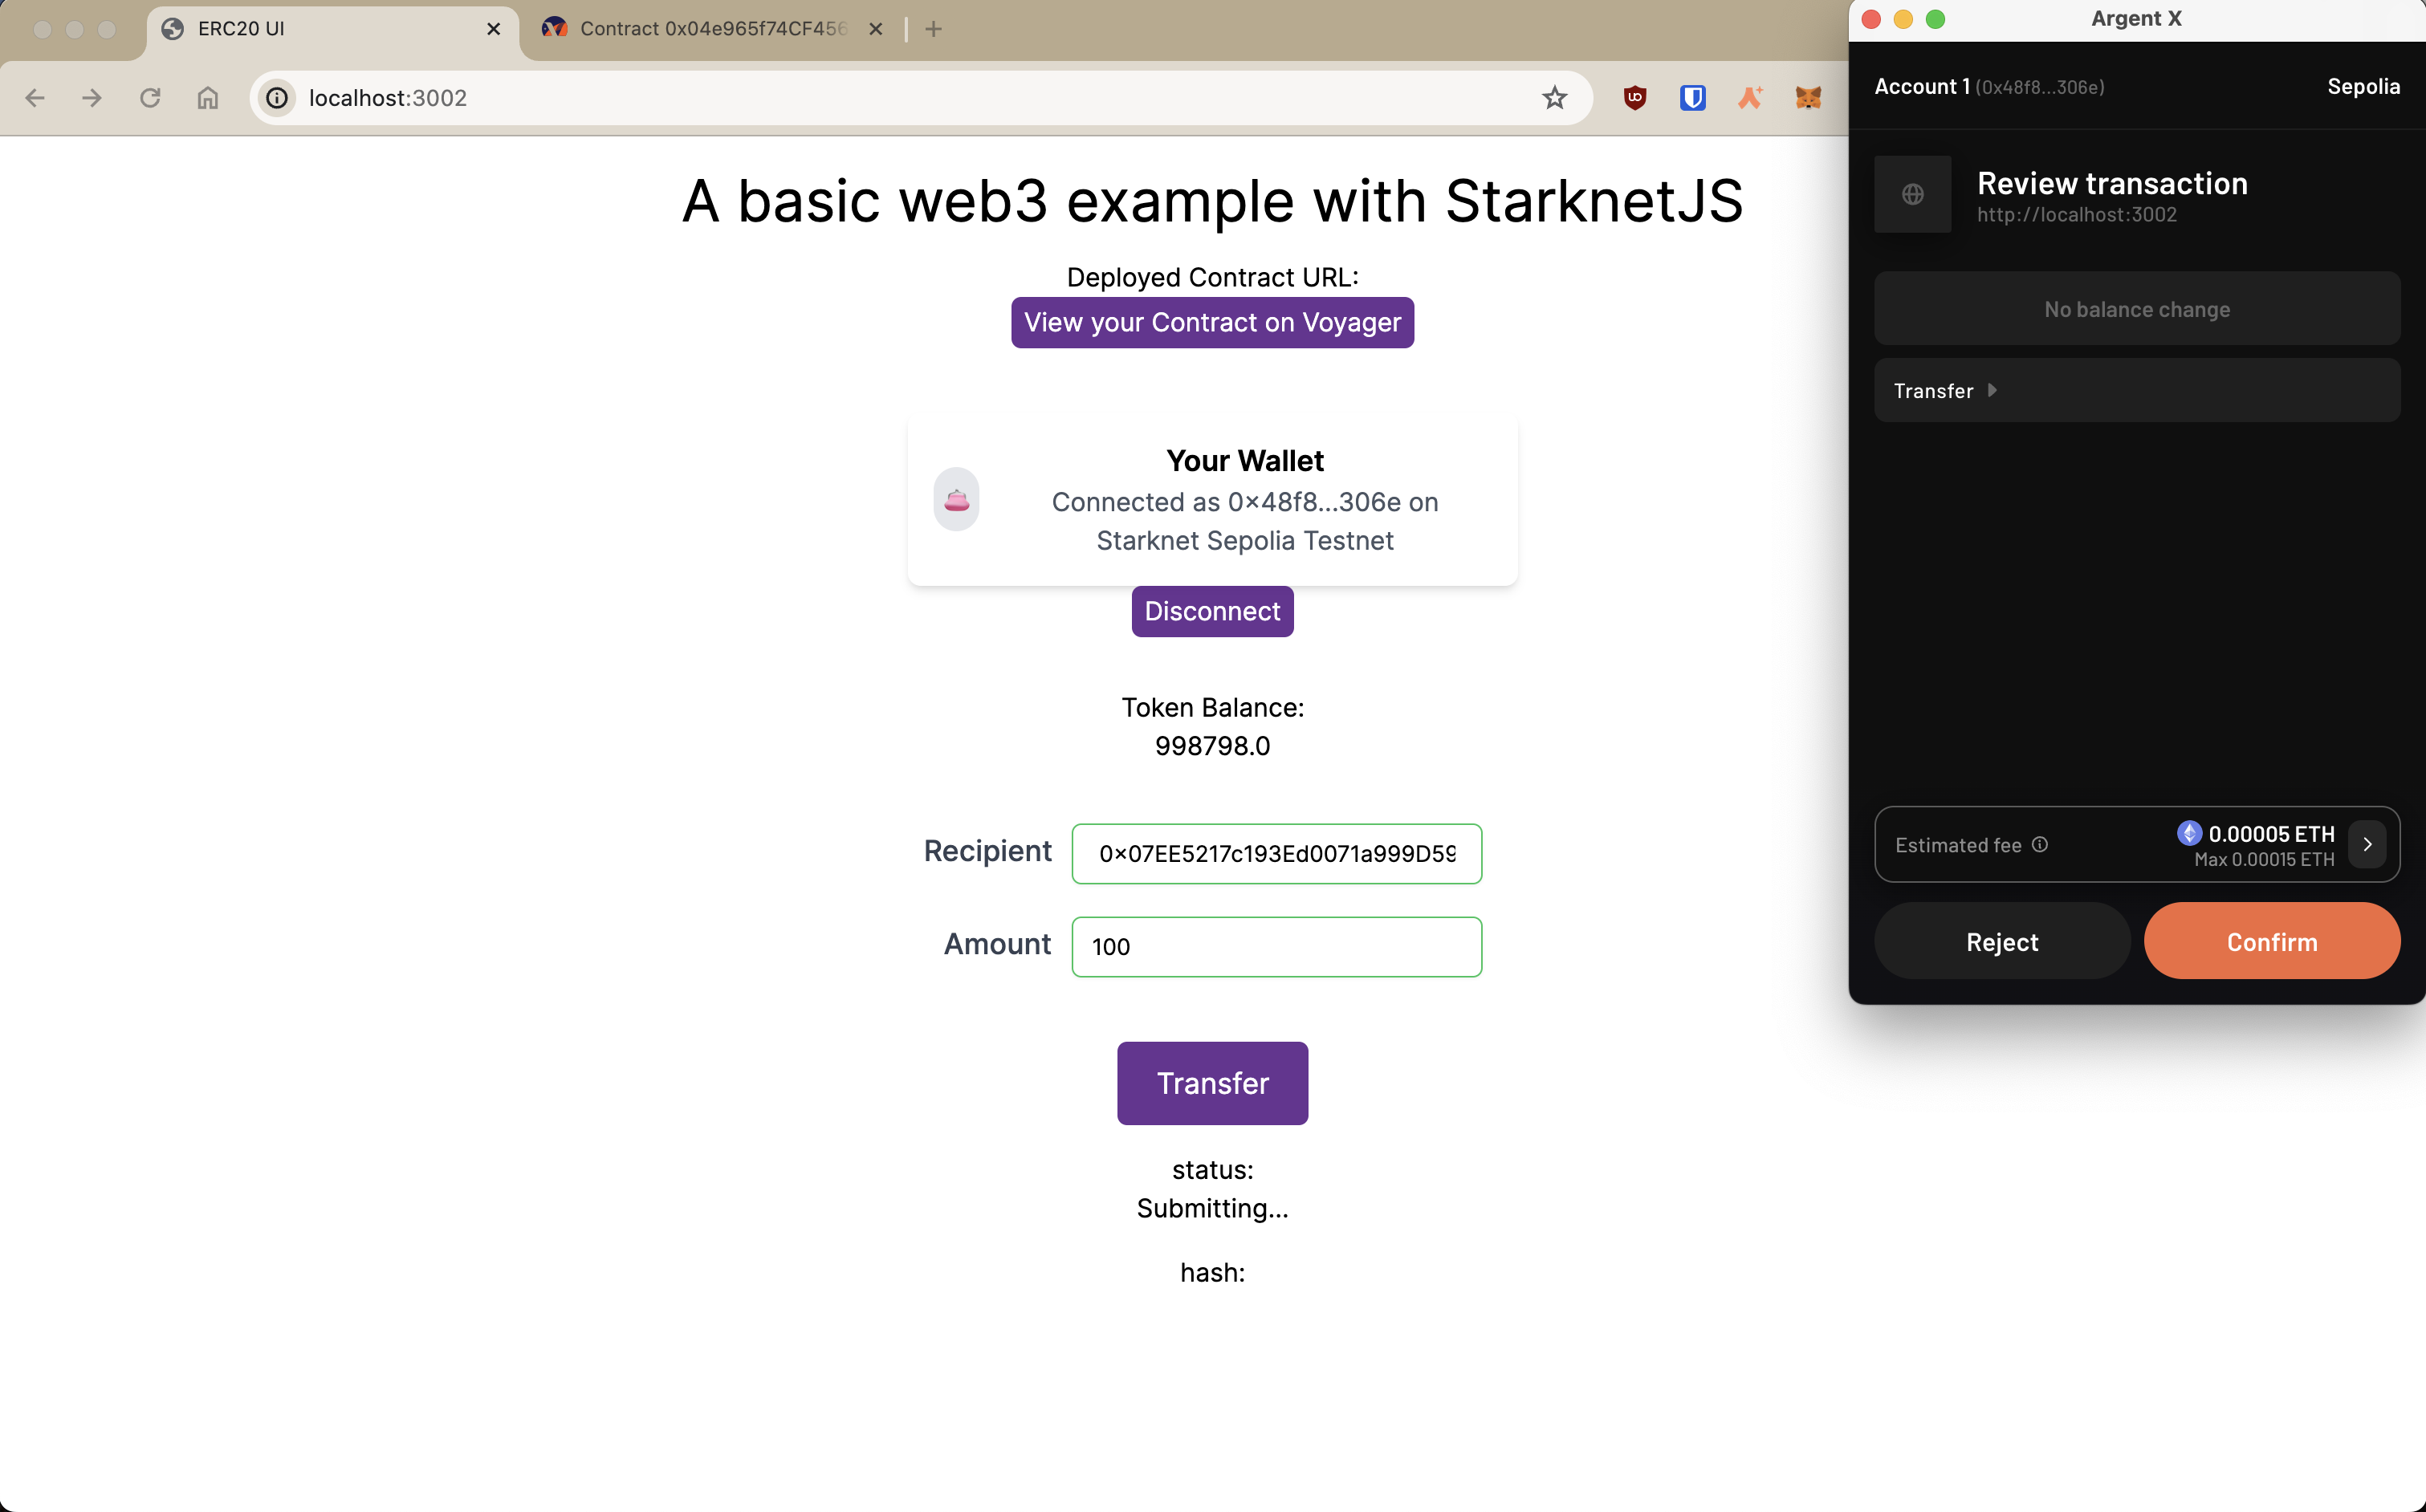
Since we sent 100 token to wallet 2, the result will be as follows:

Wallet 1
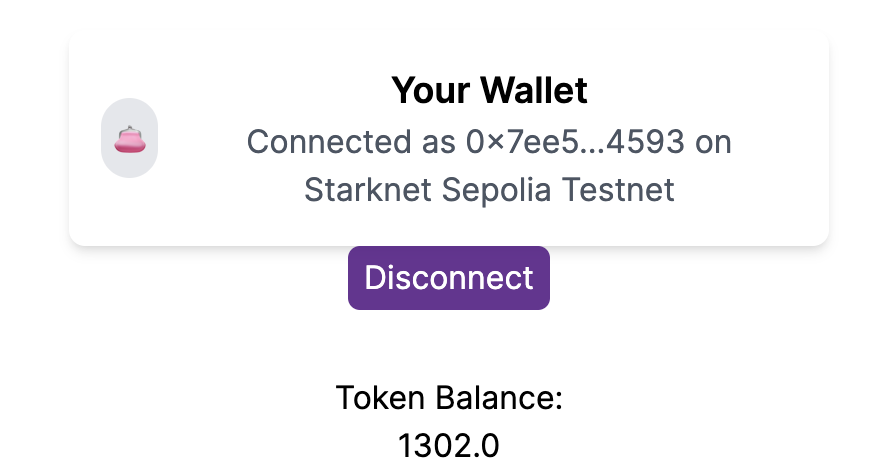
Wallet 2
Result
As the picture shows, we have successfully sent 100 tokens from wallet 1 to wallet 2 on starknet sepolia testnet!
ERC20 UI Overview
In this tutorial, we were able to accomplish the following tasks!
- Initializing environment: Setting up an environment for starknet and cairo development
- Declaring and deploying the contract: Declaring and deploying our ERC20 cairo contract on the sepolia testnet
- Initializing the frontend: Setting up the frontend with NextJS, Starknet-react, and Starknetkit to connect your Cairo contract with your wallet
- Interacting with the frontend: Connecting/disconnecting your wallet, viewing your deployed token balance, and transferring tokens to another wallet by sending transactions on the sepolia network
Starknet-React: React Integration
In the starknet ecosystem, several tools are available for front-end development. The most notable are:
-
starknet-react (documentation): A collection of React hooks tailored for Starknet, inspired by wagmi and powered by starknet.js.
-
starknet.js: This JavaScript library facilitates interactions with Starknet contracts, akin to web3.js for Ethereum.
Developed by the Apibara team, Starknet React is an open-source suite of React providers and hooks specifically for Starknet.
Integrating Starknet React
The fastest way to get started using Starknet React is by using the create-starknet Command Line Interface (CLI). The tool will guide you through setting up your Starknet application:
npm init starknet
Or, if you want to do it manually you will need to add the following dependencies to your project:
npm install @starknet-react/chains @starknet-react/core starknet get-starknet-core
Starknet.js is an SDK designed to simplify interactions with Starknet. Conversely, get-starknet specializes in wallet connection management.
Wrap your app in the StarknetConfig component to configure and provide a React Context. This component lets you specify wallet connection options for users through its connectors prop.
export default function App({ children }) {
  const chains = [goerli, mainnet];
  const provider = publicProvider();
  const { connectors } = useInjectedConnectors({
    // Show these connectors if the user has no connector installed.
    recommended: [argent(), braavos()],
    // Hide recommended connectors if the user has any connector installed.
    includeRecommended: "onlyIfNoConnectors",
    // Randomize the order of the connectors.
    order: "random",
  });

  return (
    <StarknetConfig chains={chains} provider={provider} connectors={connectors}>
      {children}
    </StarknetConfig>
  );
}
Establishing Connection and Managing Account
After defining the connectors in the config, you can use a hook to access them. This enables users to connect their wallets.
export default function Component() {
  const { connect, connectors } = useConnect();
  return (
    <ul>
      {connectors.map((connector) => (
        <li key={connector.id}>
          <button onClick={() => connect({ connector })}>
            {connector.name}
          </button>
        </li>
      ))}
    </ul>
  );
}
Now, observe the disconnect function that terminates the connection when
invoked:
const { disconnect } = useDisconnect();
return <button onClick={() => disconnect()}>Disconnect</button>;
Once connected, the useAccount hook provides access to the connected account, giving insights into the connection's current state.
const { address, isConnected, isReconnecting, account } = useAccount();

return <div>{isConnected ? <p>Hello, {address}</p> : <Connect />}</div>;
State values like isConnected and isReconnecting update automatically, easing UI updates. This is particularly useful for asynchronous processes, removing the need for manual state management in your components.
Once connected, signing messages is easy with the account value from the useAccount hook. For a smoother experience, you can also use the useSignTypedData hook.
    const { data, isPending, signTypedData } = useSignTypedData(exampleData);

    return (
      <button
        onClick={() => signTypedData(exampleData)}
        disabled={!account}
      >
        {isPending ? <p>Waiting for wallet...</p> : <p>Sign Message</p>}
      </button>
    );
Starknet React supports signing an array of BigNumberish values or an object. When signing an object, ensure the data adheres to the EIP712 type. For detailed guidance on signing, see the Starknet.js documentation: here.
Displaying StarkName
Once an account is connected, the useStarkName hook retrieves the StarkName of the account. Linked to Starknet.id, it allows for displaying the user address in a user-friendly manner.
    const { data, isLoading, isError } = useStarkName({ address });

    if (isLoading)
        return <span>Loading...</span>;
    if (isError)
        return <span>Error fetching name...</span>;

    return <span>StarkName: {data}</span>;
This hook provides additional information: error, status, fetchStatus, isSuccess, isError, isPending, isFetching, isLoading. These details offer precise insights into the current process.
Fetching Address from StarkName
To retrieve an address from a StarkName, use the useAddressFromStarkName hook.
    const { data, isLoading, isError } = useAddressFromStarkName({
      name: "vitalik.stark",
    });

    if (isLoading)
        return <span>Loading...</span>;
    if (isError)
        return <span>Error fetching address...</span>;

    return <span>address: {data}</span>;
If the provided name does not have an associated address, it will return
0x0
Navigating the Network
Starknet React provides developers with tools for network interactions, including hooks like useBlock for retrieving the latest block:
        const { data, isLoading, isError } = useBlock({
        refetchInterval: 10_000,
        blockIdentifier: "latest" as BlockNumber,
        });

        if (isLoading)
            return <span>Loading...</span>;
        if (isError || !data)
            return <span>Error...</span>;

        return <span>Hash: {data.block_hash}</span>;
Here, refetchInterval sets the data refresh rate. Starknet React uses react-query for state and query management. Other hooks like useContractRead and useWaitForTransaction are also available for interval-based updates.
The useStarknet hook gives direct access to the ProviderInterface:
    const { provider } = useProvider()

    // library.getClassByHash(...)
    // library.getTransaction(...)
Tracking Wallet changes
For a better dApp user experience, tracking wallet changes is crucial. This includes account changes, connections, disconnections, and network switches. Reload balances on account changes, or reset your dApp's state on network changes. Use useAccount and useNetwork for this.
useNetwork provides the current network chain:
    const { chain: { id, name } } = useNetwork();

    return (
        <>
            <p>Connected chain: {name}</p>
            <p>Connected chain id: {id}</p>
        </>
    )
This hook also offers blockExplorer, testnet for detailed network information.
Monitor user interactions with account and network using the useEffect hook:
    const { chain } = useNetwork();
    const { address } = useAccount();

    useEffect(() => {
        if(address) {
            // Do some work when the user changes the account on the wallet
            // Like reloading the balances
        }else{
            // Do some work when the user disconnects the wallet
            // Like reseting the state of your dApp
        }
    }, [address]);

    useEffect(() => {
        // Do some work when the user changes the network on the wallet
        // Like reseting the state of your dApp
    }, [chain]);
Contract Interactions
Read Functions
Starknet React introduces useContractRead, similar to wagmi, for read operations on contracts. These operations are independent of the user's connection status and don't require a signer.
    const { data, isError, isLoading, error } = useContractRead({
        functionName: "balanceOf",
        args: [address as string],
        abi,
        address: testAddress,
        watch: true,
    });

    if (isLoading)
        return <div>Loading ...</div>;
    if (isError || !data)
        return <div>{error?.message}</div>;

    return <div>{parseFloat(data.balance.low)}n</div>;
For ERC20 operations, the useBalance hook simplifies retrieving balances without needing an ABI.
const { isLoading, isError, error, data } = useBalance({
  address,
  watch: true,
});

if (isLoading) return <div>Loading ...</div>;
if (isError || !data) return <div>{error?.message}</div>;

return (
  <div>
    {data.value.toString()}
    {data.symbol}
  </div>
);
Write Functions
The useContractWrite hook, unlike wagmi, benefits from Starknet's native support for multicall transactions. This improves user experience by facilitating multiple transactions without individual approvals.
    const calls = useMemo(() => {
      if (!address || !contract) return [];
      // return a single object for single transaction,
      // or an array of objects for multicall**
      return contract.populateTransaction["transfer"]!(address, { low: 1, high: 0 });
    }, [contract, address]);

    const {
      writeAsync,
      data,
      isPending,
    } = useContractWrite({
      calls,
    });

    return (
      <>
        <button onClick={() => writeAsync()}>Transfer</button>
        <p>status: {isPending && <div>Submitting...</div>}</p>
        <p>hash: {data?.transaction_hash}</p>
      </>
    );
This setup starts with the populateTransaction utility, followed by executing the transaction through writeAsync. The hook also provides transaction status and hash.
A Single Contract Instance
For cases where a single contract instance is more than apecifying the contract address and ABI in each hook., use the useContract hook:
const { contract } = useContract({
  address: CONTRACT_ADDRESS,
  abi: abi_erc20,
});

// Call functions directly on contract
// contract.transfer(...);
// contract.balanceOf(...);
Tracking Transactions
UseWaitForTransaction tracks transaction states with a transaction hash, reducing network requests through caching.
const { isLoading, isError, error, data } = useWaitForTransaction({
  hash: transaction,
  watch: true,
});

if (isLoading) return <div>Loading ...</div>;
if (isError || !data) return <div>{error?.message}</div>;

return <div>{data.status?.length}</div>;
Explore all available hooks in Starknet React's documentation: https://starknet-react.com/hooks/.
Conclusion
The Starknet React library provides a range of React hooks and providers specifically designed for Starknet and the Starknet.js SDK. These tools enable developers to create applications on the Starknet network.
ERC-20 UI
This guide offers steps to build an ERC20 smart contract using Cairo and to incorporate it within a React web application with Starknet React. Readers will:
- Understand how to implement the ERC20 interface
- Learn how to deploy contracts on the Starknet network
- Discover ways to engage with contracts within a React application
- Design their own ERC20 token and initiate it on Starknet
A prerequisite for this guide is a foundational understanding of both the Cairo programming language and ReactJS. Additionally, ensure Node.js and NPM are installed on the system.
The example will walk through creating an ERC20 token named MKT and crafting a web3 interface for functionalities such as balance verification and token transfer.

Throughout this guide, the following tools and libraries will be utilized:
- Scarb 0.7.0 with Cairo 2.2.0
- Starkli 0.1.9
- Oppenzeppelin libraries v0.7.0
- Starknet React v2.1.1
- NodeJS v19.6.1
- Next.js 13.1.6
- Visual Studio Code
- Vercel
Initiating a New Starknet Project
Begin by establishing a new Starknet project named "erc20" using Scarb:
mkdir erc20
cd erc20
scarb init --name erc20
Subsequently, update the Scarb.toml to include the essential OpenZeppelin libraries. Post edits, the Scarb.toml should appear as:
[package]
name = "erc20"
version = "0.1.0"

# For more keys and definitions, visit https://docs.swmansion.com/scarb/docs/reference/manifest.html

[dependencies]
starknet = ">=2.2.0"
openzeppelin = { git = "https://github.com/OpenZeppelin/cairo-contracts.git", tag = "v0.8.0-beta.0" }

[[target.starknet-contract]]
Implementing the ERC20 Token
Begin by creating a new file named src/erc20.cairo. In this file, the ERC20 token named MKT, along with its associated functions, will be defined:
#![allow(unused)]
fn main() {
#[starknet::contract]
mod erc20 {
    use starknet::ContractAddress;
    use openzeppelin::token::erc20::ERC20;

    #[storage]
    struct Storage {}

    #[constructor]
    fn constructor(
        ref self: ContractState,
        initial_supply: u256,
        recipient: ContractAddress
    ) {
        let name = 'MyToken';
        let symbol = 'MTK';

        let mut unsafe_state = ERC20::unsafe_new_contract_state();
        ERC20::InternalImpl::initializer(ref unsafe_state, name, symbol);
        ERC20::InternalImpl::_mint(ref unsafe_state, recipient, initial_supply);
    }

    #[external(v0)]
    #[generate_trait]
    impl Ierc20Impl of Ierc20 {
        fn balance_of(self: @ContractState, account: ContractAddress) -> u256 {
            let unsafe_state = ERC20::unsafe_new_contract_state();
            ERC20::ERC20Impl::balance_of(@unsafe_state, account)
        }

        fn transfer(ref self: ContractState, recipient: ContractAddress, amount: u256) -> bool {
            let mut unsafe_state = ERC20::unsafe_new_contract_state();
            ERC20::ERC20Impl::transfer(ref unsafe_state, recipient, amount)
        }
    }
}
}
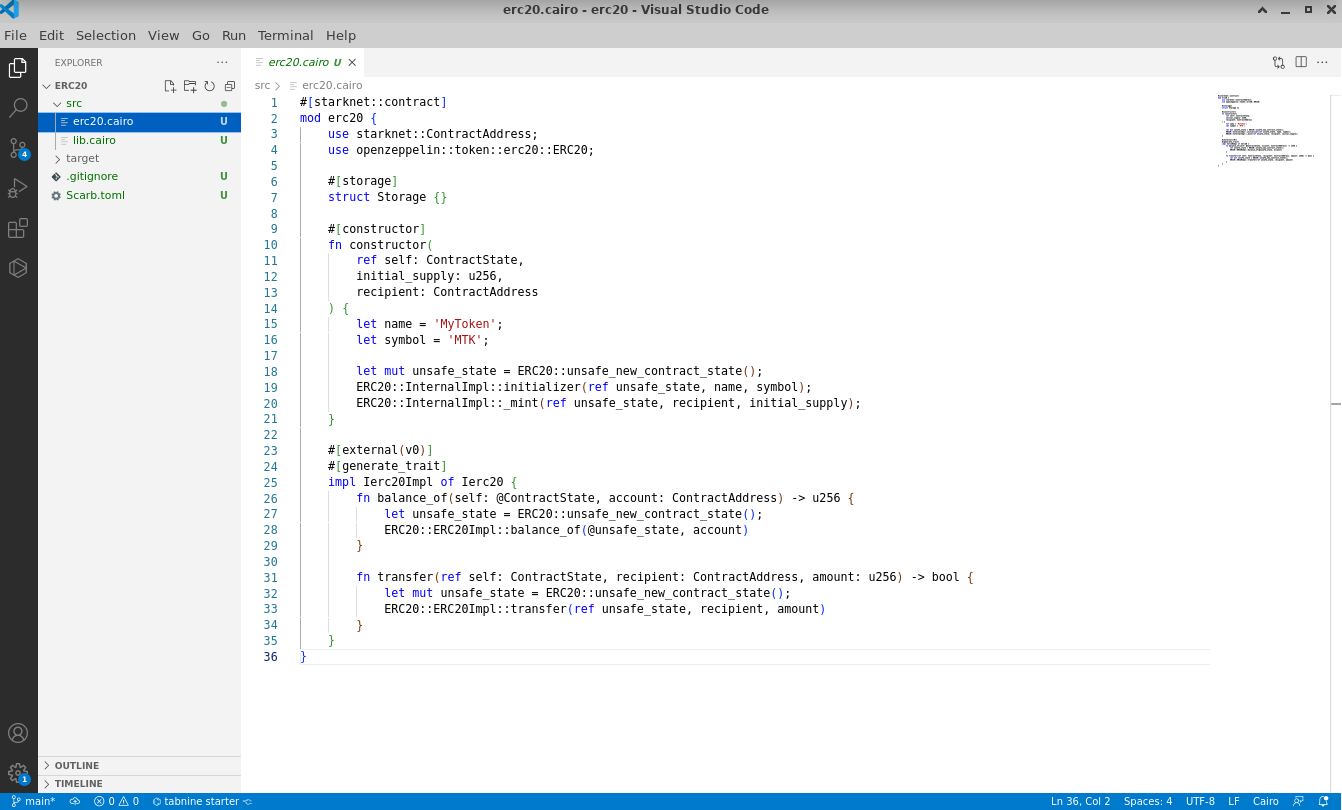
Now edit src/lib.cairo and replace the content with:
#![allow(unused)]
fn main() {
mod erc20;
}

Upon completing your contract, proceed to compile it using Scarb:
scarb build
Subsequent to the compilation, declare the smart contract on the Starknet testnet:
starkli declare target/dev/erc20_erc20.sierra.json --account ../../demo-account.json --keystore ../../demo-key.json --compiler-version 2.1.0 --network goerli-1 --watch
The output should appear similar to:
Enter keystore password:
Declaring Cairo 1 class: 0x04940154eae35788e899ceb0ef2794eaa5ea6818af5c1c726d6d278fd4979713
... [shortened for brevity]
Class hash declared: 0x04940154eae35788e899ceb0ef2794eaa5ea6818af5c1c726d6d278fd4979713
In cases where no modifications have been made to the provided contract, a notification will indicate that the contract has previously been declared on Starknet:
Enter keystore password:
Not declaring class as it's already declared. Class hash: 0x04940154eae35788e899ceb0ef2794eaa5ea6818af5c1c726d6d278fd4979713
Deploying the ERC20 Contract
Proceed to deploy the MKT Token using Starkli. Provide these arguments for successful deployment:
Initial mint: Mint 1,000,000 tokens. Given that the MKT token comprises 18 decimals (a standard of OpenZeppelin), the input required is 1,000,000 * 10^18 or 0xd3c21bcecceda1000000. Due to the contract's expectation of a u256 mint value, provide both low and high values: 0xd3c21bcecceda1000000 and 0 respectively.Receiver address: Use a preferred address. In this example: 0x0334863e3e851de87fb4b6b6113aa2a6b40ea20f22dbec55536e4eac912206fc
starkli deploy 0x04940154eae35788e899ceb0ef2794eaa5ea6818af5c1c726d6d278fd4979713 --account ../../demo-account.json --keystore ../../demo-key.json --network goerli-1 --watch 0xd3c21bcecceda1000000 0 0x0334863e3e851de87fb4b6b6113aa2a6b40ea20f22dbec55536e4eac912206fc
The output should appear similar to:
Enter keystore password:
... [shortened for brevity]
Contract deployed: 0x001892d81e09cb2c2005f0112891dacb92a6f8ce571edd03ed1f3e549abcf37f
NOTE: The deployed address received will differ for every user. Retain this address, as it will replace instances in subsequent TypeScript files to match the specific contract address.
Well done! The Cairo ERC20 smart contract has been deployed successfully on Starknet.
Installing the Starknet React Library
With the contract in place, initiate the development of the web application. Begin by incorporating the Starknet React library and setting up a new React Project called 'erc20':
$ npm init starknet
Need to install the following packages:
  create-starknet@2.0.1
Ok to proceed? (y) y
✔ What is your project named? … erc20_web
✔ What framework would you like to use? › Next.js
Installing dependencies...
Success! Created erc20_web at ~/erc20_web

We suggest that you begin by typing:

    cd erc20
    npm run dev
Post-installation, confirm the version of the Starknet React library:
npm list @starknet-react/core
The output should display the installed version, such as @starknet-react/core@2.1.1.
Once set up, make modifications to erc20_web/page.tsx by replacing its content with the following code:
'use client';
import Head from 'next/head'
import { useBlock } from '@starknet-react/core'
import WalletBar from "@/components/WalletBar";
import { BlockTag } from 'starknet';
export default function Home() {
const { data, isLoading, isError } = useBlock({
refetchInterval: 3000,
blockIdentifier: BlockTag.latest,
})
return (
<>
<Head>
<title>Create Starknet</title>
<meta name="description" content="Generated by create-starknet" />
<meta name="viewport" content="width=device-width, initial-scale=1" />
<link rel="icon" href="/favicon.ico" />
</Head>
<main>
<p>
A basic web3 example with Starknet
</p>
<div>
{isLoading
? 'Loading...'
: isError
? 'Error while fetching the latest block hash'
: `Latest block hash: ${data?.block_hash}`}
</div>
<WalletBar />
</main>
</>
)
}
To launch the web3 application:
cd erc20_web/
npm run dev
NOTE: Observe the server port that appears during launch. This will be useful for subsequent testing.
Enhancing Your React Application with Additional Features
To enhance the app's functionality, create two components for balance and transfer. Subsequently, update the Wallet.tsx file to incorporate the new features:

Balance Component
Design a balance component inside components/Balance.tsx and integrate the following code:
import { useAccount, useContractRead } from "@starknet-react/core";
import erc20ABI from '../../assets/erc20.json';
import { MouseEventHandler } from "react";

function Balance() {
  const { address } = useAccount();
  const { data, isLoading, error, refetch } = useContractRead({
    address: '0x001892d81e09cb2c2005f0112891dacb92a6f8ce571edd03ed1f3e549abcf37f',
    abi: erc20ABI,
    functionName: 'balance_of',
    args: [address || ''], // Provide a default value if address is undefined
    watch: false
  });

  if (isLoading) return <span>Loading...</span>;
  if (error) return <span>Error: {JSON.stringify(error)}</span>;

  const handleClick: MouseEventHandler<HTMLButtonElement> = async (event) => {
    event.preventDefault();
    await refetch();
  };

  return (
    <div>
      <p>Balance:</p>
      <p>{data?data.toString(): 0}</p>
      <p><button onClick={handleClick}>Refresh Balance</button></p>
      <hr/>
    </div>
  );
}

export default Balance;
NOTE: Replace the address with the address of your deployed contract.
Transfer Component
Craft a transfer component in components/Transfer.tsx and embed the subsequent code:
import { useAccount, useContractWrite } from "@starknet-react/core";
import React, { useState, useMemo } from "react";

function Transfer() {
    const { address } = useAccount();
    const [count] = useState(1);
    const [recipient, setRecipient] = useState('0x');
    const [amount, setAmount] = useState('1000000000000000000');

    const calls = useMemo(() => {
      const tx = {
        contractAddress: '0x001892d81e09cb2c2005f0112891dacb92a6f8ce571edd03ed1f3e549abcf37f',
        entrypoint: 'transfer',
        calldata: [recipient, amount, 0]
      };
      return Array(count).fill(tx);
    }, [address, count, recipient, amount]);

    const { write } = useContractWrite({ calls });

    return (
      <>
        <p>Transfer:</p>
        <p>
          Recipient:
          <input type="text" value={recipient} onChange={(e) => setRecipient(e.target.value)} />
        </p>
        <p>
          Amount (default: 1 MKT with 18 decimals):
          <input type="number" value={amount} onChange={(e) => setAmount(e.target.value)} />
        </p>
        <p><button onClick={() => write()}>Execute Transfer</button></p>
        <hr/>
      </>
    );
}

export default Transfer;
NOTE: Replace contractAddress with the address of your deployed contract.
Updating the Wallet Component
Proceed to modify the components/Wallet.tsx file. Replace any existing content with the following enhanced code:
"use client";
import { useAccount, useConnect, useDisconnect } from "@starknet-react/core";
import { useMemo } from "react";
import { Button } from "./ui/Button";
import Balance from './Balance'
import Transfer from './Transfer'

function WalletConnected() {
  const { address } = useAccount();
  const { disconnect } = useDisconnect();

  const shortenedAddress = useMemo(() => {
    if (!address) return "";
    return `${address.slice(0, 6)}...${address.slice(-4)}`;
  }, [address]);

  return (
    <div>
      <span>Connected: {shortenedAddress}</span>
      <p><button onClick={() => disconnect()}>Disconnect</button></p>
      <hr/>
      <Balance />
      <Transfer />
    </div>
  );
}

function ConnectWallet() {
  const { connectors, connect } = useConnect();

  return (
    <div>
      <span>Choose a wallet: </span>
      <p>
      {connectors.map((connector) => {
        return (
          <Button
            key={connector.id}
            onClick={() => connect({ connector })}
          >
            {connector.id}
          </Button>
        );
      })}
      </p>
    </div>
  );
}

export default function WalletBar() {
  const { address } = useAccount();

  return address ? <WalletConnected /> : <ConnectWallet />;
}
This updated code refines the Wallet component to offer a more interactive experience for users intending to connect or manage their wallets.
Finalizing the MKT Token Application
To finalize the application setup, we need the ABI file for the MKT token. Follow the steps below to generate and integrate it:
- At the root of your project, create a new directory named
assets/. - Inside the
assets/directory, create an empty JSON file namederc20.json. - Go back to your ERC20 Cairo project folder and locate the
erc20/target/erc20_erc20_sierra.jsonfile.
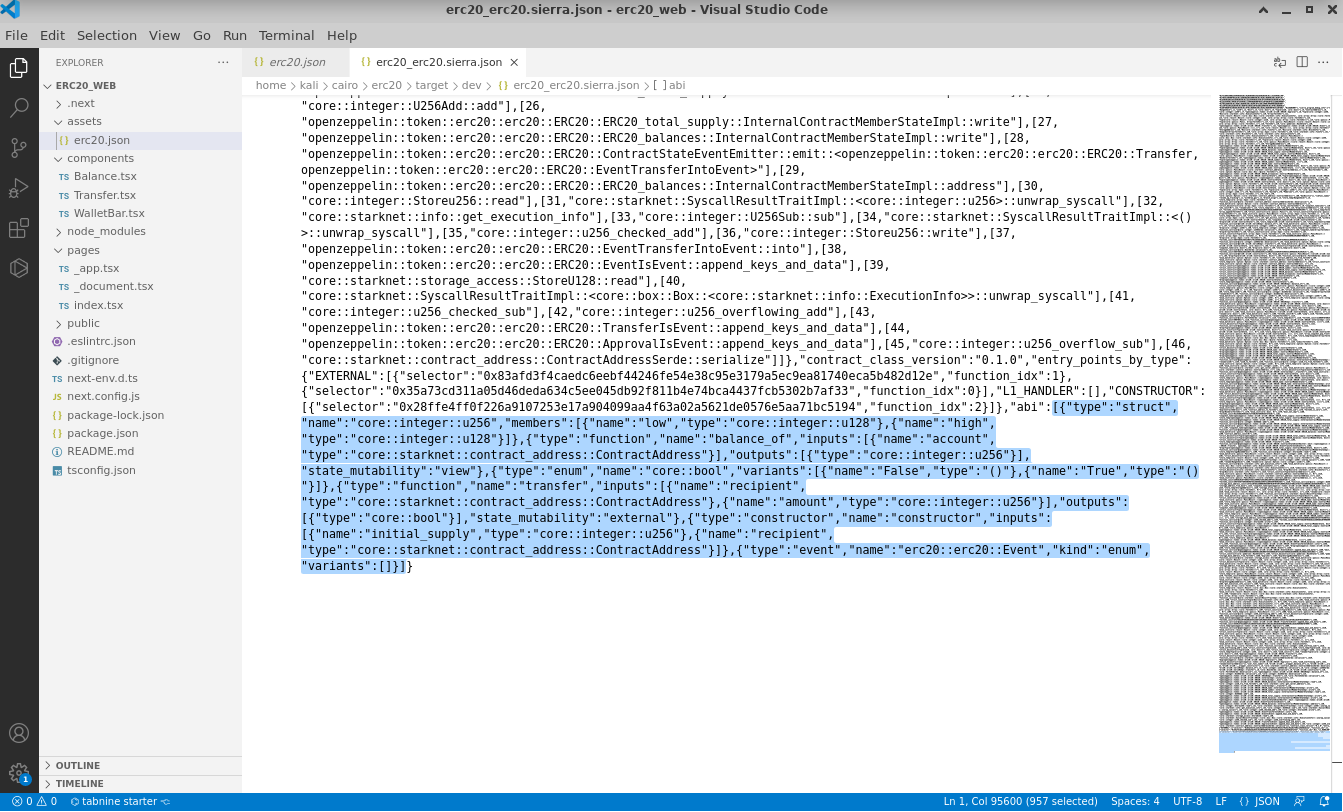
- Extract the ABI definition (ensuring you include the square brackets) and integrate it into the previously created
assets/erc20.jsonfile.

Well done! The basic MKT token application is now operational locally. Access it via http://localhost:3000 or the port noted from earlier server setup. The app allows users to connect their wallets, review their balances, and perform token transfers.
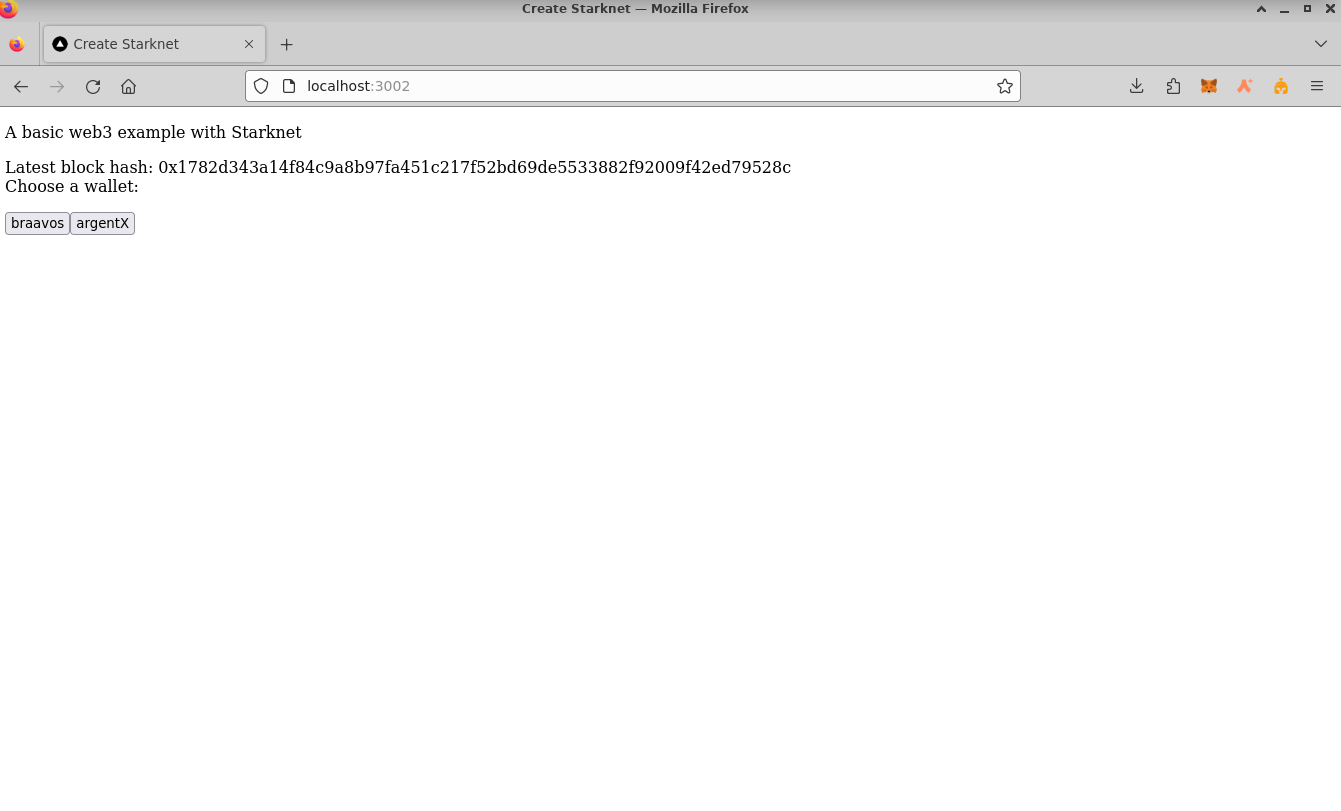
Deploying Your Project Online
To share your application with friends and allow them to check their balances and transfer tokens, publish your app online. Vercel offers a straightforward way to do this:
Set Up Vercel
- Register for an account at Vercel Signup.
- Install Vercel in your web application folder (
erc20_web):
cd erc20_web/
npm i -g vercel
vercel init
- Authenticate your Vercel account:
vercel login
After entering your email, check your inbox and click on the "Verify" button.
On successful verification, you'll receive a confirmation in the console.
- Link your project to Vercel:
vercel link
- Upload it:
vercel
- Publish your project:
vercel --prod
Congratulations! Your MKT token web3 application is now accessible to everyone.
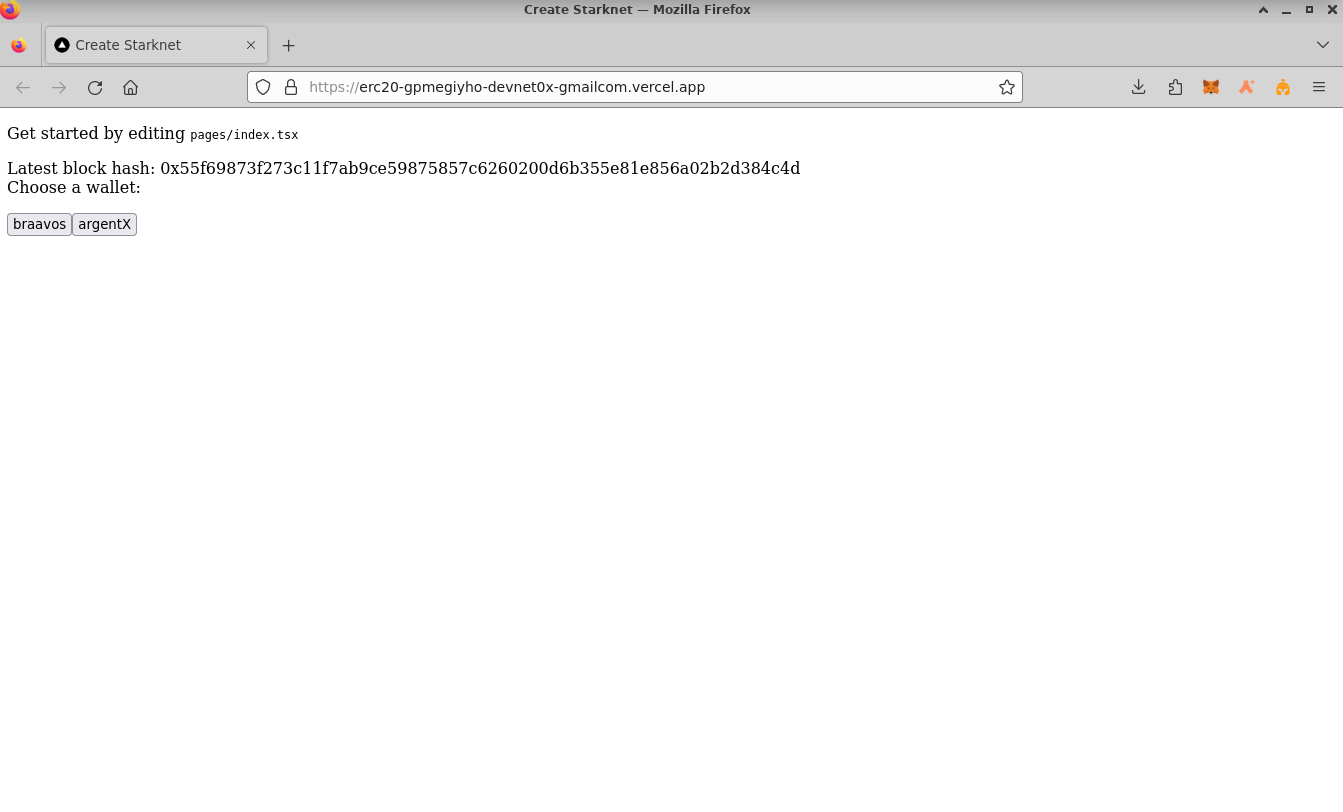
Engage with your app by:
- Connecting your wallet:
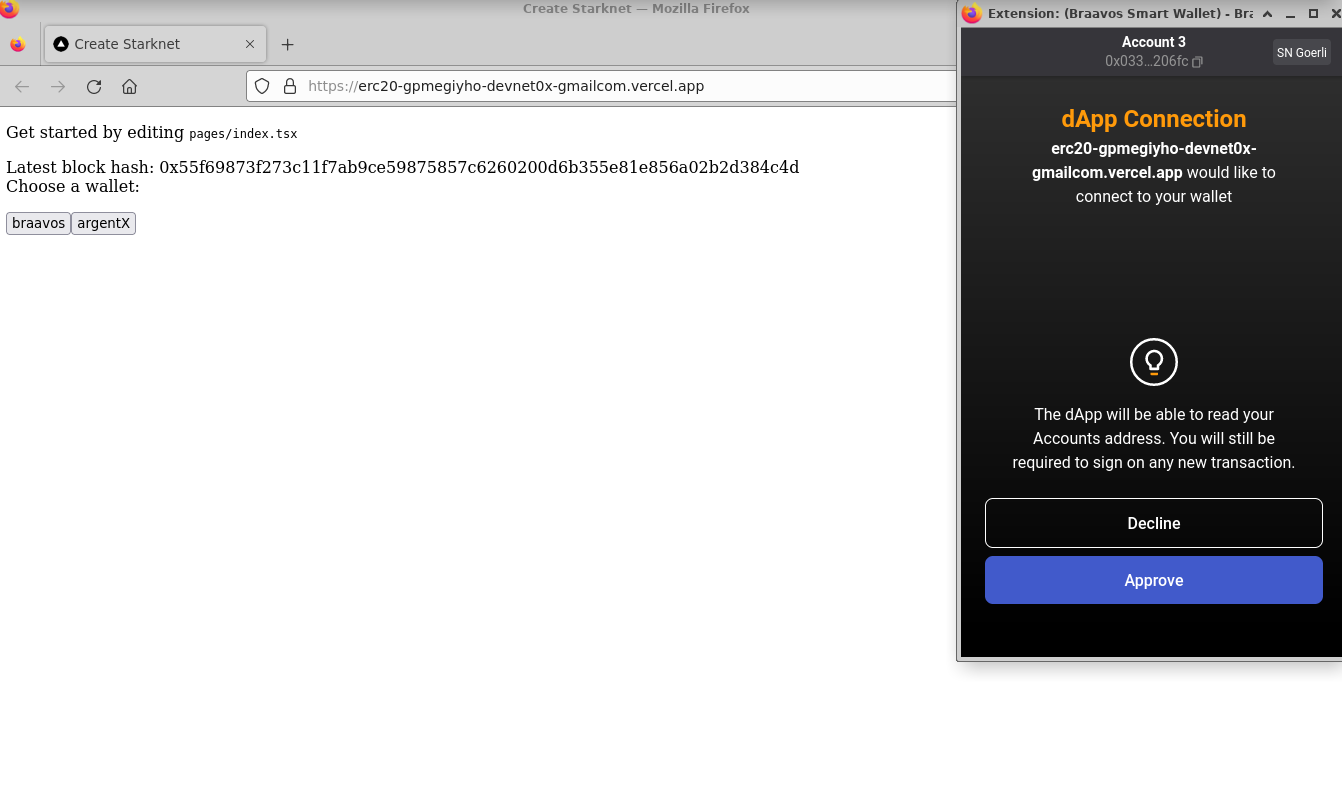
- Checking your balance:
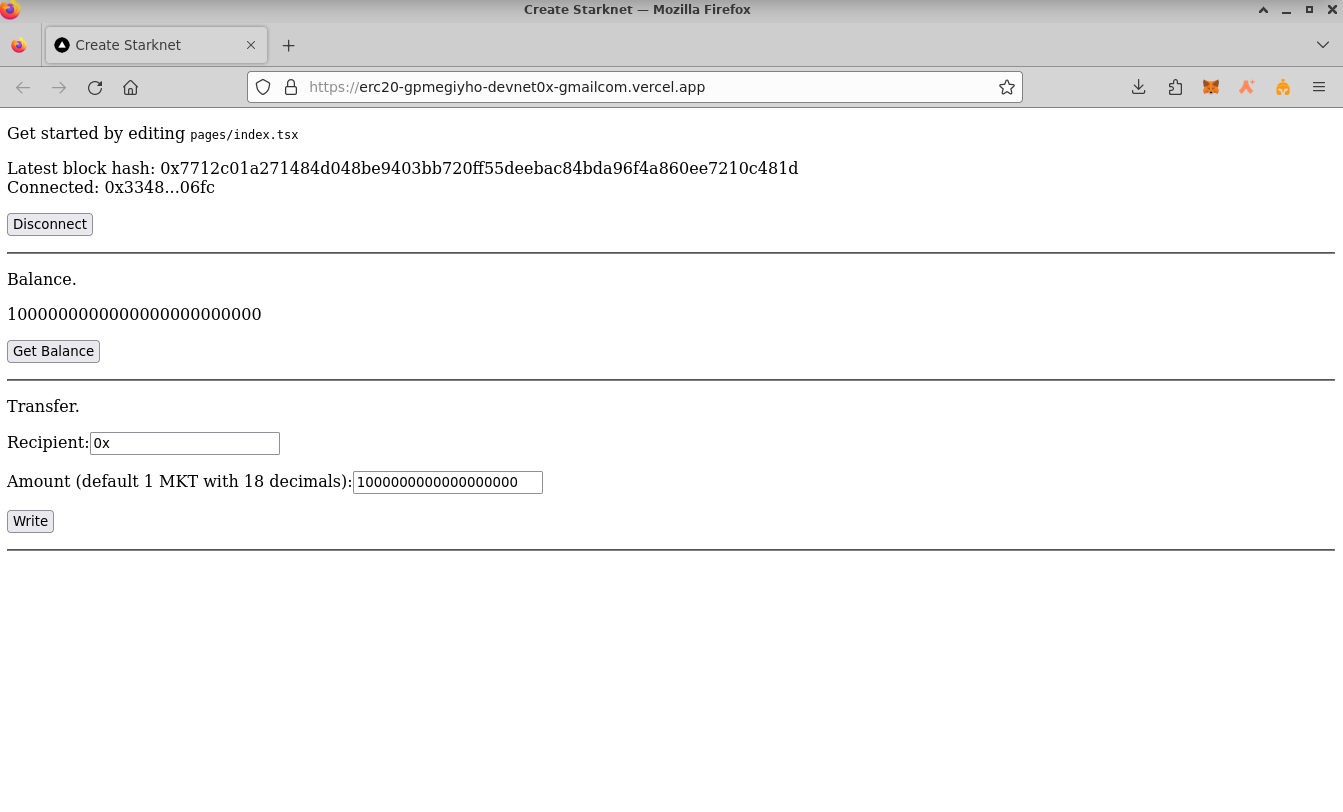
- Transferring tokens:
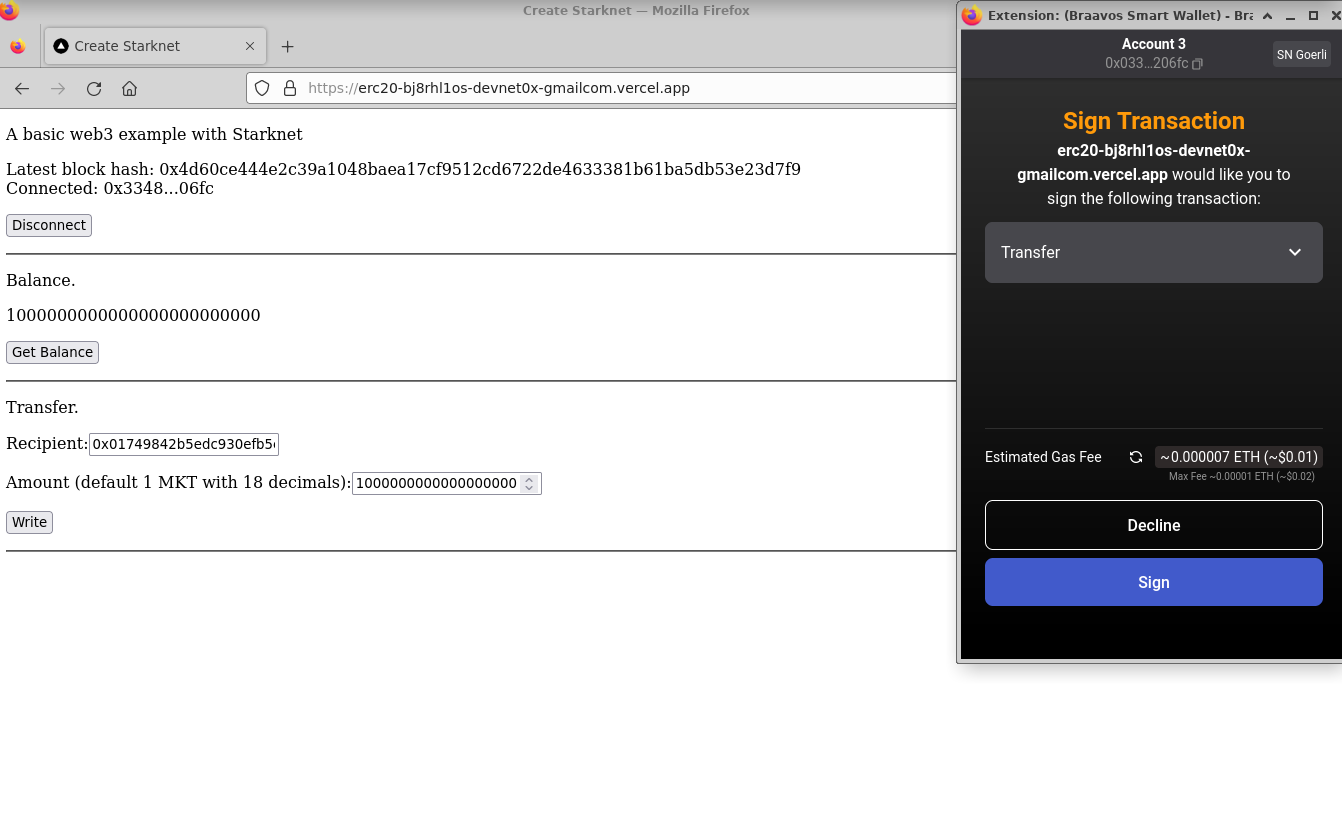
Wrapping Up
Throughout this tutorial, you've walked through the steps to craft a web3 application using React and Starknet Cairo. This application, complete with an ERC20 smart contract, offers a modern web interface for user interaction. Here's a snapshot of your achievements:
-
Project Initialization: Set up a Starknet project with Scarb and incorporated OpenZeppelin libraries.
-
Crafting the ERC20 Contract: Developed an ERC20 token using Cairo, enriched with functionalities like balance checks and token transfers. This was then compiled and launched on the Starknet network.
-
React Application: Built a React application powered by Starknet React, featuring components dedicated to balance inquiries and token transactions.
-
ABI Creation: Produced the ABI for the MKT token, a critical component to liaise with the contract.
-
Online Deployment: Brought your application to a wider audience by deploying it on Vercel. This empowered users to connect their wallets, scrutinize their balances, and execute token transactions.
The insights you've gathered from this tutorial lay a solid groundwork for creating intricate web3 applications. You're now equipped with the prowess to craft more intricate decentralized applications and smart contracts. The vast expanse of decentralized finance and blockchain is ripe for your innovative inputs. Dive in and happy coding!
Million Dollar Homepage
Starknet Homepage is a decentralized application on the Starknet blockchain. It provides a virtual space where users can claim and personalize sections of a 100x100 grid, known as "Starknet Homepage". Each section is a 10x10 pixel area. Users can acquire these sections by minting non-fungible tokens (NFTs) and then personalizing them with images and other content.
View the live app on testnet here.
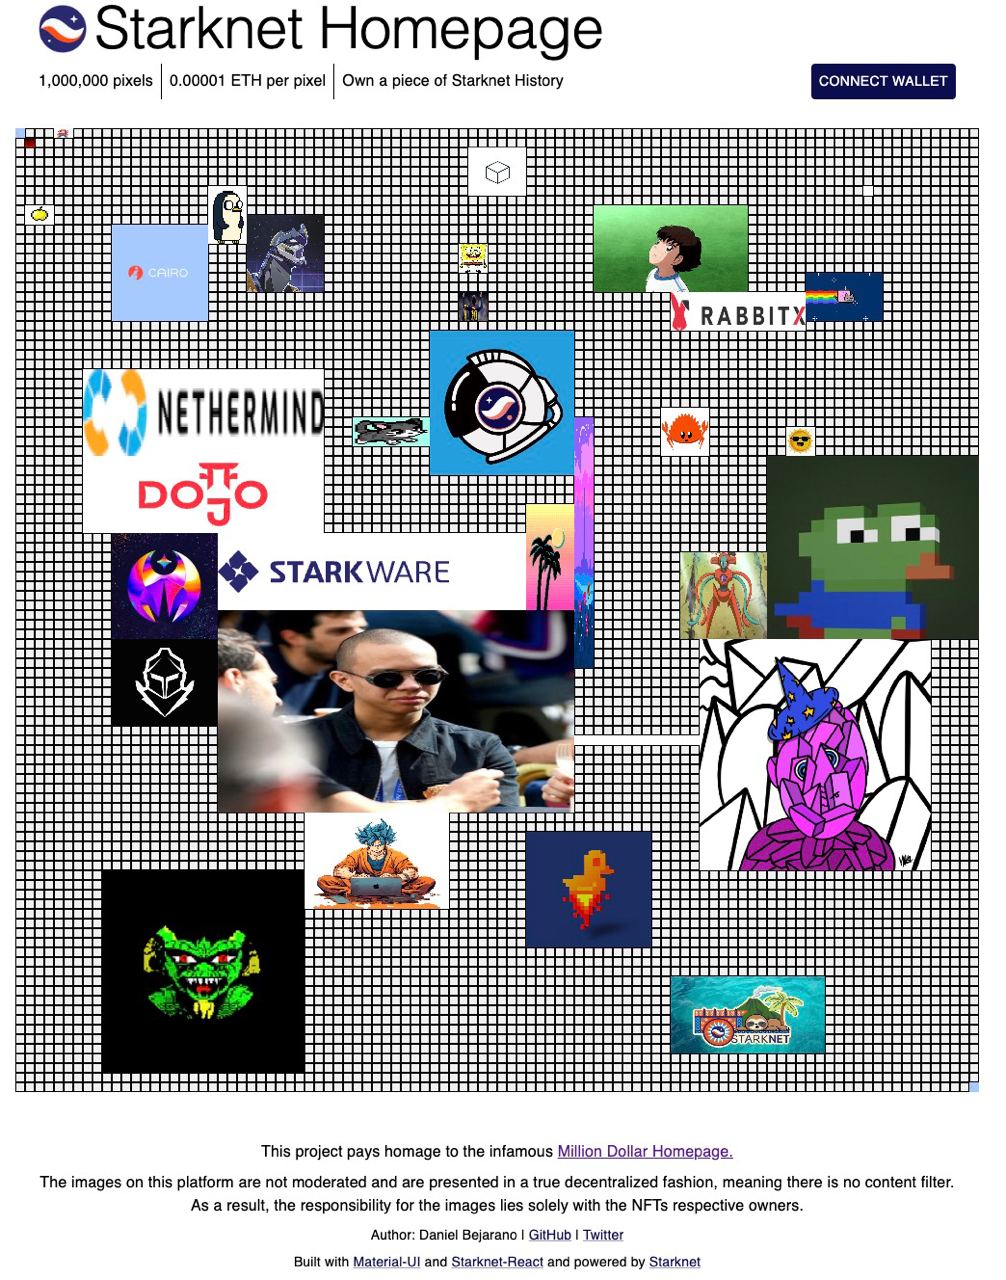
This initiative is an adaptation of the renowned Million Dollar Homepage and was conceived at the Starknet Summit 2023 Hacker House in Palo Alto, California. The following is a guide to understanding how this project was developed using the available tools in the ecosystem.
Tools Utilized:
Initial Setup
The Starknet-react app offers a command to initialize a Starknet app. This command sets up the foundational structure needed for a NextJS application.
npx create-starknet
The StarknetConfig component accepts a connectors prop, which defines wallet connection options for the user. Additionally, it can take a defaultProvider to set the network the application should connect to by default.
const connectors = [
  new InjectedConnector({ options: { id: "braavos" } }),
  new InjectedConnector({ options: { id: "argentX" } }),
];
const provider = new Provider({
  sequencer: { network: constants.NetworkName.SN_GOERLI },
});
return (
  <StarknetConfig
    autoConnect
    defaultProvider={provider}
    connectors={connectors}
  >
    <CacheProvider value={emotionCache}>
      <ThemeProvider theme={theme}>
        <Component {...pageProps} />
      </ThemeProvider>
    </CacheProvider>
  </StarknetConfig>
);
Both CacheProvider and ThemeProvider are components that facilitate the seamless integration of MaterialUI with NextJS. For a comprehensive setup guide on these components, please refer to this link.
Main Functionality
The core functionality of the Starknet Homepage centers around selecting a 4-sided region on a matrix, representing the desired 10x10 cells, and minting a token based on those cells. The responsibility of the smart contract is to validate whether the selected cells are available for minting. If a user owns Starknet Homepage tokens, they can access a dropdown to modify the token's content, including the associated image and link on the grid.
The app's primary requirements are:
- Wallet connectivity
- Grid for displaying existing tokens
- Cell selection capability
- Multicall function for token approval and minting
- Dropdown to view owned tokens
- On-chain representation of the entire 1 million pixel grid
A significant aspect to consider is the string limitation in Cairo contracts. To store links of varying sizes, they are stored as arrays of felt252s. The contract uses the following logic for this purpose:
#![allow(unused)]
fn main() {
impl StoreFelt252Array of Store<Array<felt252>> {
    fn read(address_domain: u32, base: StorageBaseAddress) -> SyscallResult<Array<felt252>> {
        StoreFelt252Array::read_at_offset(address_domain, base, 0)
    }
    fn write(
        address_domain: u32, base: StorageBaseAddress, value: Array<felt252>
    ) -> SyscallResult<()> {
        StoreFelt252Array::write_at_offset(address_domain, base, 0, value)
    }
    fn read_at_offset(
        address_domain: u32, base: StorageBaseAddress, mut offset: u8
    ) -> SyscallResult<Array<felt252>> {
        let mut arr: Array<felt252> = ArrayTrait::new();
        // Read the stored array's length. If the length is superior to 255, the read will fail.
        let len: u8 = Store::<u8>::read_at_offset(address_domain, base, offset)
            .expect('Storage Span too large');

        offset += 1;

        // Sequentially read all stored elements and append them to the array.
        let exit = len + offset;
        loop {
            if offset >= exit {
                break;
            }
            let value = Store::<felt252>::read_at_offset(address_domain, base, offset).unwrap();
            arr.append(value);
            offset += Store::<felt252>::size();
        };
        Result::Ok(arr)
    }
    fn write_at_offset(
        address_domain: u32, base: StorageBaseAddress, mut offset: u8, mut value: Array<felt252>
    ) -> SyscallResult<()> {
        // // Store the length of the array in the first storage slot. 255 of elements is max
        let len: u8 = value.len().try_into().expect('Storage - Span too large');
        Store::<u8>::write_at_offset(address_domain, base, offset, len);
        offset += 1;
        // Store the array elements sequentially
        loop {
            match value.pop_front() {
                Option::Some(element) => {
                    Store::<felt252>::write_at_offset(address_domain, base, offset, element);
                    offset += Store::<felt252>::size();
                },
                Option::None => {
                    break Result::Ok(());
                }
            };
        }
    }
    fn size() -> u8 {
        255 / Store::<felt252>::size()
    }
}
}
The storage method for links in the contract state is structured as:
#![allow(unused)]
fn main() {
struct Cell {
    token_id: u256,
    xpos: u8,
    ypos: u8,
    width: u8,
    height: u8,
    img: Array<felt252>,
    link: Array<felt252>,
}
}
The OpenZeppelin Cairo Contracts library played a crucial role in speeding up the development of the ERC721 contract for Starknet Homepage. You can find the contract for review here. Once you have installed the library, you can refer to the following example for typical usage:
#![allow(unused)]
fn main() {
#[starknet::contract]
mod MyToken {
    use starknet::ContractAddress;
    use openzeppelin::token::erc20::ERC20;
    #[storage]
    struct Storage {}
    #[constructor]
    fn constructor(
        ref self: ContractState,
        initial_supply: u256,
        recipient: ContractAddress
    ) {
        let name = 'MyToken';
        let symbol = 'MTK';
        let mut unsafe_state = ERC20::unsafe_new_contract_state();
        ERC20::InternalImpl::initializer(ref unsafe_state, name, symbol);
        ERC20::InternalImpl::_mint(ref unsafe_state, recipient, initial_supply);
    }
    #[external(v0)]
    fn name(self: @ContractState) -> felt252 {
        let unsafe_state = ERC20::unsafe_new_contract_state();
        ERC20::ERC20Impl::name(@unsafe_state)
    }
    ...
}
}
Component Logic
Grid
The Grid component represents a 100x100 matrix, with each cell being 100 pixels. This layout corresponds to the data structure found in the smart contract. To showcase the tokens already minted on the Homepage, the app employs a React Hook from starknet-react to invoke the getAllTokens function from the contract.
const [allNfts, setAllNfts] = useState<any[]>([]);
const { data, isLoading } = useContractRead({
  address: STARKNET_HOMEPAGE_ERC721_ADDRESS,
  functionName: "getAllTokens",
  abi: starknetHomepageABI,
  args: [],
});
useEffect(() => {
  if (!isLoading) {
    const arr = data?.map((nft) => {
      return deserializeTokenObject(nft);
    });
    setAllNfts(arr || []);
  }
}, [data, isLoading]);
Deserialization ensures the data from the Starknet contract is aptly transformed for frontend use. This process involves decoding the array of felt252s into extensive strings.
import { shortString, num } from "starknet";
const deserializeFeltArray = (arr: any) => {
    return arr
        .map((img: bigint) => {
            return shortString.decodeShortString(num.toHex(img));
        })
        .join("");
};
...
img: deserializeFeltArray(tokenObject.img),
link: deserializeFeltArray(tokenObject.link),
...
Furthermore, the Grid component manages the cell selection process, leading to the minting of a corresponding token. Once an area is chosen, a modal appears displaying the mint details and other necessary inputs for the call data. The intricacies of the multicall will be addressed subsequently.
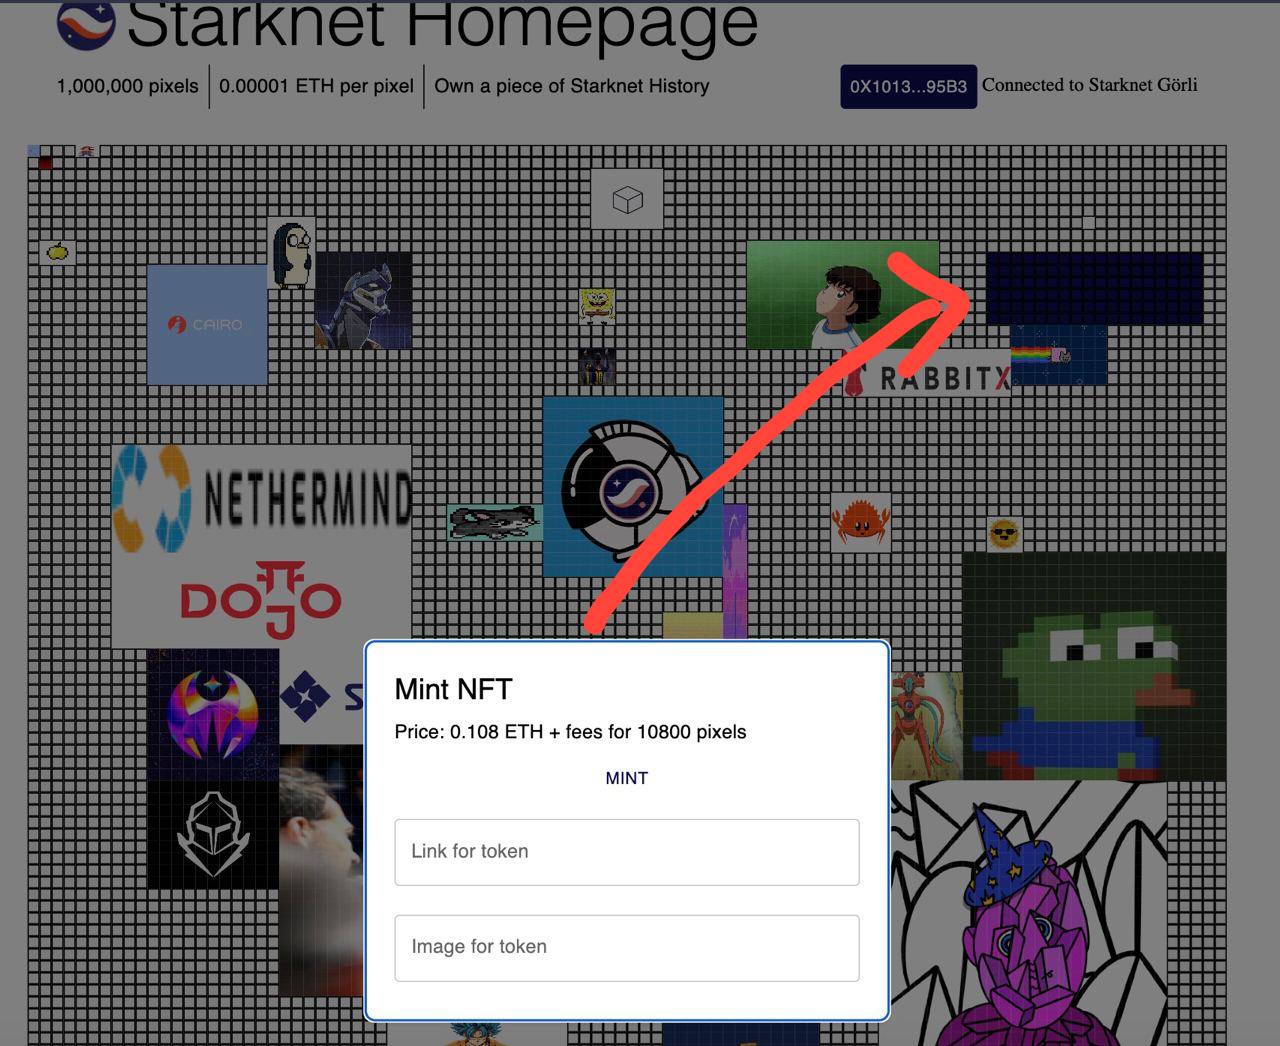
Modals
Modals offer a convenient means to present varied functionalities within the app, such as wallet connection, token minting, and token editing.
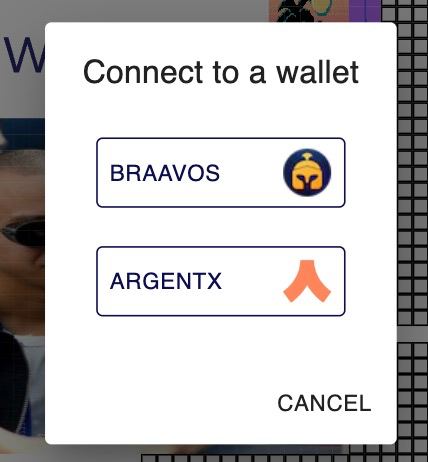
A recognized best practice is to invoke the React hook for shared information at a top-level, ensuring components like the WalletBar remain streamlined and focused.
const { address } = useAccount();

return (
    ...
    <WalletBar account={address} />
    ...
)
Below, the WalletConnected function displays the connected wallet's address, while the ConnectWallet function allows users to select and connect their wallet. The WalletBar function renders the appropriate modal based on the connection status.
function WalletConnected({ address }: { address: string }) {
const { disconnect } = useConnectors();
const { chain } = useNetwork();
const shortenedAddress = useMemo(() => {
if (!address) return "";
return `${address.slice(0, 6)}...${address.slice(-4)}`;
}, [address]);
return (
<StyledBox>
<StyledButton color="inherit" onClick={disconnect}>
{shortenedAddress}
</StyledButton>
<span> Connected to {chain && chain.name}</span>
</StyledBox>
);
}
function ConnectWallet() {
const { connectors, connect } = useConnectors();
const [open, setOpen] = useState(false);
const theme = useTheme();
const handleClickOpen = () => {
setOpen(true);
};
const handleClose = () => {
setOpen(false);
};
return (
<StyledBox>
<StyledButton color="inherit" onClick={handleClickOpen}>
Connect Wallet
</StyledButton>
<Dialog open={open} onClose={handleClose}>
<DialogTitle>Connect to a wallet</DialogTitle>
<DialogContent>
<DialogContentText>
<Grid container direction="column" alignItems="flex-start" gap={1}>
{connectors.map((connector) => (
<ConnectWalletButton
key={connector.id}
onClick={() => {
connect(connector);
handleClose();
}}
sx={{ margin: theme.spacing(1) }}
>
{connector.id}
<Image
src={`/${connector.id}-icon.png`}
alt={connector.id}
width={30}
height={30}
/>
</ConnectWalletButton>
))}
</Grid>
</DialogContentText>
</DialogContent>
<DialogActions>
<Button onClick={handleClose} color="inherit">
Cancel
</Button>
</DialogActions>
</Dialog>
</StyledBox>
);
}
export default function WalletBar({
account,
}: {
account: string | undefined;
}) {
return account ? <WalletConnected address={account} /> : <ConnectWallet />;
}
Token Dropdown
The dropdown component is dedicated to showcasing the tokens associated with the currently connected wallet. To retrieve these tokens, a transaction like the one shown below can be executed. The sole argument for this function is the contract address of the intended owner.
const readTx = useMemo(() => {
  const tx = {
    address: STARKNET_HOMEPAGE_ERC721_ADDRESS,
    functionName: "getTokensByOwner",
    abi: starknetHomepageABI,
    args: [account || "0x0000000"],
  };
  return tx;
}, [account]);

const { data, isLoading } = useContractRead(readTx);
Multicall Contract Interaction
The provided code offers an illustration of a multicall, specifically to approve a transaction for the mint price transfer followed by the actual minting action. Notably, the shortString module from starknet.js plays a pivotal role; it encodes and segments a lengthy string into an array of felt252s, the expected argument type for the contract on Starknet.
The useContractWrite is a Hook dedicated to executing a Starknet multicall, which can be employed for a singular transaction or multiple ones.
const calls = useMemo(() => {
  const splitNewImage: string[] = shortString.splitLongString(newImage);
  const splitNewLink: string[] = shortString.splitLongString(newLink);

  const tx2 = {
    contractAddress: STARKNET_HOMEPAGE_ERC721_ADDRESS,
    entrypoint: "mint",
    calldata: [
      startCell.col,
      startCell.row,
      width,
      height,
      splitNewImage,
      splitNewLink,
    ],
  };

  const price = selectedCells.length * 1000000000000000;

  const tx1 = {
    contractAddress: ERC_20_ADDRESS,
    entrypoint: "approve",
    calldata: [STARKNET_HOMEPAGE_ERC721_ADDRESS, `${price}`, "0"],
  };
  return [tx1, tx2];
}, [startCell, newImage, newLink, width, height, selectedCells.length]);

const { writeAsync: writeMulti } = useContractWrite({ calls });
Another crucial aspect to point out is the calldata of the approve function for the ether transfer: calldata: [STARKNET_HOMEPAGE_ERC721_ADDRESS, '${price}', "0"],. The amount argument is split into two parts because it's a u256, which is composed of two separate felt252 values.
Once the multicall is prepared, the next step is to initiate the function and sign the transaction using the connected wallet.
const handleMintClick = async (): Promise<void> => {
  setIsMintLoading(true);
  try {
    await writeMulti();
    setIsMintLoading(false);
    setState((prevState) => ({
      ...prevState,
      showPopup: false,
      selectedCells: [],
      mintPrice: undefined,
    }));
  } catch (error) {
    console.error("Error approving transaction:", error);
  }
};
Conditional Multicall for Token Editing
Another instructive illustration of a conditional multicall setup is the modal used to modify the data associated with a token.
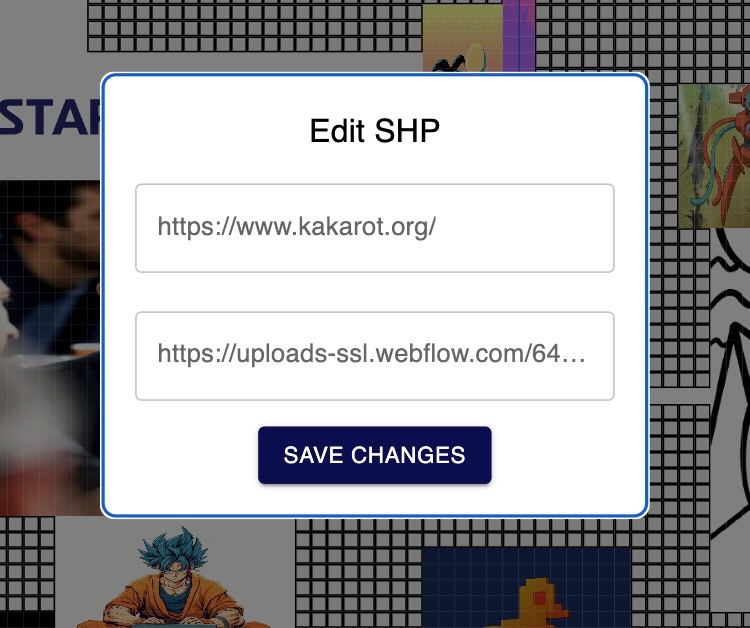
There are scenarios where the user may wish to alter just one attribute of the token, rather than both. Consequently, a conditional multicall configuration becomes necessary. It's essential to recall that the token id in the Cairo contract is defined as a u256, implying it comprises two felt252 values.
const calls = useMemo(() => {
  const txs = [];
  const splitNewImage: string[] = shortString.splitLongString(newImage);
  const splitNewLink: string[] = shortString.splitLongString(newLink);

  if (newImage !== "" && nft) {
    const tx1 = {
      contractAddress: STARKNET_HOMEPAGE_ERC721_ADDRESS,
      entrypoint: "setTokenImg",
      calldata: [nft.token_id, 0, splitNewImage],
    };
    txs.push(tx1);
  }

  if (newLink !== "" && nft) {
    const tx2 = {
      contractAddress: STARKNET_HOMEPAGE_ERC721_ADDRESS,
      entrypoint: "setTokenLink",
      calldata: [nft.token_id, 0, splitNewLink],
    };
    txs.push(tx2);
  }

  return txs;
}, [nft, newImage, newLink]);
Starknet Homepage Overview
- Grid Component: Represents a 100x100 matrix, allowing users to select cells and mint corresponding tokens. It fetches existing tokens using the
getAllTokensfunction from the contract and displays them. - Modals: Serve as the user interface for actions like wallet connection, token minting, and token editing.
- Token Dropdown: Displays tokens associated with a connected wallet. It retrieves these tokens using the
getTokensByOwnerfunction. - Multicall Contract Interaction: Enables token minting and editing. This process utilizes conditional multicalls based on user preferences, especially for editing token attributes.
Throughout the platform, string limitations in Cairo contracts require encoding lengthy strings into arrays of felt252s. The OpenZeppelin Cairo Contracts library significantly expedites the development of the ERC721 contract for the Starknet Homepage.
Starknet-py: Python SDK 🚧
Starknet.py is a Python SDK designed for integrating websites, decentralized applications, backends, and more, with Starknet. It serves as a bridge, enabling smooth interaction between your application and the Starknet blockchain.
- For detailed information, documentation, and getting started guides, visit the Starknet.py documentation.
- To access the source code, contribute, or view the latest updates, check out the Starknet.py GitHub repository.
- For community support, discussions, and staying connected with other developers, join the Starknet Discord community. Look for the
🐍starknet-pychannel in Starknet Discord.
Starknet-rs: Rust SDK 🚧
Foundry Forge: Testing
Merely deploying contracts is not the end game. Many tools have offered this capability in the past. Forge sets itself apart by hosting a Cairo VM instance, enabling the sequential execution of tests. It employs Scarb for contract compilation.
To utilize Forge, define test functions and label them with test attributes. Users can either test standalone Cairo functions or integrate contracts, dispatchers, and test contract interactions on-chain.
snForge Command-Line Usage
This section guides you through the Starknet Foundry snforge command-line tool. Learn how to set up a new project, compile the code, and execute tests.
To start a new project with Starknet Foundry, use the snforge init command and replace project_name with your project's name.
snforge init project_name
Once you've set up the project, inspect its layout:
cd project_name
tree . -L 1
The project structure is as follows:
.
├── README.md
├── Scarb.toml
├── src
└── tests
src/holds your contract source code.tests/is the location of your test files.Scarb.tomlis for project andsnforgeconfigurations.
Ensure the CASM and SIERRA code generation is active in the Scarb.toml file:
# ...
[[target.starknet-contract]]
casm = true
sierra = true
# ...
Requirements for snforge
Before you run snforge test certain prerequisites must be addressed:
- Install the latest scarb version.
- Install starknet-foundry by running this command:
curl -L https://raw.githubusercontent.com/foundry-rs/starknet-foundry/master/scripts/install.sh | sh
Follow the instructions and then run:
snfoundryup
- Check your
snforgeversion, run :snforge version
As athe time of this tutorial, we used snforge version snforge 0.16.0 which is the latest at this time.
Test
Run tests using snforge test:
snforge

Collected 2 test(s) from tesing package
Running 0 test(s) from src/
Running 2 test(s) from tests/
[PASS] tests::test_contract::test_cannot_increase_balance_with_zero_value (gas: ~1839)
[PASS] tests::test_contract::test_increase_balance (gas: ~3065)
Tests: 2 passed, 0 failed, 0 skipped, 0 ignored, 0 filtered out
Integrating snforge with Existing Scarb Projects
For those with an established Scarb project who wish to incorporate snforge, ensure the snforge_std package is declared as a dependency. Insert the line below in the [dependencies] section of your Scarb.toml:
# ...
[dependencies]
snforge_std = { git = "https://github.com/foundry-rs/starknet-foundry", tag = "v0.16.0" }
Ensure the tag version corresponds with your snforge version. To verify your snforge version:
snforge --version
Or, add this dependency using the scarb command:
scarb add snforge_std --git https://github.com/foundry-rs/starknet-foundry.git --tag v0.16.0
With these steps, your existing Scarb project is now snforge-ready.
Testing with snforge
Utilize Starknet Foundry's snforge test command to efficiently run tests.
Executing Tests
Navigate to the package directory and issue this command to run tests:
snforge
Sample output might resemble:
Collected 2 test(s) from tesingg package
Running 0 test(s) from src/
Running 2 test(s) from tests/
[PASS] tests::test_contract::test_cannot_increase_balance_with_zero_value (gas: ~1839)
[PASS] tests::test_contract::test_increase_balance (gas: ~3065)
Tests: 2 passed, 0 failed, 0 skipped, 0 ignored, 0 filtered out
Example: Testing a Simple Contract
The example provided below demonstrates how to test a Starknet contract using snforge.
#[starknet::interface]
trait IHelloStarknet<TContractState> {
    fn increase_balance(ref self: TContractState, amount: felt252);
    fn get_balance(self: @TContractState) -> felt252;
}

#[starknet::contract]
mod HelloStarknet {
    #[storage]
    struct Storage {
        balance: felt252,
    }

    #[abi(embed_v0)]
    impl HelloStarknetImpl of super::IHelloStarknet<ContractState> {
        fn increase_balance(ref self: ContractState, amount: felt252) {
            assert(amount != 0, 'Amount cannot be 0');
            self.balance.write(self.balance.read() + amount);
        }

        fn get_balance(self: @ContractState) -> felt252 {
            self.balance.read()
        }
    }
}
Remember, the identifier following mod signifies the contract name. Here, the contract name is HelloStarknet.
Craft the Test
Below is a test for the HelloStarknet contract. This test deploys HelloStarknet and interacts with its functions:
use starknet::ContractAddress;

use snforge_std::{declare, ContractClassTrait};

use tesingg::IHelloStarknetSafeDispatcher;
use tesingg::IHelloStarknetSafeDispatcherTrait;
use tesingg::IHelloStarknetDispatcher;
use tesingg::IHelloStarknetDispatcherTrait;

fn deploy_contract(name: felt252) -> ContractAddress {
    let contract = declare(name);
    contract.deploy(@ArrayTrait::new()).unwrap()
}

#[test]
fn test_increase_balance() {
    let contract_address = deploy_contract('HelloStarknet');

    let dispatcher = IHelloStarknetDispatcher { contract_address };

    let balance_before = dispatcher.get_balance();
    assert(balance_before == 0, 'Invalid balance');

    dispatcher.increase_balance(42);

    let balance_after = dispatcher.get_balance();
    assert(balance_after == 42, 'Invalid balance');
}

#[test]
fn test_cannot_increase_balance_with_zero_value() {
    let contract_address = deploy_contract('HelloStarknet');

    let safe_dispatcher = IHelloStarknetSafeDispatcher { contract_address };

    #[feature("safe_dispatcher")]
    let balance_before = safe_dispatcher.get_balance().unwrap();
    assert(balance_before == 0, 'Invalid balance');

    #[feature("safe_dispatcher")]
    match safe_dispatcher.increase_balance(0) {
        Result::Ok(_) => panic_with_felt252('Should have panicked'),
        Result::Err(panic_data) => {
            assert(*panic_data.at(0) == 'Amount cannot be 0', *panic_data.at(0));
        }
    };
}
To run the test, execute the snforge command. The expected output is:
Collected 2 test(s) from tesing package
Running 0 test(s) from src/
Running 2 test(s) from tests/
[PASS] tests::test_contract::test_cannot_increase_balance_with_zero_value (gas: ~1839)
[PASS] tests::test_contract::test_increase_balance (gas: ~3065)
Tests: 2 passed, 0 failed, 0 skipped, 0 ignored, 0 filtered out
Example: Testing ERC20 Contract
There are several methods to test smart contracts, such as unit tests, integration tests, fuzz tests, fork tests, E2E tests, and using foundry cheatcodes. This section discusses testing an ERC20 example contract from the starknet-js subchapter examples using unit and integration tests, filtering, foundry cheatcodes, and fuzz tests through the snforge CLI.
ERC20 Contract Example
After setting up your foundry project, add the following dependency to your Scarb.toml (in this case we are using version 0.8.0 of the OpenZeppelin Cairo contracts, due to the fact that it uses components):
openzeppelin = { git = "https://github.com/OpenZeppelin/cairo-contracts.git", tag = "v0.8.1" }
Here's a basic ERC20 contract:
use starknet::ContractAddress;
#[starknet::interface]
trait IERC20<TContractState> {
    fn get_name(self: @TContractState) -> felt252;
    fn get_symbol(self: @TContractState) -> felt252;
    fn get_decimals(self: @TContractState) -> u8;
    fn get_total_supply(self: @TContractState) -> u256;
    fn balance_of(self: @TContractState, account: ContractAddress) -> u256;
    fn allowance(self: @TContractState, owner: ContractAddress, spender: ContractAddress) -> u256;
    fn transfer(ref self: TContractState, recipient: ContractAddress, amount: u256);
    fn transfer_from(
        ref self: TContractState, sender: ContractAddress, recipient: ContractAddress, amount: u256
    );
    fn approve(ref self: TContractState, spender: ContractAddress, amount: u256);
    fn increase_allowance(ref self: TContractState, spender: ContractAddress, added_value: u256);
    fn decrease_allowance(
        ref self: TContractState, spender: ContractAddress, subtracted_value: u256
    );


    fn mint(ref self: TContractState, recipient: ContractAddress, amount: u256) -> bool;
}

#[starknet::contract]
mod ERC20Token {

Importing necessary libraries

    use starknet::ContractAddress;
    use starknet::get_caller_address;
    use starknet::contract_address_const;

Similar to address(0) in Solidity

    use core::zeroable::Zeroable;
    use super::IERC20;

    //Stroge Variables
    #[storage]
    struct Storage {
        name: felt252,
        symbol: felt252,
        decimals: u8,
        total_supply: u256,
        balances: LegacyMap<ContractAddress, u256>,
        allowances: LegacyMap<
            (ContractAddress, ContractAddress), u256
        >, //similar to mapping(address => mapping(address => uint256))
    }
    //  Event
    #[event]
    #[derive(Drop, starknet::Event)]
    enum Event {
        Approval: Approval,
        Transfer: Transfer
    }

    #[derive(Drop, starknet::Event)]
    struct Transfer {
        from: ContractAddress,
        to: ContractAddress,
        value: u256
    }

    #[derive(Drop, starknet::Event)]
    struct Approval {
        owner: ContractAddress,
        spender: ContractAddress,
        value: u256,
    }

The contract constructor is not part of the interface. Nor are internal functions part of the interface.

Constructor

    #[constructor]
    fn constructor(ref self: ContractState, // _name: felt252,

    recipient: ContractAddress) {
        // The .is_zero() method here is used to determine whether the address type recipient is a 0 address, similar to recipient == address(0) in Solidity.
        assert(!recipient.is_zero(), 'transfer to zero address');

        self.name.write('ERC20Token');
        self.symbol.write('ECT');
        self.decimals.write(18);
        self.total_supply.write(1000000);
        self.balances.write(recipient, 1000000);

        self
            .emit(
                Transfer { //Here, `contract_address_const::<0>()` is similar to address(0) in Solidity
                    from: contract_address_const::<0>(), to: recipient, value: 1000000
                }
            );
    }

    #[abi(embed_v0)]
    impl IERC20Impl of IERC20<ContractState> {
        fn get_name(self: @ContractState) -> felt252 {
            self.name.read()
        }
        fn get_symbol(self: @ContractState) -> felt252 {
            self.symbol.read()
        }

        fn get_decimals(self: @ContractState) -> u8 {
            self.decimals.read()
        }

        fn get_total_supply(self: @ContractState) -> u256 {
            self.total_supply.read()
        }


        fn balance_of(self: @ContractState, account: ContractAddress) -> u256 {
            self.balances.read(account)
        }

        fn allowance(
            self: @ContractState, owner: ContractAddress, spender: ContractAddress
        ) -> u256 {
            self.allowances.read((owner, spender))
        }

     fn mint(ref self: ContractState, recipient: ContractAddress, amount: u256) -> bool {
            let owner = self.owner.read();
            let caller = get_caller_address();
            assert(owner == caller, Errors::CALLER_NOT_OWNER);
            assert(!recipient.is_zero(), Errors::ADDRESS_ZERO);
            assert(self.balances.read(recipient) >= amount, Errors::INSUFFICIENT_FUND);
            self.balances.write(recipient, self.balances.read(recipient) + amount);
            self.total_supply.write(self.total_supply.read() - amount);
            // call transfer
            // Transfer(Zeroable::zero(), recipient, amount);

            true
        }


        fn transfer(ref self: ContractState, recipient: ContractAddress, amount: u256) {
            let caller = get_caller_address();
            self.transfer_helper(caller, recipient, amount);
        }

        fn transfer_from(
            ref self: ContractState,
            sender: ContractAddress,
            recipient: ContractAddress,
            amount: u256
        ) {
            let caller = get_caller_address();
            let my_allowance = self.allowances.read((sender, caller));

            assert(my_allowance > 0, 'You have no token approved');
            assert(amount <= my_allowance, 'Amount Not Allowed');
            // assert(my_allowance <= amount, 'Amount Not Allowed');

            self
                .spend_allowance(
                    sender, caller, amount
                ); //responsible for deduction of the amount allowed to spend
            self.transfer_helper(sender, recipient, amount);
        }

        fn approve(ref self: ContractState, spender: ContractAddress, amount: u256) {
            let caller = get_caller_address();
            self.approve_helper(caller, spender, amount);
        }

        fn increase_allowance(
            ref self: ContractState, spender: ContractAddress, added_value: u256
        ) {
            let caller = get_caller_address();
            self
                .approve_helper(
                    caller, spender, self.allowances.read((caller, spender)) + added_value
                );
        }

        fn decrease_allowance(
            ref self: ContractState, spender: ContractAddress, subtracted_value: u256
        ) {
            let caller = get_caller_address();
            self
                .approve_helper(
                    caller, spender, self.allowances.read((caller, spender)) - subtracted_value
                );
        }
    }

    #[generate_trait]
    impl HelperImpl of HelperTrait {
        fn transfer_helper(
            ref self: ContractState,
            sender: ContractAddress,
            recipient: ContractAddress,
            amount: u256
        ) {
            let sender_balance = self.balance_of(sender);

            assert(!sender.is_zero(), 'transfer from 0');
            assert(!recipient.is_zero(), 'transfer to 0');
            assert(sender_balance >= amount, 'Insufficient fund');
            self.balances.write(sender, self.balances.read(sender) - amount);
            self.balances.write(recipient, self.balances.read(recipient) + amount);
            true;

            self.emit(Transfer { from: sender, to: recipient, value: amount, });
        }

        fn approve_helper(
            ref self: ContractState, owner: ContractAddress, spender: ContractAddress, amount: u256
        ) {
            assert(!owner.is_zero(), 'approve from 0');
            assert(!spender.is_zero(), 'approve to 0');

            self.allowances.write((owner, spender), amount);

            self.emit(Approval { owner, spender, value: amount, })
        }

        fn spend_allowance(
            ref self: ContractState, owner: ContractAddress, spender: ContractAddress, amount: u256
        ) {
            // First, read the amount authorized by owner to spender
            let current_allowance = self.allowances.read((owner, spender));

            // define a variable ONES_MASK of type u128
            let ONES_MASK = 0xfffffffffffffffffffffffffffffff_u128;

            // to determine whether the authorization is unlimited,

            let is_unlimited_allowance = current_allowance.low == ONES_MASK
                && current_allowance
                    .high == ONES_MASK; //equivalent to type(uint256).max in Solidity.

            // This is also a way to save gas, because if the authorized amount is the maximum value of u256, theoretically, this amount cannot be spent.
            if !is_unlimited_allowance {
                self.approve_helper(owner, spender, current_allowance - amount);
            }
        }
    }
This contract allows minting tokens to a recipient during deployment, checking balances, and transferring tokens, relying on the openzeppelin ERC20 library.
Test Preparation
Organize your test file and include the required imports:
#[cfg(test)]
mod test {
    use core::serde::Serde;
    use super::{IERC20, ERC20Token, IERC20Dispatcher, IERC20DispatcherTrait};
    use starknet::ContractAddress;
    use starknet::contract_address::contract_address_const;
    use core::array::ArrayTrait;
    use snforge_std::{declare, ContractClassTrait, fs::{FileTrait, read_txt}};
    use snforge_std::{start_prank, stop_prank, CheatTarget};
    use snforge_std::PrintTrait;
    use core::traits::{Into, TryInto};
}
For testing, you'll need a helper function to deploy the contract instance.
This function requires a supply amount and recipient address:
Before deploying a starknet contract, we need a contract_class.
Get it using the declare function from starknet Foundry
Supply values the constructor arguments when deploying
    fn deploy_contract() -> ContractAddress {
        let erc20contract_class = declare('
        ERC20Token');
        let file = FileTrait::new('data/constructor_args.txt');
        let constructor_args = read_txt(@file);
        let contract_address = erc20contract_class.deploy(@constructor_args).unwrap();
        contract_address
    }
Generate an address
    mod Account {
        use starknet::ContractAddress;
        use core::traits::TryInto;

        fn User1() -> ContractAddress {
            'user1'.try_into().unwrap()
        }
        fn User2() -> ContractAddress {
            'user2'.try_into().unwrap()
        }

        fn admin() -> ContractAddress {
            'admin'.try_into().unwrap()
        }
    }
Use declare and ContractClassTrait from snforge_std. Then, initialize the supply and recipient, declare the contract, compute the calldata, and deploy.
Writing the Test Cases
Verifying the contract details After Deployment using Fuzz testing
To begin, test the deployment helper function to confirm the details provided:
#[test]
    fn test_constructor() {
        let contract_address = deploy_contract();
        let dispatcher = IERC20Dispatcher { contract_address };
        // let name = dispatcher.get_name();
        let name = dispatcher.get_name();

        assert(name == 'ERC20Token', 'name is not correct');
    }

    #[test]
    fn test_decimal_is_correct() {
        let contract_address = deploy_contract();
        let dispatcher = IERC20Dispatcher { contract_address };
        let decimal = dispatcher.get_decimals();

        assert(decimal == 18, 'Decimal is not correct');
    }

    #[test]
    fn test_total_supply() {
        let contract_address = deploy_contract();
        let dispatcher = IERC20Dispatcher { contract_address };
        let total_supply = dispatcher.get_total_supply();

        assert(total_supply == 1000000, 'Total supply is wrong');
    }

    #[test]
    fn test_address_balance() {
        let contract_address = deploy_contract();
        let dispatcher = IERC20Dispatcher { contract_address };
        let balance = dispatcher.get_total_supply();
        let admin_balance = dispatcher.balance_of(Account::admin());
        assert(admin_balance == balance, Errors::INVALID_BALANCE);

        start_prank(CheatTarget::One(contract_address), Account::admin());

        dispatcher.transfer(Account::user1(), 10);
        let new_admin_balance = dispatcher.balance_of(Account::admin());
        assert(new_admin_balance == balance - 10, Errors::INVALID_BALANCE);
        stop_prank(CheatTarget::One(contract_address));

        let user1_balance = dispatcher.balance_of(Account::user1());
        assert(user1_balance == 10, Errors::INVALID_BALANCE);
    }

    #[test]
    #[fuzzer(runs: 22, seed: 38)]
    fn test_allowance(amount: u256) {
        let contract_address = deploy_contract();
        let dispatcher = IERC20Dispatcher { contract_address };

        start_prank(CheatTarget::One(contract_address), Account::admin());
        dispatcher.approve(contract_address, 20);

        let currentAllowance = dispatcher.allowance(Account::admin(), contract_address);

        assert(currentAllowance == 20, Errors::NOT_ALLOWED);
        stop_prank(CheatTarget::One(contract_address));
    }

    #[test]
    fn test_transfer() {
        let contract_address = deploy_contract();
        let dispatcher = IERC20Dispatcher { contract_address };

        // Get original balances
        let original_sender_balance = dispatcher.balance_of(Account::admin());
        let original_recipient_balance = dispatcher.balance_of(Account::user1());

        start_prank(CheatTarget::One(contract_address), Account::admin());

        dispatcher.transfer(Account::user1(), 50);

        // Confirm that the funds have been sent!
        assert(
            dispatcher.balance_of(Account::admin()) == original_sender_balance - 50,
            Errors::FUNDS_NOT_SENT
        );

        // Confirm that the funds have been recieved!
        assert(
            dispatcher.balance_of(Account::user1()) == original_recipient_balance + 50,
            Errors::FUNDS_NOT_RECIEVED
        );

        stop_prank(CheatTarget::One(contract_address));
    }


    #[test]
    fn test_transfer_from() {
        let contract_address = deploy_contract();
        let dispatcher = IERC20Dispatcher { contract_address };

        start_prank(CheatTarget::One(contract_address), Account::admin());
        dispatcher.approve(Account::user1(), 20);
        stop_prank(CheatTarget::One(contract_address));

        assert(dispatcher.allowance(Account::admin(), Account::user1()) == 20, Errors::NOT_ALLOWED);

        start_prank(CheatTarget::One(contract_address), Account::user1());
        dispatcher.transfer_from(Account::admin(), Account::user2(), 10);
        assert(
            dispatcher.allowance(Account::admin(), Account::user1()) == 10, Errors::FUNDS_NOT_SENT
        );
        stop_prank(CheatTarget::One(contract_address));
    }

    #[test]
    #[should_panic(expected: ('Amount Not Allowed',))]
    fn test_transfer_from_should_fail() {
        let contract_address = deploy_contract();
        let dispatcher = IERC20Dispatcher { contract_address };
        start_prank(CheatTarget::One(contract_address), Account::admin());
        dispatcher.approve(Account::user1(), 20);
        stop_prank(CheatTarget::One(contract_address));

        start_prank(CheatTarget::One(contract_address), Account::user1());
        dispatcher.transfer_from(Account::admin(), Account::user2(), 40);
    }

    #[test]
    #[should_panic(expected: ('You have no token approved',))]
    fn test_transfer_from_failed_when_not_approved() {
        let contract_address = deploy_contract();
        let dispatcher = IERC20Dispatcher { contract_address };
        start_prank(CheatTarget::One(contract_address), Account::user1());
        dispatcher.transfer_from(Account::admin(), Account::user2(), 5);
    }

    #[test]
    fn test_approve() {
        let contract_address = deploy_contract();
        let dispatcher = IERC20Dispatcher { contract_address };

        start_prank(CheatTarget::One(contract_address), Account::admin());
        dispatcher.approve(Account::user1(), 50);
        assert(dispatcher.allowance(Account::admin(), Account::user1()) == 50, Errors::NOT_ALLOWED);
    }

    #[test]
    fn test_increase_allowance() {
        let contract_address = deploy_contract();
        let dispatcher = IERC20Dispatcher { contract_address };

        start_prank(CheatTarget::One(contract_address), Account::admin());
        dispatcher.approve(Account::user1(), 30);
        assert(dispatcher.allowance(Account::admin(), Account::user1()) == 30, Errors::NOT_ALLOWED);

        dispatcher.increase_allowance(Account::user1(), 20);

        assert(
            dispatcher.allowance(Account::admin(), Account::user1()) == 50,
            Errors::ERROR_INCREASING_ALLOWANCE
        );
    }

    #[test]
    fn test_decrease_allowance() {
        let contract_address = deploy_contract();
        let dispatcher = IERC20Dispatcher { contract_address };

        start_prank(CheatTarget::One(contract_address), Account::admin());
        dispatcher.approve(Account::user1(), 30);
        assert(dispatcher.allowance(Account::admin(), Account::user1()) == 30, Errors::NOT_ALLOWED);

        dispatcher.decrease_allowance(Account::user1(), 5);

        assert(
            dispatcher.allowance(Account::admin(), Account::user1()) == 25,
            Errors::ERROR_DECREASING_ALLOWANCE
        );
    }
Running snforge test produces:
   Collected 12 test(s) from te package
Running 12 test(s) from src/
[PASS] testing::ERC20Token::test::test_total_supply (gas: ~1839)
[PASS] testing::ERC20Token::test::test_decimal_is_correct (gas: ~3065)
[PASS] testing::ERC20Token::test::test_approve (gas: ~3165)
[PASS] testing::ERC20Token::test::test_decrease_allowance (gas: ~1015)
[PASS] testing::ERC20Token::test::test_constructor (gas: ~3067)
[PASS] testing::ERC20Token::test::test_transfer_from (gas: ~6130)
[PASS] testing::ERC20Token::test::test_transfer_from_should_fail (gas: ~3145)
[PASS] testing::ERC20Token::test::test_allowance (gas: ~5123)
[PASS] testing::ERC20Token::test::test_transfer (gas: ~3065)
[PASS] testing::ERC20Token::test::test_transfer_from_failed_when_not_approved (gas: ~3165)
[PASS] testing::ERC20Token::test::test_address_balance (gas: ~7335)
[PASS] testing::ERC20Token::test::test_increase_allowance(gas: ~3125)
Tests: 12 passed, 0 failed, 0 skipped, 0 ignored, 0 filtered out
Fuzz Testing
Fuzz testing introduces random inputs to the code to identify vulnerabilities, security issues, and unforeseen behaviors. While you can manually provide these inputs, automation is preferable when testing a broad set of values.
Let discuss Random Fuzz Testing as a type of Fuzz testing:
Random Fuzz testing
To convert a test to a random fuzz test, simply add arguments to the test function. These arguments can then be used in the test body. The test will be run many times against different randomly generated values.
See the example below in test_fuzz.cairo:
fn sum(a: felt252, b: felt252) -> felt252 {
    return a + b;
}

#[test]
fn test_sum(x: felt252, y: felt252) {
    assert(sum(x, y) == x + y, 'sum incorrect');
}
Then run snforge test
Running 0 test(s) from tests/
Tests: 0 passed, 1 failed, 0 skipped, 0 ignored, 0 filtered out


    Running 0 test(s) from src/
    Running 1 test(s) from tests/
    [PASS] tests::test_fuzz::test_fuzz_sum (fuzzer runs = 256)
    Tests: 1 passed, 0 failed, 0 skipped
Fuzzer seed: 214510115079707873
The fuzzer supports these types by February 2024:
- u8
- u16
- u32
- u64
- u128
- u256
- felt252
Fuzzer Configuration
It is possible to configure the number of runs of the random fuzzer as well as its seed for a specific test case:
#[test]
#[fuzzer(runs: 22, seed: 38)]
fn test_sum(x: felt252, y: felt252) {
    assert(sum(x, y) == x + y, 'sum incorrect');
}
It can also be configured globally, via command line arguments:
$ snforge test --fuzzer-runs 1234 --fuzzer-seed 1111
Or in scarb.toml:
# ...
[tool.snforge]
fuzzer_runs = 1234
fuzzer_seed = 1111
# ...
For more insight on fuzz tests, you can view it here
Filter Tests
To execute specific tests, use a filter string with the snforge command. Tests matching the filter based on their absolute module tree path will be executed.
For instance, to run all tests with the string 'test_' in their name:
snforge test_
Expected output:
    Collected 3 test(s) from erc20_contract package
    Running 0 test(s) from src/
    Running 3 test(s) from tests/
    [PASS] tests::test_erc20::tests::test_balance_of
    [PASS] tests::test_erc20::tests::test_transfer
    [PASS] tests::test_fuzz::test_fuzz_sum (fuzzer runs = 256)
    Tests: 3 passed, 0 failed, 0 skipped
    Fuzzer seed: 10426315620495146768
All the tests with the string 'test_' in their test name went through.
Another example: To filter and run test_fuzz_sum we can partially match the test name with the string 'fuzz_sum' like this:
snforge test_fuzz_sum
To execute an exact test, combine the --exact flag with a fully qualified test name:
snforge package_name::test_name --exact
To halt the test suite upon the first test failure, use the --exit-first flag:
snforge --exit-first
If a test fails, the output will resemble:
    Collected 3 test(s) from erc20_contract package
    Running 0 test(s) from src/
    Running 3 test(s) from tests/
    [FAIL] tests::test_erc20::tests::test_balance_of

    Failure data:
    original value: [381278114803728420489684244530881381], converted to a string: [Invalid Balance]

    [SKIP] tests::test_erc20::tests::test_transfer
    [SKIP] tests::test_fuzz::test_fuzz_sum
    Tests: 0 passed, 1 failed, 2 skipped

    Failures:
        tests::test_erc20::tests::test_balance_of
Conclusion
Starknet Foundry offers a notable step forward in Starknet contract development and testing. This toolset sharpens the process of creating, deploying, and testing Cairo contracts. Its main components, Forge and Cast, provide developers with robust tools for Cairo contract work.
Forge shines with its dual functionality: deploying and thoroughly testing Cairo contracts. It directly supports test writing in Cairo, removing the need for other languages and simplifying the task. Moreover, Forge seamlessly integrates with Scarb, emphasizing its adaptability, especially with existing Scarb projects.
The snforge command-line tool makes initializing, setting up, and testing Starknet contracts straightforward.
Security Considerations
In blockchain programming, understanding and mitigating smart contract vulnerabilities is vital to maintain user trust. This is as true for Cairo as any other language.
We'll cover common security issues and Starknet-specific vulnerabilities in Cairo, along with strategies to safeguard your contracts.
Your insights can enhance this chapter. To contribute, submit a pull request to the Book repo.
Note: Some code examples here are simplified pseudo-code, meant for concept explanation, not for production use.
1. Access Control
Access control vulnerabilities occur when a smart contract's functions are insufficiently protected, allowing unauthorized actions. This can result in unexpected behavior and data manipulation.
Take, for instance, a smart contract for token minting without proper access control:
#![allow(unused)]
fn main() {
#[starknet::contract]
mod Token {
    #[storage]
    struct Storage {
        total_supply: u256, // Stores the total supply of tokens.
    }

    #[external(v0)]
    impl ITokenImpl of IToken {
        fn mint_tokens(ref self: ContractState, amount: u256) {
            // The mint_tokens function updates the total supply.
            // Without access control, any user can call this function, posing a risk.
            self.total_supply.write(self.total_supply.read() + amount);
        }
    }
}
}
In this code, the mint_tokens function is vulnerable because any user can call it, leading to potential token supply exploitation. Implementing access controls would restrict this function to authorized users only.
Recommendation
To prevent access control vulnerabilities, integrate authorization mechanisms like role-based access control (RBAC) or ownership checks. You can develop a custom solution or use templates from sources like OpenZeppelin.
In our earlier example, we can enhance security by adding an owner variable, initializing the owner in the constructor, and including a verification in the mint_tokens function to allow only the owner to mint tokens.
#![allow(unused)]
fn main() {
#[starknet::contract]
mod Token {

    #[storage]
    struct Storage {
        owner: ContractAddress, // New variable to store the contract owner's address.
        total_supply: u256,
    }

    #[constructor]
    fn constructor(ref self: ContractState,) {
        let sender = get_caller_address(); // Get the address of the contract creator.
        self.owner.write(sender); // Set the creator as the owner.
    }

    #[external(v0)]
    impl ITokenImpl of IToken {
        fn mint_tokens(ref self: ContractState, amount: u256) {
            // Check if the caller is the owner before minting tokens.
            let sender = get_caller_address();
            assert(sender == self.owner.read()); // Assert ensures only the owner can mint.

            self.total_supply.write(self.total_supply.read() + amount);
        }
    }
}
}
By establishing robust access control, you ensure that only authorized entities execute your smart contract functions, significantly reducing the risk of unauthorized interference.
2. Reentrancy
Reentrancy vulnerabilities arise when a smart contract calls an external contract before updating its state. This allows the external contract to recursively call the original function, potentially leading to unintended behavior.
Consider a game contract where whitelisted addresses can mint an NFT sword and then execute an on_receive_sword() function before returning it. This NFT contract is at risk of a reentrancy attack, where an attacker can mint multiple swords.
#![allow(unused)]
fn main() {
#[storage]
struct Storage {
    available_swords: u256, // Stores available swords.
    sword: LegacyMap::<ContractAddress, u256>, // Maps swords to addresses.
    whitelisted: LegacyMap::<ContractAddress, u256>, // Tracks whitelisted addresses.
    ...
    ...
}

#[constructor]
fn constructor(ref self: ContractState,) {
    self.available_swords.write(100); // Initializes the sword count.
}

#[external(v0)]
impl IGameImpl of IGame {
    fn mint_one_sword(ref self: ContractState) {
        let sender = get_caller_address();
        if self.whitelisted.read(sender) {
            // Update the sword count before minting.
            let sword_count = self.available_swords.read();
            self.available_swords.write(sword_count - 1);
            // Mint a sword.
            self.sword.write(sender, 1);
            // Callback to sender's contract.
            let callback = ICallerDispatcher { contract_address: sender }.on_receive_sword();
            // Remove sender from whitelist after callback to prevent reentrancy.
            self.whitelisted.write(sender, false);
        }
}
}
An attacker's contract can implement the on_receive_sword function to exploit the reentry vulnerability and mint multiple swords by calling mint_one_sword again before removing the sender from the whitelist:
#![allow(unused)]
fn main() {
fn on_receive_sword(ref self: ContractState) {
    let nft_sword_contract = get_caller_address();
    let call_number: felt252 = self.total_calls.read();
    self.total_calls.write(call_number + 1);
    if call_number < 10 {
        // Attempt to mint a sword again.
        let call = ISwordDispatcher { contract_address: nft_sword_contract }.mint_one_sword();
    }
}
}
Reentrancy protections are critical in many ERC standards with safeTransfer functions (like ERC721, ERC777, ERC1155, ERC223) and in flash loans, where borrower contracts need to safely use and return funds.
Recommendation:
To prevent reentrancy attacks, use the check-effects-interactions pattern. This means updating your contract's internal state before interacting with external contracts. In the previous example, remove the sender from the whitelist before making the external call.
#![allow(unused)]
fn main() {
if self.whitelisted.read(sender) {
    // Update the sword count first.
    let sword_count = self.available_swords.read();
    self.available_swords.write(sword_count - 1);
    // Mint a sword to the caller.
    self.sword.write(sender, 1);
    // Crucially, remove the sender from the whitelist before the external call.
    self.whitelisted.write(sender, false);
    // Only then, make the callback to the sender.
    let callback = ICallerDispatcher { contract_address: sender }.on_receive_sword();
}
}
Adhering to this pattern enhances the security of your smart contract by minimizing the risk of reentrancy attacks and preserving the integrity of its internal state.
3. Tx.Origin Authentication
In Solidity, tx.origin is a global variable that stores the address of the transaction initiator, while msg.sender stores the address of the transaction caller. In Cairo, we have the account_contract_address global variable and get_caller_address function, which serve the same purpose.
Using account_contract_address (the equivalent of tx.origin) for authentication in your smart contract functions can lead to phishing attacks. Attackers can create custom smart contracts and trick users into placing them as intermediaries in a transaction call, effectively impersonating the contract owner.
For example, consider a Cairo smart contract that allows transferring funds to the owner and uses account_contract_address for authentication:
#![allow(unused)]
fn main() {
use starknet::get_caller_address;
use box::BoxTrait;

struct Storage {
    owner: ContractAddress, // Stores the owner's address.
}

#[constructor]
fn constructor(){
    // Initialize the owner as the contract deployer.
    let contract_deployer = get_caller_address();
    self.owner.write(contract_deployer)
}

#[external(v0)]
impl ITokenImpl of IToken {
    fn transferTo(ref self: ContractState, to: ContractAddress, amount: u256) {
        let tx_info = starknet::get_tx_info().unbox();
        let authorizer: ContractAddress = tx_info.account_contract_address;
        // Verifies the transaction initiator as the owner.
        assert(authorizer == self.owner.read());
        // Processes the fund transfer.
        self.balance.write(to + amount);
    }
}
}
An attacker can trick the owner into using a malicious contract, allowing the attacker to call the transferTo function and impersonate the contract owner:
#![allow(unused)]
fn main() {
#[starknet::contract]
mod MaliciousContract {
...
...
#[external(v0)]
impl IMaliciousContractImpl of IMaliciousContract {
    fn transferTo(ref self: ContractState, to: ContractAddress, amount: u256) {
        // Malicious callback to transfer funds.
        let callback = ICallerDispatcher { contract_address: sender }.transferTo(ATTACKER_ACCOUNT, amount);
    }
}
}
Recommendation:
To guard against phishing attacks, replace account_contract_address (origin) authentication with get_caller_address (sender) in the transferTo function:
#![allow(unused)]
fn main() {
use starknet::get_caller_address;

struct Storage {
    owner: ContractAddress, // Stores the owner's address.
}

#[constructor]
fn constructor(){
    // Initialize the owner as the contract deployer.
    let contract_deployer = get_caller_address();
    self.owner.write(contract_deployer)
}

#[external(v0)]
impl ITokenImpl of IToken {
    fn transferTo(ref self: ContractState, to: ContractAddress, amount: u256) {
        let authorizer = get_caller_address();
        // Verify that the caller is the owner.
        assert(authorizer == self.owner.read());
        // Execute the fund transfer.
        self.balance.write(to + amount);
    }
}
}
This change ensures secure authentication, preventing unauthorized users from executing critical functions and safeguarding against phishing attempts.
4. Handling Overflow and Underflow in Smart Contracts
Overflow and underflow vulnerabilities arise from assigning values too large (overflow) or too small (underflow) for a specific data type.
Consider the felt252 data type: adding or subtracting values beyond its range can yield incorrect results:
#![allow(unused)]
fn main() {
    fn overflow_felt252() -> felt252 {
        // Assigns the maximum felt252 value: 2^251 + 17 * 2^192
        let max: felt252 = 3618502788666131106986593281521497120414687020801267626233049500247285301248 + 17 * 6277101735386680763835789423207666416102355444464034512896;
        // Attempting to add beyond the maximum value.
        max + 3
    }

    fn underflow_felt252() -> felt252 {
        let min: felt252 = 0;
        // Same maximum value as in overflow.
        let subtract = (3618502788666131106986593281521497120414687020801267626233049500247285301248 + 17 * 6277101735386680763835789423207666416102355444464034512896);
        // Subtracting more than the minimum, leading to underflow.
        min - subtract
    }
}
Executing these functions will result in incorrect values due to overflow and underflow, as illustrated in the following image:

Recommendation:
To prevent incorrect results, use protected data types like u128 or u256, which are designed to manage overflows and underflows.
Here's how you can use the u256 data type to handle these issues:
#![allow(unused)]
fn main() {
    fn overflow_u256() -> u256 {
        let max_u128: u128 = 0xffffffffffffffffffffffffffffffff_u128; // Maximum u128 value.
        let max: u256 = u256 { low: max_u128, high: max_u128 }; // Maximum u256 value.
        let three: u256 = u256 { low: 3_u128, high: 0_u128 }; // Value of 3.
        max + three // Attempting to add beyond max, will trigger overflow protection.
    }

    fn underflow_u256() -> u256 {
        let min: u256 = u256 { low: 0_u128, high: 0_u128 }; // Zero value for u256.
        let three: u256 = u256 { low: 3_u128, high: 0_u128 }; // Value of 3.
        min - three // Attempting to subtract from zero, will trigger underflow protection.
    }
}
When these functions encounter overflows or underflows, the transaction will revert, as shown in these images:


Failure reasons for u256:
- Overflow:
0x753235365f616464204f766572666c6f77=u256_add Overflow - Underflow:
0x753235365f737562204f766572666c6f77=u256_sub Overflow
Similarly, the u128 data type can be used to handle overflow and underflow:
#![allow(unused)]
fn main() {
    fn overflow_u128() -> u128 {
        let max: u128 = 0xffffffffffffffffffffffffffffffff_u128; // Maximum u128 value.
        max + 3_u128 // Adding to max, overflow protection triggers if necessary.
    }

    fn underflow_u128() -> u128 {
        let min: u128 = 0_u128; // Zero value for u128.
        min - 3_u128 // Subtracting from zero, underflow protection activates if needed.
    }
}
Overflow or underflow in u128 will similarly revert the transaction, with corresponding failure reasons:


Failure reasons for u128:
- Overflow:
0x753132385f616464204f766572666c6f77=u128_add Overflow - Underflow:
0x753132385f737562204f766572666c6f77=u128_sub Overflow
Using these data types, you can ensure safer arithmetic operations in your smart contracts, avoiding unintended consequences of overflows and underflows.
5. Private Data On-Chain.
Storing secret values in smart contracts presents a challenge because all on-chain data is publicly accessible, even if the code isn't published. For example, consider a smart contract storing a password (12345678) using a constructor parameter:
#![allow(unused)]
fn main() {
#[starknet::contract]
mod StoreSecretPassword {
    struct Storage {
        password: felt252, // Field to store the password.
    }

    #[constructor]
    fn constructor(_password: felt252) {
        // Writing the password to the storage.
        self.password.write(_password);
    }
}
}

However, understanding Cairo's storage layout, we can create a script to read the stored variable:
import { Provider, hash } from "starknet";

const provider = new Provider({
  sequencer: {
    network: "goerli-alpha",
  },
});

var passHash = hash.starknetKeccak("password");
console.log(
  "getStor=",
  await provider.getStorageAt(
    "0x032d0392eae7440063ea0f3f50a75dbe664aaa1df76b4662223430851a113369",
    passHash,
    812512,
  ),
);
Executing this script reveals the stored password value (hex value of 12345678):

Moreover, using a block explorer, we can view the deployed parameters in the transaction:
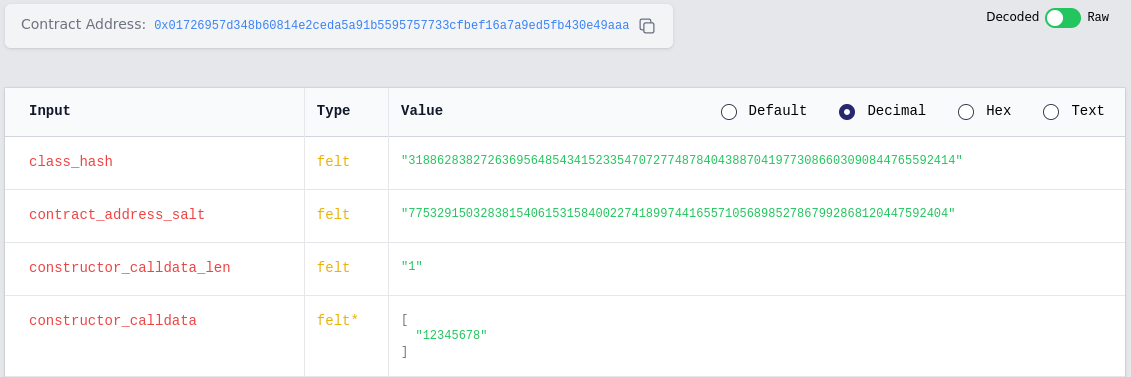
Recommendation:
If your smart contract requires storing private data on-chain, consider off-chain encryption before sending data to the blockchain. Alternatively, explore options like hashes, merkle trees, or commit-reveal patterns to maintain data privacy.
6. Denial of Service.
Denial of Service (DoS), also called griefing attack, entails a situation where the atacker causes grief for other users of the protocol. A DoS attacker cripples the functionality of a Smart Contract even if they gain no economic value from doing so. A major attack vector when it comes to Denial of Service is the gas exhaustion attack. In this attack, a malicious user can call a function that needs an excessive amount of gas for execution. The consequent exhaustion of gas can cause the smart contract to stop, thus denying services to legitimate users.
#![allow(unused)]
fn main() {
    use starknet::ContractAddress;
    mod DoS {
        #[storage]
        struct Storage{
            // Stored variables
        }


        #[external(v0)]
        impl ITransactionImpl of ITransaction{
             fn transaction(ref self:ContractState, ) {

                   loop {
                    // very expensive computation
                   }
            }
        }
    }
}
The minimalist contract above shows a transaction that would need intensive computation. The occurrence could result from an attacker calling the transaction function many times, leading to gas exhaustion.
Recommendation:
The smart contract has to be minimized as much as possible to reduce gas consumption. Gas limits could also be incorporated when designing functions. The developer should also try to estimate gas usage every step, to ensure that all aspects are carefully accounted for.
Call for Contributions: Additional Vulnerabilities
We've discussed several common vulnerabilities in Cairo smart contracts, but many other security risks need attention. We invite community contributions to expand this chapter with more vulnerabilities:
- Storage Collision
- Flash Loan Attacks
- Oracle Manipulation
- Bad Randomness
- Untrusted Delegate Calls
- Public Burn
If you have expertise in these areas, please consider contributing your knowledge, including explanations and examples of these vulnerabilities. Your input will greatly benefit the Starknet and Cairo developer community, aiding in the development of more secure and resilient smart contracts.
We appreciate your support in enhancing the safety and security of the Starknet ecosystem for developers and users alike.
Starknet Security Tools
Starknet offers a range of tools for testing the security of smart contracts. We invite developers to improve existing tools or create new ones.
This section covers:
- Tools for security testing.
- Security considerations for smart contracts.
Below is an overview of the tools for Starknet security testing discussed in this chapter:
- Cairo-fuzzer: A tool for smart contract developers to test security. It functions both as a standalone tool and as a library.
- Caracal: A static analysis tool for Starknet smart contracts, utilizing the SIERRA representation.
- Thoth: A comprehensive Cairo/Starknet security toolkit. It includes analyzers, disassemblers, and decompilers.
Cairo-Fuzzer
Cairo-Fuzzer is a tool designed for smart contract developers to assess security. It operates both independently and as a library.
Features
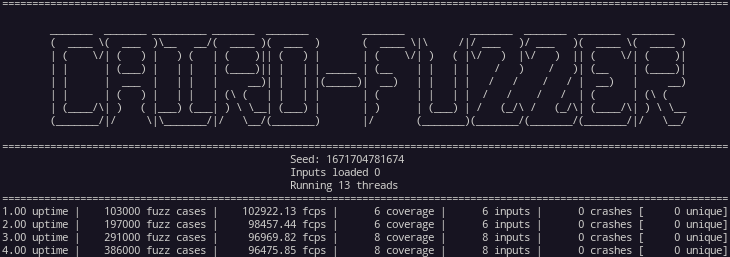
- Execute Cairo contracts.
- Execute Starknet contracts.
- Replay fuzzing corpus.
- Minimize fuzzing corpus.
- Load previous corpus.
- Manage multiple arguments.
- Utilize workspace architecture.
- Import dictionaries.
- Integrate Cairo-fuzzer as a library.
Usage
To use Cairo-fuzzer, run the following command:
cargo run --release -- --cores 3 --contract tests/fuzzinglabs.json --function "Fuzz_symbolic_execution"
This outputs:
For more usage information, follow our tutorial
CMDLINE (--help):

Usage: cairo-fuzzer [OPTIONS]

Options:
      --cores <CORES>              Set the number of threads to run [default: 1]
      --contract <CONTRACT>        Set the path of the JSON artifact to load [default: ]
      --function <FUNCTION>        Set the function to fuzz [default: ]
      --workspace <WORKSPACE>      Workspace of the fuzzer [default: fuzzer_workspace]
      --inputfolder <INPUTFOLDER>  Path to the inputs folder to load [default: ]
      --crashfolder <CRASHFOLDER>  Path to the crashes folder to load [default: ]
      --inputfile <INPUTFILE>      Path to the inputs file to load [default: ]
      --crashfile <CRASHFILE>      Path to the crashes file to load [default: ]
      --logs                       Enable fuzzer logs in file
      --seed <SEED>                Set a custom seed (only applicable for 1 core run)
      --run-time <RUN_TIME>        Number of seconds this fuzzing session will last
      --config <CONFIG>            Load config file
      --replay                     Replay the corpus folder
      --minimizer                  Minimize Corpora
  -h, --help                       Print help information
Caracal
Caracal is a static analysis tool for Starknet smart contracts, specifically analyzing their SIERRA representation.
Features
- Vulnerability detectors for Cairo code.
- Report printers.
- Taint analysis.
- Data flow analysis framework.
- Compatibility with Scarb projects.
Installation
Precompiled Binaries
Download precompiled binaries from the releases page. Use binary version v0.1.x for Cairo compiler 1.x.x, and v0.2.x for Cairo compiler 2.x.x.
Building from Source
Requirements
- Rust compiler
- Cargo
Installation Steps
Clone and build from the repository:
cargo install --git https://github.com/crytic/caracal --profile release --force
Building from a Local Copy:
If you prefer to build from a local copy:
git clone https://github.com/crytic/caracal
cd caracal
cargo install --path . --profile release --force
Thoth
Thoth (pronounced "taut" or "toss") is a security toolkit for Cairo/Starknet. Written in Python 3, it includes analyzers, disassemblers, and decompilers. Thoth is capable of generating call graphs, control-flow graphs (CFG), and data-flow graphs for Sierra files or Cairo/Starknet compilation artifacts. It also features tools like a symbolic execution engine and a symbolic bounded model checker.
Features
-
Remote & Local Analysis: Works with contracts on Mainnet/Goerli and local compilations.
-
Decompiler: Transforms assembly into decompiled code using SSA (Static Single Assignment).
-
Call Flow Analysis: Generates Call Flow Graphs.
-
Static Analysis: Conducts various types of analyses (security/optimization/analytics) on contracts.
-
Symbolic Execution: Finds variable values for specific paths in functions and generates test cases.
-
Data Flow Analysis: Produces Data Flow Graphs (DFG) for each function.
-
Disassembler: Converts bytecode to assembly.
-
Control Flow Analysis: Creates Control Flow Graphs (CFG).
-
Cairo Fuzzer Inputs: Generates inputs for Cairo fuzzer.
-
Sierra Files Analysis: Analyzes Sierra files.
-
Sierra Files Symbolic Execution: Performs symbolic execution on Sierra files.
-
Symbolic Bounded Model Checker: Functions as a symbolic bounded model checker.
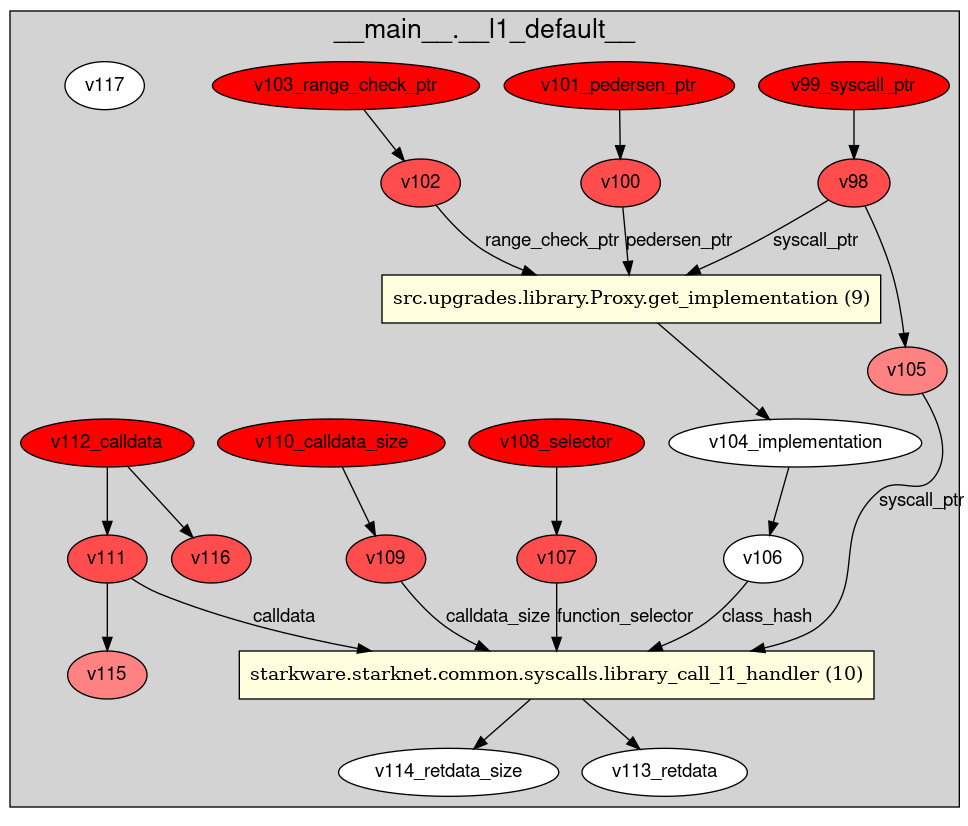
Installation
Install Thoth using the following commands:
sudo apt install graphviz
git clone https://github.com/FuzzingLabs/thoth && cd thoth
pip install .
thoth -h
Apibara
Apibara is the fastest platform to build production-grade indexers that connect onchain data to web2 services, like for example Postrgres, MongoDB, or any other database of your choice. More here.
What is an indexer?
An indexer is a service that listens to the blockchain and indexes the data you are interested in. It makes it easy to query the blockchain data and build applications on top of it.
What can you build with Apibara?
Some examples of what you can build with Apibara are:
- Real-time NFT collections dashboard
- Real-time swaps dashboard
Building an exmaple
In this example, we will build a small app similar to the concept Starkscan but that will solely listen to swaps happening on AVNU in real-time. For the fronted we will use react.
Apibara offers his direct access node that we will use to listen to the swaps.
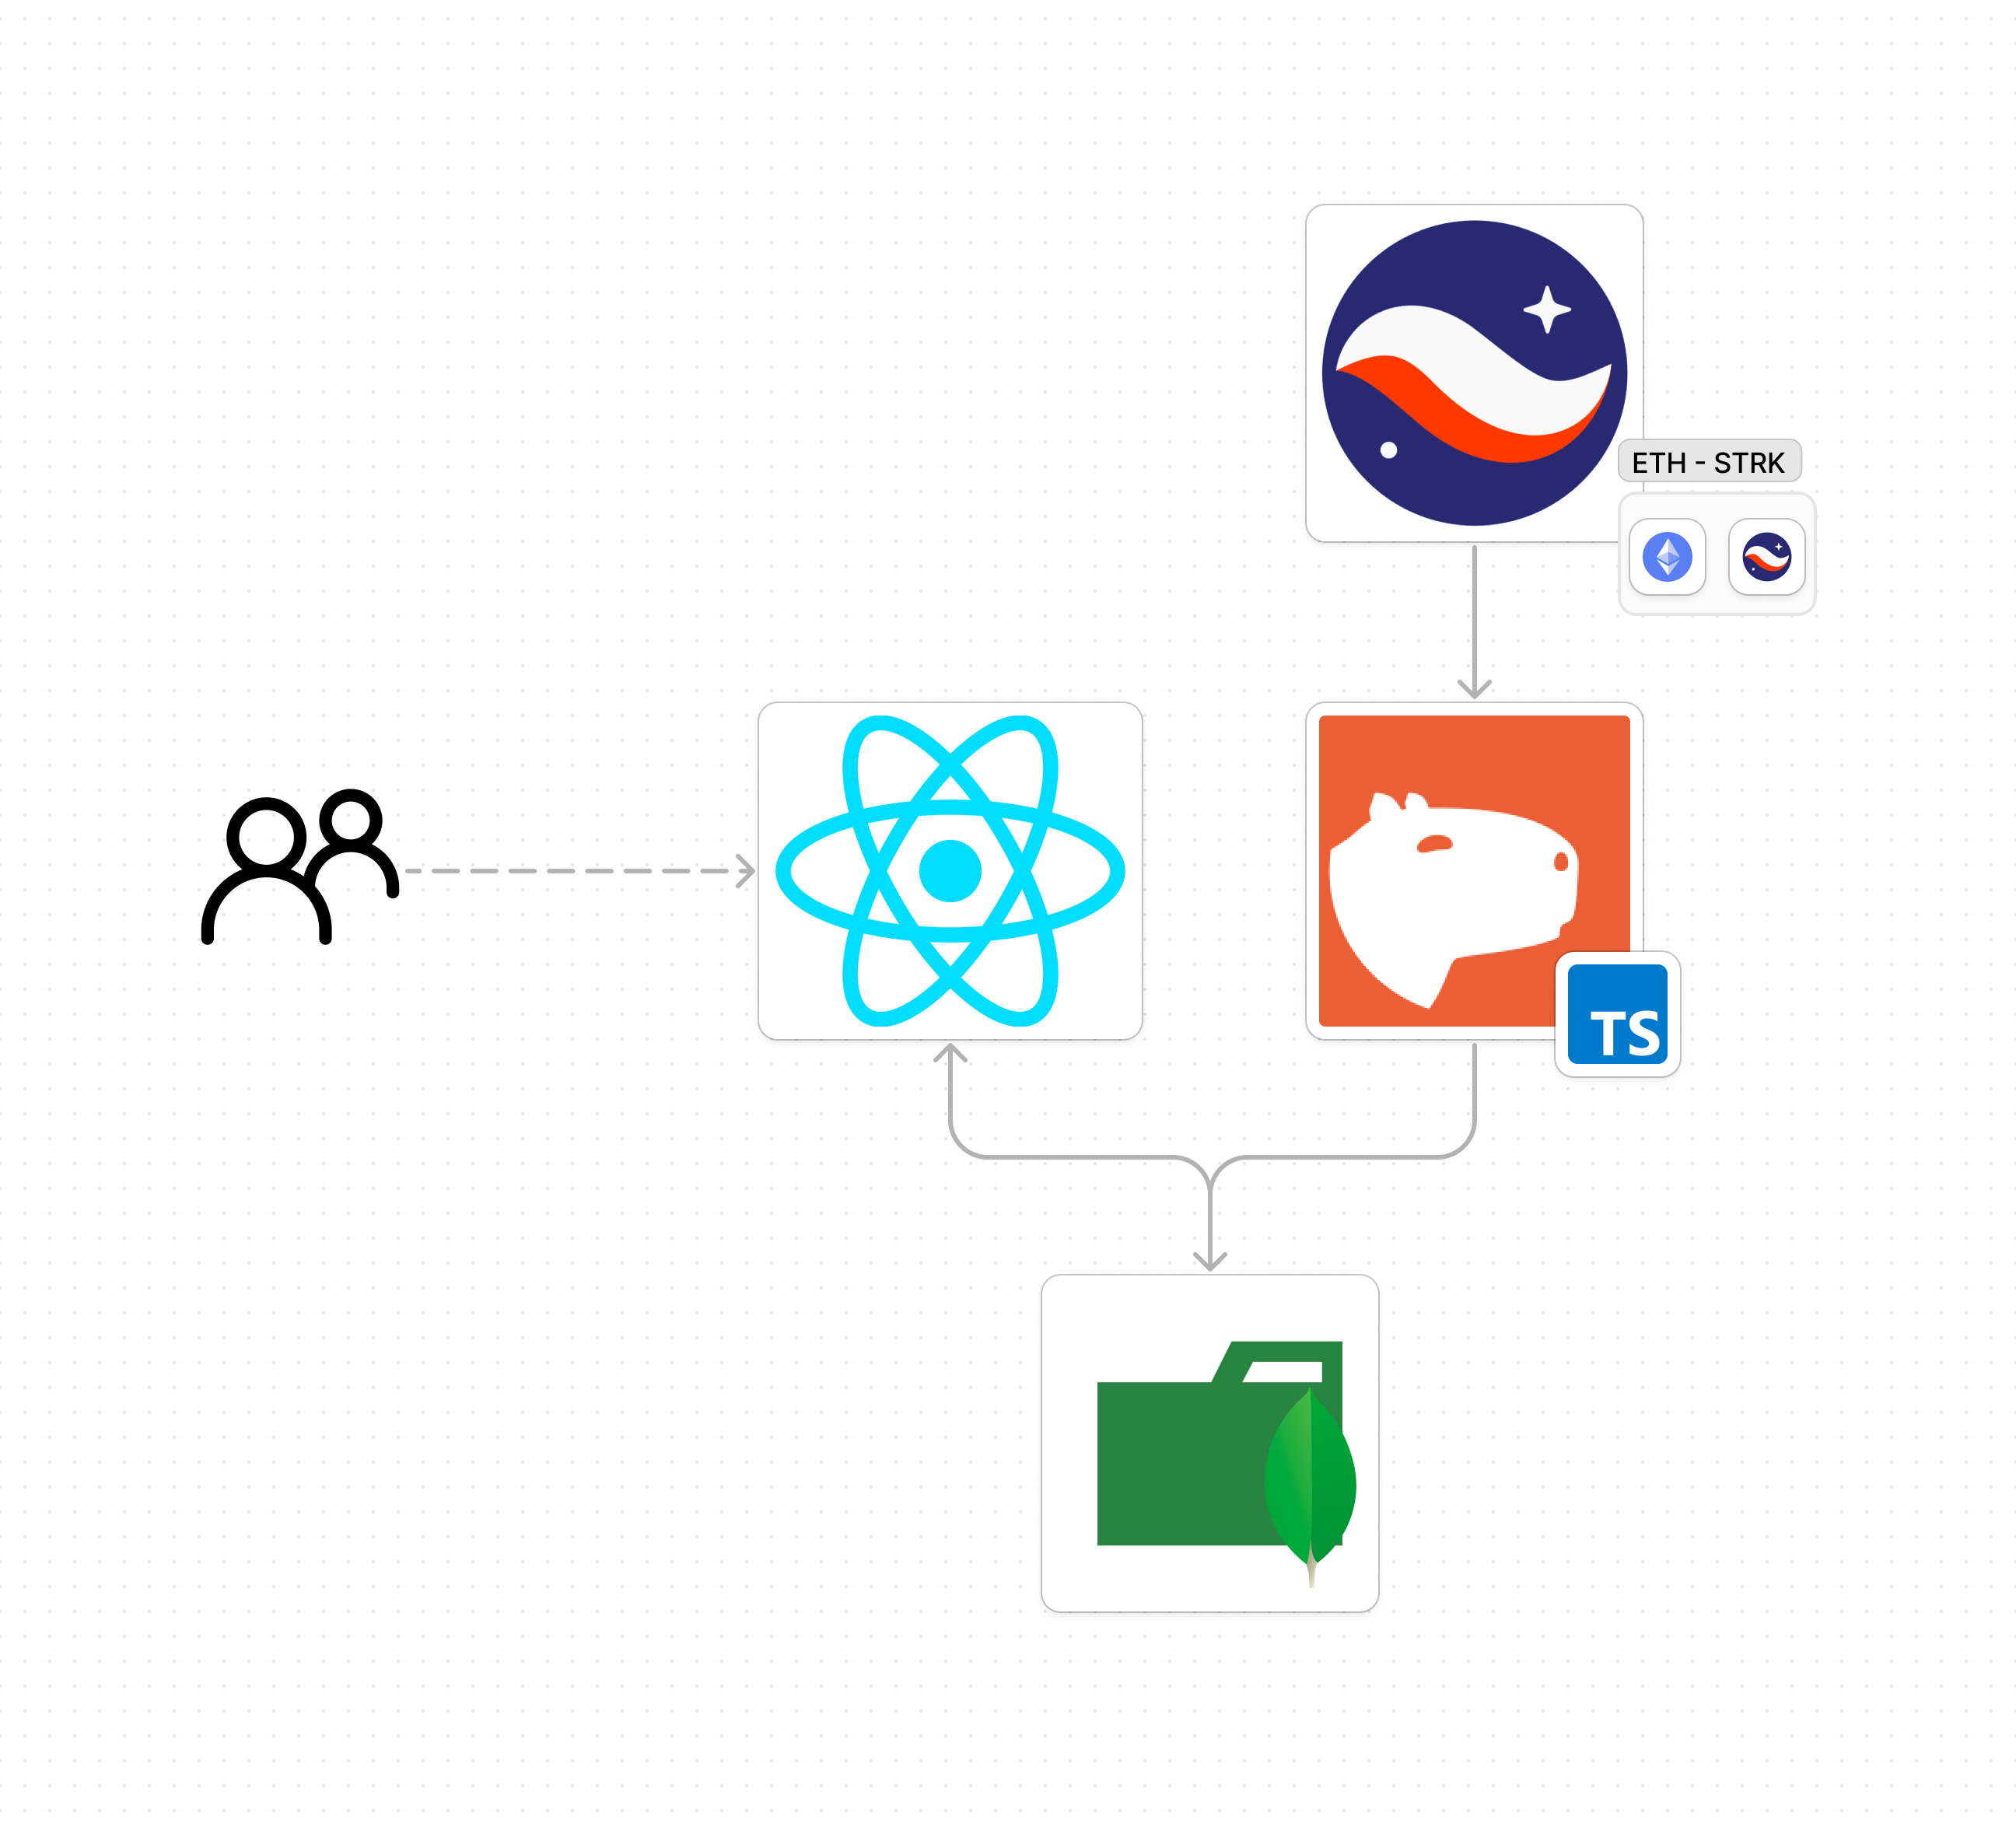
Get an Apibara API Key
Head to Apibara, sign up and create a new indexer. You can choose between:
- DNA (Direct Node Access) Key. You can use Python SDK or Typescript SDK.
- Webhook
We will use the DNA key to listen to the swaps happening on AVNU. You will get a key something like:
dna_ytgQur8CpufdaOQAEZ0w
Save it, we will use it later.
Set the server
We will use Apibara's TypeScript SDK to set a server script that will listen to the swaps happening on AVNU.
Apibara itself offers and example of usage TypeScript Example.
First, ensure you have Node.js and npm installed on your machine. You can check by running node -v and npm -v in your terminal. If you don't have them installed, download and install from Node.js official website.
Next, create a new directory for your project and navigate into it:
mkdir apibara-server
cd apibara-server
npm init -y
Install apibara's dependencies and some other dependencies we will use:
npm install @apibara/protocol @apibara/startknet starknet ethers dotenv
Create a file called index.ts and add the following code:
import { StreamClient } from "@apibara/protocol";
import {
  Filter,
  StarkNetCursor,
  v1alpha2,
  FieldElement,
} from "@apibara/starknet";
import { RpcProvider, constants, provider, uint256 } from "starknet";
import { formatUnits } from "ethers";
import * as dotenv from "dotenv";
import { MongoDBService } from "./MongoDBService";
import { BlockNumber } from "starknet";
dotenv.config();

const tokensDecimals = [
  {
    //ETH
    ticker: "ETH",
    decimals: 18,
    address:
      "0x049d36570d4e46f48e99674bd3fcc84644ddd6b96f7c741b1562b82f9e004dc7",
  },
  {
    //USDT
    ticker: "USDT",
    decimals: 6,
    address:
      "0x068f5c6a61780768455de69077e07e89787839bf8166decfbf92b645209c0fb8",
  },
  {
    //USDC
    ticker: "USDC",
    decimals: 6,
    address:
      "0x053c91253bc9682c04929ca02ed00b3e423f6710d2ee7e0d5ebb06f3ecf368a8",
  },
  {
    //STRK
    ticker: "STRK",
    decimals: 18,
    address:
      "0x04718f5a0fc34cc1af16a1cdee98ffb20c31f5cd61d6ab07201858f4287c938d",
  },
];

async function main() {
  try {
    // Apibara streaming
    const client = new StreamClient({
      url: "mainnet.starknet.a5a.ch",
      token: process.env.APIBARA_TOKEN,
      async onReconnect(err, retryCount) {
        console.log("reconnect", err, retryCount);
        // Sleep for 1 second before retrying.
        await new Promise((resolve) => setTimeout(resolve, 1000));

        return { reconnect: true };
      },
    });

    const provider = new RpcProvider({
      nodeUrl: constants.NetworkName.SN_MAIN,
      chainId: constants.StarknetChainId.SN_MAIN,
    });
    const hashAndBlockNumber = await provider.getBlockLatestAccepted();
    const block_number = hashAndBlockNumber.block_number;
    // The address of the swap event
    const key = FieldElement.fromBigInt(
      BigInt(
        "0xe316f0d9d2a3affa97de1d99bb2aac0538e2666d0d8545545ead241ef0ccab",
      ),
    );
    // The contract that emits the event. The AVNU swap contract
    const address = FieldElement.fromBigInt(
      BigInt(
        "0x04270219d365d6b017231b52e92b3fb5d7c8378b05e9abc97724537a80e93b0f",
      ),
    );

    //Initialize the filter
    const filter_test = Filter.create()
      .withHeader({ weak: false })
      .addEvent((ev) => ev.withFromAddress(address).withKeys([key]))
      .encode();

    // Configure the apibara client
    client.configure({
      filter: filter_test,
      batchSize: 1,
      cursor: StarkNetCursor.createWithBlockNumber(block_number),
    });

    // Start listening to messages
    for await (const message of client) {
      switch (message.message) {
        case "data": {
          if (!message.data?.data) {
            continue;
          }
          for (const data of message.data.data) {
            const block = v1alpha2.Block.decode(data);
            const { header, events, transactions } = block;
            if (!header || !transactions) {
              continue;
            }
            console.log("Block " + header.blockNumber);
            console.log("Events", events.length);

            for (const event of events) {
              console.log(event);
              if (event.event && event.receipt) {
                handleEventAvnuSwap(header, event.event, event.receipt);
              }
            }
          }
          break;
        }
        case "invalidate": {
          break;
        }
        case "heartbeat": {
          console.log("Received heartbeat");
          break;
        }
      }
    }
  } catch (error) {
    console.error("Initialization failed", error);
    process.exit(1);
  }
}

main()
  .then(() => process.exit(0))
  .catch((error) => {
    console.error(error);
    process.exit(1);
  });

async function handleEventAvnuSwap(
  header: v1alpha2.IBlockHeader,
  event: v1alpha2.IEvent,
  receipt: v1alpha2.ITransactionReceipt,
) {
  console.log("STARTING TO HANDLE AVNUSWAP EVENT");
  if (!event.data) return null;

  const takerAddress = FieldElement.toHex(event.data[0]);
  const sellAddress = FieldElement.toHex(event.data[1]);

  const sellToken = tokensDecimals.find(
    (token) => token.address === sellAddress,
  );
  const sellAddressDecimals = sellToken?.decimals;
  if (!sellAddressDecimals) return null; // Skip if sell token is not supported

  const sellAmount = +formatUnits(
    uint256.uint256ToBN({
      low: FieldElement.toBigInt(event.data[2]),
      high: FieldElement.toBigInt(event.data[3]),
    }),
    sellAddressDecimals,
  );

  const buyAddress = FieldElement.toHex(event.data[4]);
  const buyToken = tokensDecimals.find((token) => token.address === buyAddress);
  const buyAddressDecimals = buyToken?.decimals;
  if (!buyAddressDecimals) return null; // Skip if buy token is not supported

  const buyAmount = +formatUnits(
    uint256.uint256ToBN({
      low: FieldElement.toBigInt(event.data[5]),
      high: FieldElement.toBigInt(event.data[6]),
    }),
    buyAddressDecimals,
  );

  const beneficiary = FieldElement.toHex(event.data[7]);

  if (header.blockNumber == null) {
    return null;
  }
  console.log("FINISHED HANDLING AVNUSWAP EVENT");
  const swapData = {
    exchange: "avnu-swap",
    sell_token: sellAddress,
    buy_token: buyAddress,
    pair: `${sellToken?.ticker}-${buyToken?.ticker}`,
    block_number: +header.blockNumber,
    block_time: header.timestamp?.seconds?.toString(),
    timestamp: new Date().toISOString(),
    transaction_hash: FieldElement.toHex(
      receipt.transactionHash ?? FieldElement.fromBigInt(BigInt(0)),
    ),
    taker_address: takerAddress,
    sell_amount: sellAmount,
    buy_amount: buyAmount,
    beneficiary_address: beneficiary,
  };
  try {
    await MongoDBService.insertSwapData("swaps", swapData);
    console.log("AvnuSwap data saved to MongoDB");
  } catch (error) {
    console.error("Failed to save AvnuSwap data to MongoDB", error);
  }
}
Now let's explain the core parts of the code:
- Set the apibara streaming client. Here we create an apibara client with the url and the token we got from the apibara dashboard.
async function main() {
  try {
    // Apibara streaming
    const client = new StreamClient({
      url: 'mainnet.starknet.a5a.ch',
      token: process.env.APIBARA_TOKEN,
      async onReconnect(err, retryCount) {
        console.log('reconnect', err, retryCount)
        // Sleep for 1 second before retrying.
        await new Promise((resolve) => setTimeout(resolve, 1000))

        return { reconnect: true }
      },
    })
Have in mind that the url is the mainnet url, but you can also use the testnet url.
https://goerli.starknet.a5a.ch
https://mainnet.starknet.a5a.ch
https://sepolia.starknet.a5a.ch
- Get the latest block number. We will use the latest block number to set the cursor of the apibara client.
const provider = new RpcProvider({
  nodeUrl: constants.NetworkName.SN_MAIN,
  chainId: constants.StarknetChainId.SN_MAIN,
});
const hashAndBlockNumber = await provider.getBlockLatestAccepted();
const block_number = hashAndBlockNumber.block_number;
- Set the filter. This is the key part where we indicate to the apibara client what we want to listen to. In this case, we want to listen to the swaps events happening on the AVNU swap contract.
const key = FieldElement.fromBigInt(
  BigInt("0xe316f0d9d2a3affa97de1d99bb2aac0538e2666d0d8545545ead241ef0ccab"),
);
const address = FieldElement.fromBigInt(
  BigInt("0x04270219d365d6b017231b52e92b3fb5d7c8378b05e9abc97724537a80e93b0f"),
);
const filter_test = Filter.create()
  .withHeader({ weak: false })
  .addEvent((ev) => ev.withFromAddress(address).withKeys([key]))
  .encode();
- Configure the apibara client. Here we set the filter, the batch size, and the cursor.
client.configure({
  filter: filter_test,
  batchSize: 1,
  cursor: StarkNetCursor.createWithBlockNumber(block_number),
});
- Start listening to the messages. Here we listen to the messages and handle the events.
for await (const message of client) {
switch (message.message) {
case "data": {
if (!message.data?.data) {
continue;
}
for (const data of message.data.data) {
const block = v1alpha2.Block.decode(data);
const { header, events, transactions } = block;
if (!header || !transactions) {
continue;
}
for (const event of events) {
console.log(event);
if (event.event && event.receipt) {
handleEventAvnuSwap(header, event.event, event.receipt);
}
}
}
break;
}
case "invalidate": {
break;
}
case "heartbeat": {
console.log("Received heartbeat");
break;
}
}
}
- Handling the events. Here we handle the events and save the swaps data to a MongoDB.
async function handleEventAvnuSwap(
header: v1alpha2.IBlockHeader,
event: v1alpha2.IEvent,
receipt: v1alpha2.ITransactionReceipt,
) {
console.log("STARTING TO HANDLE AVNUSWAP EVENT");
if (!event.data) return null;
const takerAddress = FieldElement.toHex(event.data[0]);
const sellAddress = FieldElement.toHex(event.data[1]);
//...
//Parse the data
//...
console.log("FINISHED HANDLING AVNUSWAP EVENT");
const swapData = {
exchange: "avnu-swap",
sell_token: sellAddress,
buy_token: buyAddress,
pair: `${sellToken?.ticker}-${buyToken?.ticker}`,
block_number: +header.blockNumber,
block_time: header.timestamp?.seconds?.toString(),
timestamp: new Date().toISOString(),
transaction_hash: FieldElement.toHex(
receipt.transactionHash ?? FieldElement.fromBigInt(BigInt(0)),
),
taker_address: takerAddress,
sell_amount: sellAmount,
buy_amount: buyAmount,
beneficiary_address: beneficiary,
};
try {
await MongoDBService.insertSwapData("swaps", swapData);
console.log("AvnuSwap data saved to MongoDB");
} catch (error) {
console.error("Failed to save AvnuSwap data to MongoDB", error);
}
}
If you want to get the full code, you can find it here.
Run the server
To run the server, you will need to have a MongoDB running. You can use a local MongoDB or a cloud MongoDB like MongoDB Atlas.
Remember to replace the MONGODB_URI with your MongoDB URI.
MONGODB_URI="mongodb:xxx"
To run the server, you can use the following command:
npm run start
Lets see it in action
No that we have apibara streaming the swap objects into our MongoDB, we can build a frontend to display the swaps in real-time. Please see the example in here
Since, this go out of the scope of this book, we will not cover the frontend part.
Deployed real-time swaps dashboard
This example is deployed here.
Conclusion
This is a simple example of how to use apibara to listen to swaps happening on AVNU in real-time. You can index your NFT collection, listen to swaps, or any other event you are interested in and build a frontend to display the data in real-time.
Resources
Architecture
This is an introduction to Starknet’s Layer 2 architecture,
Starknet is a coordinated system, with each component—Sequencers, Provers, and nodes—playing a specific yet interconnected role. Although Starknet hasn’t fully decentralized yet, it’s actively moving toward that goal. This understanding of the roles and interactions within the system will help you better grasp the intricacies of the Starknet ecosystem.
High-Level Overview
Starknet’s operation begins when a transaction is received by a gateway, which serves as the Mempool. This stage could also be managed by the Sequencer. The transaction is initially marked as "RECEIVED." The Sequencer then incorporates the transaction into the network state and tags it as "ACCEPTED_ON_L2." The final step involves the Prover, which executes the operating system on the new block, calculates its proof, and submits it to the Layer 1 (L1) for verification.
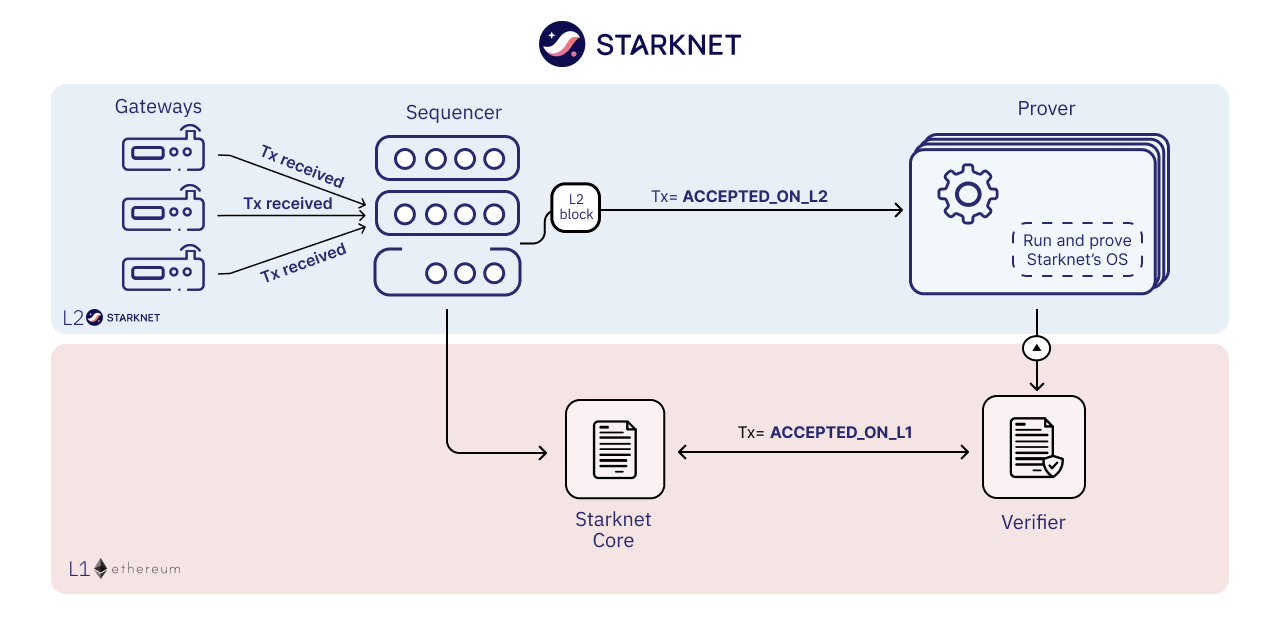
Starknet architecture
In essence, Starknet’s architecture involves multiple components:
-
The Sequencer is responsible for receiving transactions, ordering them, and producing blocks. It operates similarly to validators in Ethereum or Bitcoin.
-
The Prover is tasked with generating proofs for the created blocks and transactions. It uses Cairo’s Virtual Machine to run provable programs, thereby creating execution traces necessary for generating STARK proofs.
-
Layer 1 (L1), in this case Ethereum, hosts a smart contract capable of verifying these STARK proofs. If the proofs are valid, Starknet’s state root on L1 is updated.
Starknet’s state is a comprehensive snapshot maintained through Merkle trees, much like in Ethereum. This establishes the architecture of the validity roll-up and the roles of each component.
For a more in-depth look at each component, read on.
After exploring the introductory overview of the different components, delve deeper into their specific roles by referring to their dedicated subchapters in this Chapter.
Sequencers
Sequencers are the backbone of the Starknet network, akin to Ethereum’s validators. They usher transactions into the system.
Validity rollups excel at offloading some network chores, like bundling and processing transactions, to specialized players. This setup is somewhat like how Ethereum and Bitcoin delegate security to miners. Sequencing, like mining, demands hefty resources.
For networks like Starknet and other platforms utilizing Validity rollups, a similar parallel is drawn. These networks outsource transaction processing to specialized entities and then verify their work. These specialized entities in the context of Validity rollups are known as "Sequencers."
Instead of providing security, as miners do, Sequencers provide transaction capacity. They order (sequence) multiple transactions into a single batch, executes them, and produce a block that will later be proved by the Prover and submmited to the Layer 1 network as a single, compact proof, known as a "rollup." In other words, just as validators in Ethereum and miners in Bitcoin are specialized actors securing the network, Sequencers in Validity rollup-based networks are specialized actors that provide transaction capacity.
This mechanism allows Validity (or ZK) rollups to handle a higher volume of transactions while maintaining the security of the underlying Ethereum network. It enhances scalability without compromising on security.
Sequencers follow a systematic method for transaction processing:
-
Sequencing: They collect transactions from users and order (sequence) them.
-
Executing: Sequencers then process these transactions.
-
Batching: Transactions are grouped together in batches or blocks for efficiency.
-
Block Production: Sequencers produce blocks that contain batches of processed transactions.
Sequencers must be reliable and highly available, as their role is critical to the network’s smooth functioning. They need powerful and well-connected machines to perform their role effectively, as they must process transactions rapidly and continuously.
The current roadmap for Starknet includes decentralizing the Sequencer role. This shift towards decentralization will allow more participants to become Sequencers, contributing to the robustness of the network.
For more details in the Sequencer role, refer to the dedicated subchapter in this Chapter.
Provers
Provers serve as the second line of verification in the Starknet network. Their main task is to validate the work of the Sequencers (when they receive the block produced by the Sequencer) and to generate proofs that these processes were correctly performed.
The duties of a Prover include:
-
Receiving Blocks: Provers obtain blocks of processed transactions from Sequencers.
-
Processing: Provers process these blocks a second time, ensuring that all transactions within the block have been correctly handled.
-
Proof Generation: After processing, Provers generate a proof of correct transaction processing.
-
Sending Proof to Ethereum: Finally, the proof is sent to the Ethereum network for validation. If the proof is correct, the Ethereum network accepts the block of transactions.
Provers need even more computational power than Sequencers because they have to calculate and generate proofs, a process that is computationally heavy. However, the work of Provers can be split into multiple parts, allowing for parallelism and efficient proof generation. The proof generation process is asynchronous, meaning it doesn’t have to occur immediately or in real-time. This flexibility allows for the workload to be distributed among multiple Provers. Each Prover can work on a different block, allowing for parallelism and efficient proof generation.
The design of Starknet relies on these two types of actors — Sequencers and Provers — working in tandem to ensure efficient processing and secure verification of transactions.
For more details in the Prover role, refer to the dedicated subchapter in this Chapter.
Optimizing Sequencers and Provers: Debunking Common Misconceptions
The relationship between Sequencers and Provers in blockchain technology often sparks debate. A common misunderstanding suggests that either the Prover or the Sequencer is the main bottleneck. To set the record straight, let’s discuss the optimization of both components.
Starknet, utilizing the Cairo programming language, currently supports only sequential transactions. Plans are in place to introduce parallel transactions in the future. However, as of now, the Sequencer operates one transaction at a time, making it the bottleneck in the system.
In contrast, Provers operate asynchronously and can execute multiple tasks in parallel. The use of proof recursion allows for task distribution across multiple machines, making scalability less of an issue for Provers.
Given the asynchronous and scalable nature of Provers, focus in Starknet has shifted to enhancing the Sequencer’s efficiency. This explains why current development efforts are primarily aimed at the sequencing side of the equation.
Nodes
When it comes to defining what nodes do in Bitcoin or Ethereum, people often misinterpret their role as keeping track of every transaction within the network. This, however, is not entirely accurate.
Nodes serve as auditors of the network, maintaining the state of the network, such as how much Bitcoin each participant owns or the current state of a specific smart contract. They accomplish this by processing transactions and preserving a record of all transactions, but that’s a means to an end, not the end itself.
In Validity rollups and specifically within Starknet, this concept is somewhat reversed. Nodes don’t necessarily have to process transactions to get the state. In contrast to Ethereum or Bitcoin, Starknet nodes aren’t required to process all transactions to maintain the state of the network.
There are two main ways to access network state data: via an API gateway or using the RPC protocol to communicate with a node. Operating your own node is typically faster than using a shared architecture, like the gateway. Over time, Starknet plans to deprecate APIs and replace them with a JSON RPC standard, making it even more beneficial to operate your own node.
It’s worth noting that encouraging more people to run nodes increases the resilience of the network and prevents server flooding, which has been an issue in networks in other L2s.
Currently, there are primarily three methods for a node to keep track of the network’s state and we can have nodes implement any of these methods:
-
Replaying Old Transactions: Like Ethereum or Bitcoin, a node can take all the transactions and re-execute them. Although this approach is accurate, it isn’t scalable unless you have a powerful machine that’s capable of handling the load. If you can replay all transactions, you can become a Sequencer.
-
Relying on L2 Consensus: Nodes can trust the Sequencer(s) to execute the network correctly. When the Sequencer updates the state and adds a new block, nodes accept the update as accurate.
-
Checking Proof Validation on L1: Nodes can monitor the state of the network by observing L1 and ensuring that every time a proof is sent, they receive the updated state. This way, they don’t have to trust anyone and only need to keep track of the latest valid transaction for Starknet.
Each type of node setup comes with its own set of hardware requirements and trust assumptions.
Nodes That Replay Transactions
Nodes that replay transactions require powerful machines to track and execute all transactions. These nodes don’t have trust assumptions; they rely solely on the transactions they execute, guaranteeing that the state at any given point is valid.
Nodes That Rely on L2 Consensus
Nodes relying on L2 consensus require less computational power. They need sufficient storage to keep the state but don’t need to process a lot of transactions. The trade-off here is a trust assumption. Currently, Starknet revolves around one Sequencer, so these nodes are trusting Starkware not to disrupt the network. However, once a consensus mechanism and leader election amongst Sequencers are in place, these nodes will only need to trust that a Sequencer who staked their stake to produce a block is not willing to lose it.
Nodes That Check Proof Validation on L1
Nodes that only update their state based on proof validation on L1 require the least hardware. They have the same requirements as an Ethereum node, and once Ethereum light nodes become a reality, maintaining such a node could be as simple as using a smartphone. The only trade-off is latency. Proofs are not sent to Ethereum every block but intermittently, resulting in delayed state updates. Plans are in place to produce proofs more frequently, even if they are not sent to Ethereum immediately, allowing these nodes to reduce their latency. However, this development is still a way off in the Starknet roadmap.
Conclusion
Through this chapter, we delve into Starknet’s structure, uncovering the importance of Sequencers, Provers, and nodes. Each plays a unique role, but together, they create a highly scalable, efficient, and secure network that marks a significant step forward in Layer 2 solutions. As Starknet evolves towards decentralization, understanding these roles will provide valuable insight into the inner workings of this network.
As we venture further into the Starknet universe, our next stop will be an exploration of the transaction lifecycle before we dive into the heart of coding with Cairo.
Transaction Versions
Understanding Starknet's transaction types is essential to master its architecture and capabilities. Each transaction type serves a unique purpose, and getting a grip on their differences is crucial for proficient Starknet usage.
Starknet OS: The Backbone
Central to Starknet's functionality is the Starknet Operating System (OS), a Cairo program that fuels the network. This OS orchestrates key activities, including:
- Deploying contracts
- Executing transactions
- Facilitating L1<>L2 message exchanges
In Starknet terminology, "protocol level" alludes to modifications in the foundational Starknet OS Cairo program, ensuring its steadfastness.
Transaction Types
- Declare Transactions: Unique in their ability to introduce new classes, leading to potential new smart contracts.
- Invoke Transactions: They call upon an action but can't introduce new ones.
- Deploy Account Transactions: Designed for setting up smart wallet contracts.
Declare Transactions
Declare transactions are the sole mechanism for introducing new smart contracts to Starknet.
Recall programming in C++. Before employing a variable or function, it's first 'declared', signaling to the compiler its existence and type. Only then can you 'define' or use it. Declare transactions in Starknet operate on similar principles: they announce a new operation, prepping it for future use.
Versions:
- V0 - Suited for Cairo 0 contracts before nonces.
- V1 - Tailored for Cairo 0 with nonces.
- V2 (current) - Optimized for the modern Cairo contracts.
Here's a key distinction to understand between the different Cairo versions:
With Cairo 0, developers sent Cairo Assembly (CASM) code directly to the sequencer. But with the contemporary Cairo version, they send Sierra code to the Sequencer. Breaking it down, Cairo 0 compiled straight to CASM, while the current Cairo version compiles to Sierra, which subsequently compiles to CASM. A crucial difference is that Sierra executions are infallible and always provable, whereas in Cairo 0, transactions could fail. If they did, they became non-provable. The latest Cairo iteration ensures all code compiles to Sierra, making every transaction reliable.
When declaring a contract with the latest version, developers are essentially announcing Sierra code, not just raw CASM.
Examining the parameters of a V2 transaction reveals measures that ensure the class hash corresponds to the Sierra code being dispatched. The class hash encompasses the hash of the Cairo assembly code, but since developers send Sierra code, it's imperative to ensure that the dispatched code aligns with the indicated class hash.
// TODO -> Provide specifics about the parameters included in the transaction.
In essence, using the most recent Cairo version implies the utilization of the latest Declare transaction version.
Invoke Transactions
Unlike Declare transactions, Invoke transactions don't add new functions. They ask the network to carry out actions, such as executing or deploying contracts. This method contrasts with Ethereum, where a contract can either be deployed by sending a distinct transaction or by having another smart contract factory to deploy it. Starknet uses only the second method.
The Universal Deployer Contract (UDC) in Starknet illustrates this idea. UDC, a public utility, helps deploy contracts. This mirrors how in C++, a declared function is called to perform tasks.
In computer science terms, think of how functions operate in C++. After declaring a function or object, you invoke it to take action. Starknet's Invoke transaction works similarly, activating pre-declared contracts or functions.
Every Invoke transaction in Starknet undergoes __validate__ and __execute__ stages. The __validate__ step checks the transaction's correctness, similar to a syntax or logic check. After validation, the __execute__ phase processes the transaction.
This two-step process, focusing on utilizing existing functionalities, highlights Starknet's distinct transaction strategy.
Deploy Account Transactions
A challenge arises: How do you set up accounts without having one already? When creating your first smart wallet contract, deployment fees arise. How do you cover these without a smart wallet? The solution is deploy account transactions.
Uniquely in Starknet, addresses can accept funds even without an associated smart wallet. This trait is pivotal during deployment. Before an account is formally created, the __validate__ function checks the proposed deployment address (even if it lacks a smart wallet) for sufficient funds. If present, the constructor proceeds, resulting in account deployment. This method guarantees the new account's legitimacy and financial readiness.
Conclusion
It's vital to understand each transaction type. Declare transactions stand out for their role in presenting new functions. By likening the process to C++ declarations, developers can grasp the reasoning behind each transaction.
Transactions Lifecycle
This chapter outlines the path of a Starknet transaction from its initiation to its finalization.
Starknet processes transactions in distinct steps:
- A transaction starts by being sent to a gateway, a node, which acts as the Mempool.
- The Sequencer, currently a single service, first validates and then executes the transactions in order.
- If validated successfully, the status becomes RECEIVED.
- If not, the status is REJECTED.
- Successfully executed transactions are applied to the state and marked as ACCEPTED_ON_L2.
- Failed transactions during this phase are REVERTED.
- In the Prover stage, the system operates on the new block, computes its proof, and sends it to L1.
The following image shows the transaction flow:
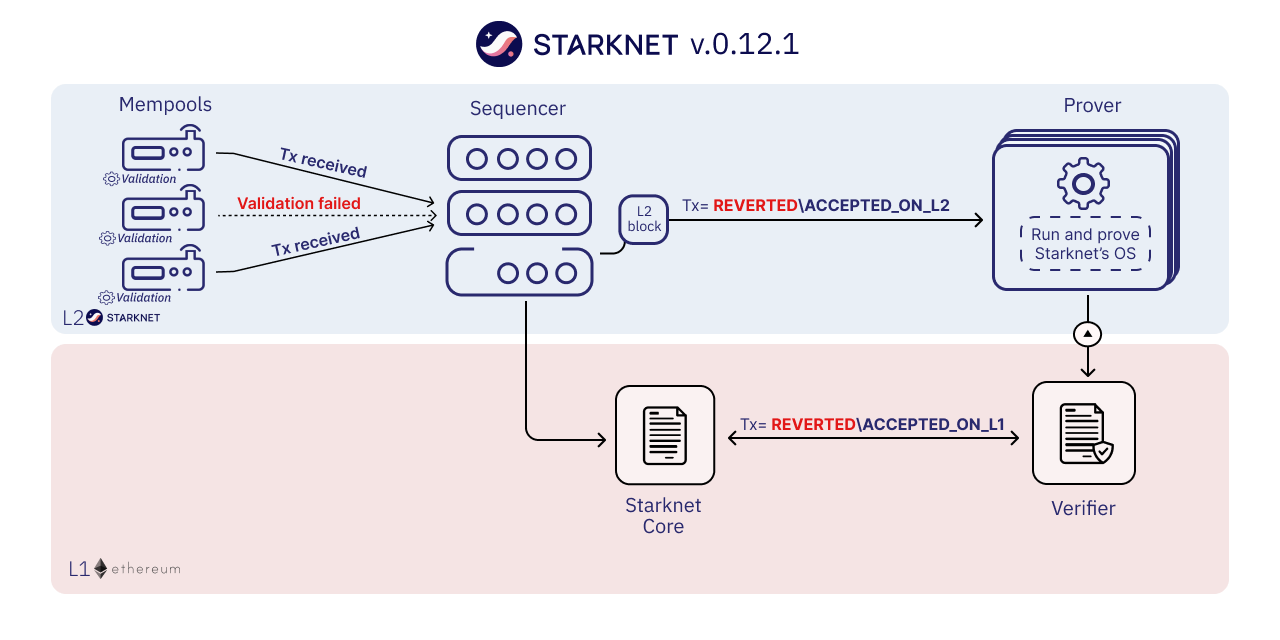
Before exploring each step in-depth, let's clarify the different transaction statuses.
Each transaction has two primary status types:
- finality_status: Reflects the transaction's finality. Possible values are:
- RECEIVED: The transaction passed Mempool validation but hasn't been included in a block.
- ACCEPTED_ON_L2 and ACCEPTED_ON_L1: The transaction was added to a block on L2 or L1, respectively.
- execution_status: Indicates the transaction's execution outcome. Values include:
- REJECTED, REVERTED, or SUCCEEDED.
To obtain this information, query the transaction receipt returned by the Nodes. Refer to the Tooling chapter in the Starknet Book for methods like the transaction_receipt command in starkli or the fetch_transaction_receipt method in the starknet-py library. We will use these tools throughout this chapter.
Nonces in Starknet
Initially, Starknet did not incorporate nonces. This omission meant that the same transaction could be sent multiple times with an identical nonce, leading to duplicate hashes—a problem. In Ethereum, nonces not only sequence transactions but also ensure each has a unique hash. Similarly, Starknet employs nonces to assign a distinct hash to every transaction.
Starknet's current stance on nonces mandates that they be sequential. In other words, when you transmit a transaction from your account, its nonce must precisely follow the previous transaction's nonce.
Although nonce abstraction would allow developers to manage this logic at the smart contract level, Starknet is reviewing this feature. However, its implementation is not deemed a priority.
Transaction Creation
A transaction starts with its preparation. The sender:
- Queries their account nonce, which acts as a unique identifier for the transaction.
- Signs the transaction.
- Sends it to their Node.
The Node, analogous to a post office, receives the transaction and broadcasts it on the Starknet network, primarily to the Sequencer. As the network evolves, the transaction will be broadcasted to multiple Sequencers.
Before broadcasting the transaction to the Sequencer, the gateways perform a validation step, such as checking that the max fee exceeds a minimum fee and the account's balance is greater than the max fee. The transaction will be saved in the storage if the validation function passes.
The Sequencer's Role
On receiving the transaction, the Sequencer acknowledges its receipt but hasn't processed it yet—similar to Ethereum's mempool state.
Sequencer's Process:
- Receive the transaction.
- Validate it.
- Execute it.
- Update the state.
Remember, Starknet processes transactions sequentially. The nonce won't change until the Sequencer processes the transaction. This can complicate backend application development, potentially causing errors if sending multiple transactions consecutively.
Acceptance on Layer-2 (L2)
Once the Sequencer validates and executes a transaction, it updates the state without waiting for block creation. The transaction finality status changes from 'RECEIVED' to 'ACCEPTED ON L2' at this stage and the execution status to 'SUCCEEDED'.
Following the state update, the transaction is included in a block. However, the block isn't emitted immediately. The Sequencer decides the opportune moment to emit the block, either when there are enough transactions to form a block or after a certain time has passed. When the block is emitted, the block becomes available for other Nodes to query.
The transaction will have the following status:
- Finality status: ACCEPTED_ON_L2
- Execution status: SUCCEEDED
If a transaction fails during execution, it will be included in the block with the status 'REVERTED'. In other words, REVERTED transactions
It's essential to remember that at this stage, no proof has been generated, and the transaction relies on L2 consensus for security against censorship. There remains a slim possibility of transaction reversal if all Sequencers collude. Therefore, these stages should be seen as different layers of transaction finality.
Acceptance on Layer-1 (L1)
The final step in the transaction's lifecycle is its acceptance on Layer-1 (L1). A Prover receives the block containing the transaction, re-executes the block, generates a proof, and sends it to Ethereum. Specifically, the proof is sent to a smart contract on Ethereum called the Verifier smart contract, which checks the proof's validity. If valid, the transaction's status changes to 'accepted on L1', signifying the transaction's security by Ethereum consensus.
Transaction Status Transition:
- Accepted on L2 -> Accepted on L1
[Optional] Transaction Finality in Starknet
Transaction finality refers to the point at which a transaction is considered irreversible and is no longer susceptible to being reversed or undone. It's the assurance that once a transaction is committed, it can't be altered or rolled back, hence securing the integrity of the transaction and the system as a whole.
Let's dive into the transaction finality in both Starknet and Ethereum, and how they compare.
Ethereum Transaction Finality
Ethereum operates on a Proof of Stake (PoS) consensus mechanism. A transaction has the finality status when it is part of a block that can't change without a significant amount of ETH getting burned. The number of blocks required to ensure that a transaction won't be rolled back is called 'blocks to finality', and the time to create those blocks is called 'time to finality'.
It is considered to be an average of 6 blocks to reach the finality status; given that a new block is validated each 12 seconds, the average time to finality for a transaction is 75 seconds.
Starknet Transaction Finality
Starknet, a Layer-2 (L2) solution on Ethereum, has a two-step transaction finality process. The first step is when the transaction gets accepted on Layer-2 (Starknet), and the second step is when the transaction gets accepted on Layer-1 (Ethereum).
Accepted on L2: When a transaction is processed by the Sequencer and included in a block on Starknet, it reaches L2 finality. However, this finality relies on the L2 consensus and comes with a slight risk of collusion among Sequencers leading to transaction reversal. Accepted on L1: The absolute finality comes when the block containing the transaction gets a proof generated, the proof is validated by the Verifier contract on Ethereum, and the state is updated on Ethereum. At this point, the transaction is as secure as the Ethereum's PoS consensus can provide, meaning it becomes computationally infeasible to alter or reverse.
Comparison
The main difference between Ethereum and Starknet's transaction finality lies in the stages of finality and their reliance on consensus mechanisms.
Ethereum's transaction finality becomes increasingly unlikely to be reversed as more blocks are added. Starknet's finality process is two-fold. The initial finality (L2) is quicker but relies on L2 consensus and carries a small risk of collusion. The ultimate finality (L1) is slower, as it involves generation and validation of proofs and updates on Ethereum. However, once reached, it provides the same level of security as an Ethereum transaction.
REJECTED Transactions
When a transaction passes validation in the Mempool but fails during the sequencer's validate phase, it receives the REJECTED status. Such transactions are not included in any block and maintain the finality_status as RECEIVED. This rejection can occur for reasons including:
- Check max_fee is higher than the minimal tx cost
- Check Account balance is at least max_fee
- Check nonce. A mismatched nonce, where the transaction's nonce doesn't align with the account's expected next nonce.
- Execute validate (here a repeated contract declaration will fail and the transaction will be rejected)
- Limit #txs per account in the Gateway
Such transaction will have the following status:
- Finality status: RECEIVED
- Execution status: REJECTED
To demonstrate a transaction with an invalid nonce, consider the Python code below (get_transaction_receipt.py). Using the starknet-py library, it fetches a rejected transaction:
import asyncio
from starknet_py.net.gateway_client import GatewayClient
async def fetch_transaction_receipt(transaction_id: str, network: str = "testnet"):
client = GatewayClient(network)
call_result = await client.get_transaction_receipt(transaction_id)
return call_result
receipt = asyncio.run(fetch_transaction_receipt("0x6d6e6575b85913ee8dfb170fe0db418f58f9422a0c6115350a79f9b38a1f5b8"))
print(receipt)
Execute the code with:
python3 get_transaction_receipt.py
The resulting transaction receipt will include:
execution_status=<TransactionExecutionStatus.REJECTED: 'REJECTED'>, finality_status=<TransactionFinalityStatus.RECEIVED: 'RECEIVED'>,
block_number=None,
actual_fee=0
It's important to note that the user isn't charged a fee because the transaction didn't execute in the Sequencer.
Handling of Reverted Transactions
A transaction can be reverted due to failed execution, the transaction will still be included in a block, and the account will be charged for the resources consumed.
This adds a trust assumption for the Sequencer to be honest and non-censoring. In later versions, there will be an OS change that will enable the Sequencer to prove that a transaction failed and charge the correct amount of gas for it, thus making it censorship-resistant with provably failed transactions.
Transaction Status Transition
- Received -> Reverted
Transaction Lifecycle Summary
The following outlines the various steps in a transaction's lifecycle:
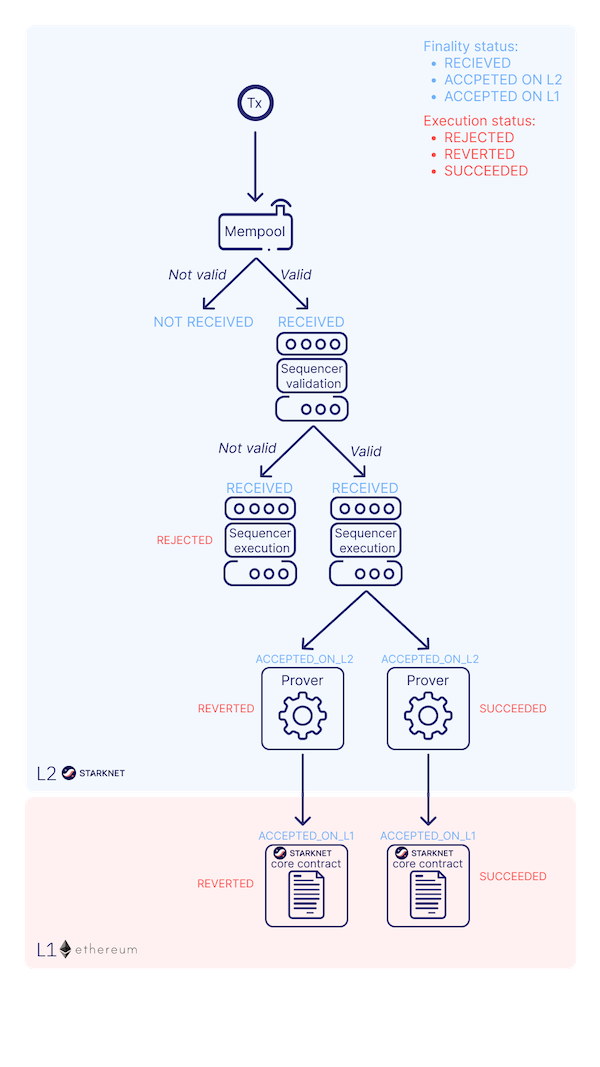
Conclusion
The lifecycle of a Starknet transaction is a carefully curated journey, ensuring efficient, secure, and transparent transaction processing. It incorporates everything from transaction creation, Sequencer processing, Layer-2 and Layer-1 validation, to handling rejected and reverted transactions. By comprehending this lifecycle, developers and users can better navigate the Starknet ecosystem and leverage its capabilities to the fullest.
Fee Mechanism
NOTE: This section is a work in progress. Contributions are welcome.
Implementing a fee system enhances Starknet's performance. Without fees, the system risks becoming overwhelmed by numerous transactions, even with optimizations.
Fee Collection
When a transaction occurs on Layer 2 (L2), Starknet collects the corresponding fee using ERC-20 tokens. The transaction submitter pays the fee, and the sequencer receives it.
Fee Calculation
Fee Measurement
Currently, fees are denominated in ETH. To determine the expected fee, multiply the transaction's gas estimate by the gas price:
expected_fee = gas_estimate * gas_price;
Fee Computation
To grasp fee computation, understand these terms:
-
Built-In: These are predefined operations in your code, simplifying common tasks or calculations. The following are built-ins:
- Cairo Steps: These building blocks in Cairo facilitate various program operations. Essential for running smart contracts and apps on blockchain platforms, the steps used influence a program's cost and efficiency.
- Pedersen Hashes: A method to convert data into a distinct code, similar to a data fingerprint, ensuring data integrity on blockchains.
- Range Checks: Safety measures in programs, ensuring numbers or values stay within designated limits to avoid errors.
- Signature Verifications: These confirm that a digital signature matches the anticipated one, verifying the sender's authenticity.
-
Weight: Indicates the significance or cost of an operation, showing how resource-intensive an action is in the program.
Computation
In Cairo, each execution trace is divided into distinct slots dedicated to specific built-in components, influencing fee calculation.
Consider a trace containing the following component limits:
| Component | Limit |
|---|---|
| Cairo Steps | 200,000,000 |
| Pedersen Hashes | 5,000,000 |
| Signature Verifications | 1,000,000 |
| Range Checks | 2,500,000 |
When a component reaches its maximum, the proof is sent to Layer 1. It's imperative to set these component divisions beforehand as they cannot be adjusted dynamically.
Assuming a transaction utilizes 10,000 Cairo steps and 500 Pedersen hashes, it could accommodate 40,000 such transactions in this trace (given the calculation 20,000,000/500). The gas price becomes 1/40,000 of the proof submission cost. In this instance, the number of Cairo steps isn't the constraining factor, so it isn't factored into our performance estimate.
Typically, the sequencer determines a vector, CairoResourceUsage, for every transaction. This vector accounts for:
- The count of Cairo steps.
- The application count of each Cairo built-in (like range checks and Pedersen hashes).
The sequencer then pairs this data with the CairoResourceFeeWeights vector, dictating the gas cost of each proof component.
For instance:
If a proof with 20,000,000 Pedersen hashes costs 5 million gas, then the Pedersen built-in has a weight of 0.25 gas per use (calculated as 5,000,000/20,000,000). Sequencers set these weight values based on proof parameters.
The fee is determined by the most restrictive component and is calculated as:
maxk[CairoResourceUsagek * CairoResourceFeeWeightsk]
Where "k" denotes the Cairo resource elements, encompassing step numbers and built-ins. The weightings for these components are:
| Component | Gas Cost | Range |
|---|---|---|
| Cairo Step | 0.01 gwei/gas | per step |
| Pedersen | 0.32 gwei/gas | per application |
| Poseidon | 0.32 gwei/gas | per application |
| Range Check | 0.16 gwei/gas | per application |
| ECDSA | 20.48 gwei/gas | per application |
| Keccak | 20.48 gwei/gas | per application |
| Bitwise | 0.64 gwei/gas | per application |
| EC_OP | 10.24 gwei/gas | per application |
Data Availability
Data availability is key in blockchain networks, especially in Layer 2 solutions like Starknet.
Rollups, acting as a bridge between the Ethereum blockchain and off-chain computation, enable transactions off-chain while maintaining Ethereum's security and asset system. The focus often lies on scaling computation and execution, but it's just part of the challenge. Both computation and data aspects are vital for effective blockchain scaling.
The growing use of rollups, which facilitate more off-chain execution, intensifies the need for efficient data availability solutions. This demand arises from the necessity to store, access, and verify data from off-chain transactions. Robust data availability solutions are critical for rollup success. Without effective data handling, the scalability and performance advantages of rollups could be significantly undermined.
Base layer blockchains such as Ethereum are evolving towards becoming Data Availability (DA) layers (more here). A prime example of this evolution is Celestia. They have spearheaded this movement by developing a Layer 1 blockchain with a DA-centric approach.
In parallel, Ethereum is undergoing a significant transition. Historically an execution-focused blockchain, Ethereum is now incorporating new Ethereum Improvement Proposals (EIPs) to shift its focus towards DA.
Data Availability in Starknet
-
State Transition Process: In Starknet, as in most blockchain networks, the system transitions from a state $n$ to state $(n+1)$ by executing a series of transactions within a block. In Starknet's case, this is done through the Cairo language.
-
Accessing Current State Information: To know the current state $n$ of the network, there are two primary sources:
- The Sequencer: It holds comprehensive details about the network's current state.
- Layer 2 Full Nodes: In Starknet, there are multiple full nodes, such as Juno, Papyrus, and Pathfinder, which users can run on their computers.
The liveness problem arises from a concern: what happens if both the sequencer and all the full nodes become unresponsive? This could be due to a variety of reasons, such as technical failures or external attacks.
If for some reason, both the sequencer and the Layer 2 full nodes stop responding, there would be no way to ascertain the current state $n$ of the network. In such a scenario, while transactions could still be received, the network would be unable to transition to state $(n+1)$ due to the lack of information about state $n$. Consequently, the network would essentially become stuck.
Although this situation is highly unlikely, its potential impact is significant. It would halt the progress of the network, preventing any state transitions and effectively freezing operations.
State Diffs
Starknet addresses the liveness problem through the transmission of validity proofs and state differences to Layer 1. This process is critical for ensuring that the network remains operational and its state can be verified independently of the sequencer and Layer 2 full nodes.
-
Validity Proof to Layer 1: After computing the validity proof, Starknet sends it to Layer 1, specifically to the Verifier.
-
State Diff as Cold Data: Along with the validity proof, Starknet also sends what's known as the 'state diff.' The state diff represents the changes in the Layer 2 state since the last validity proof was sent. This includes updates and modifications made to the network's state.
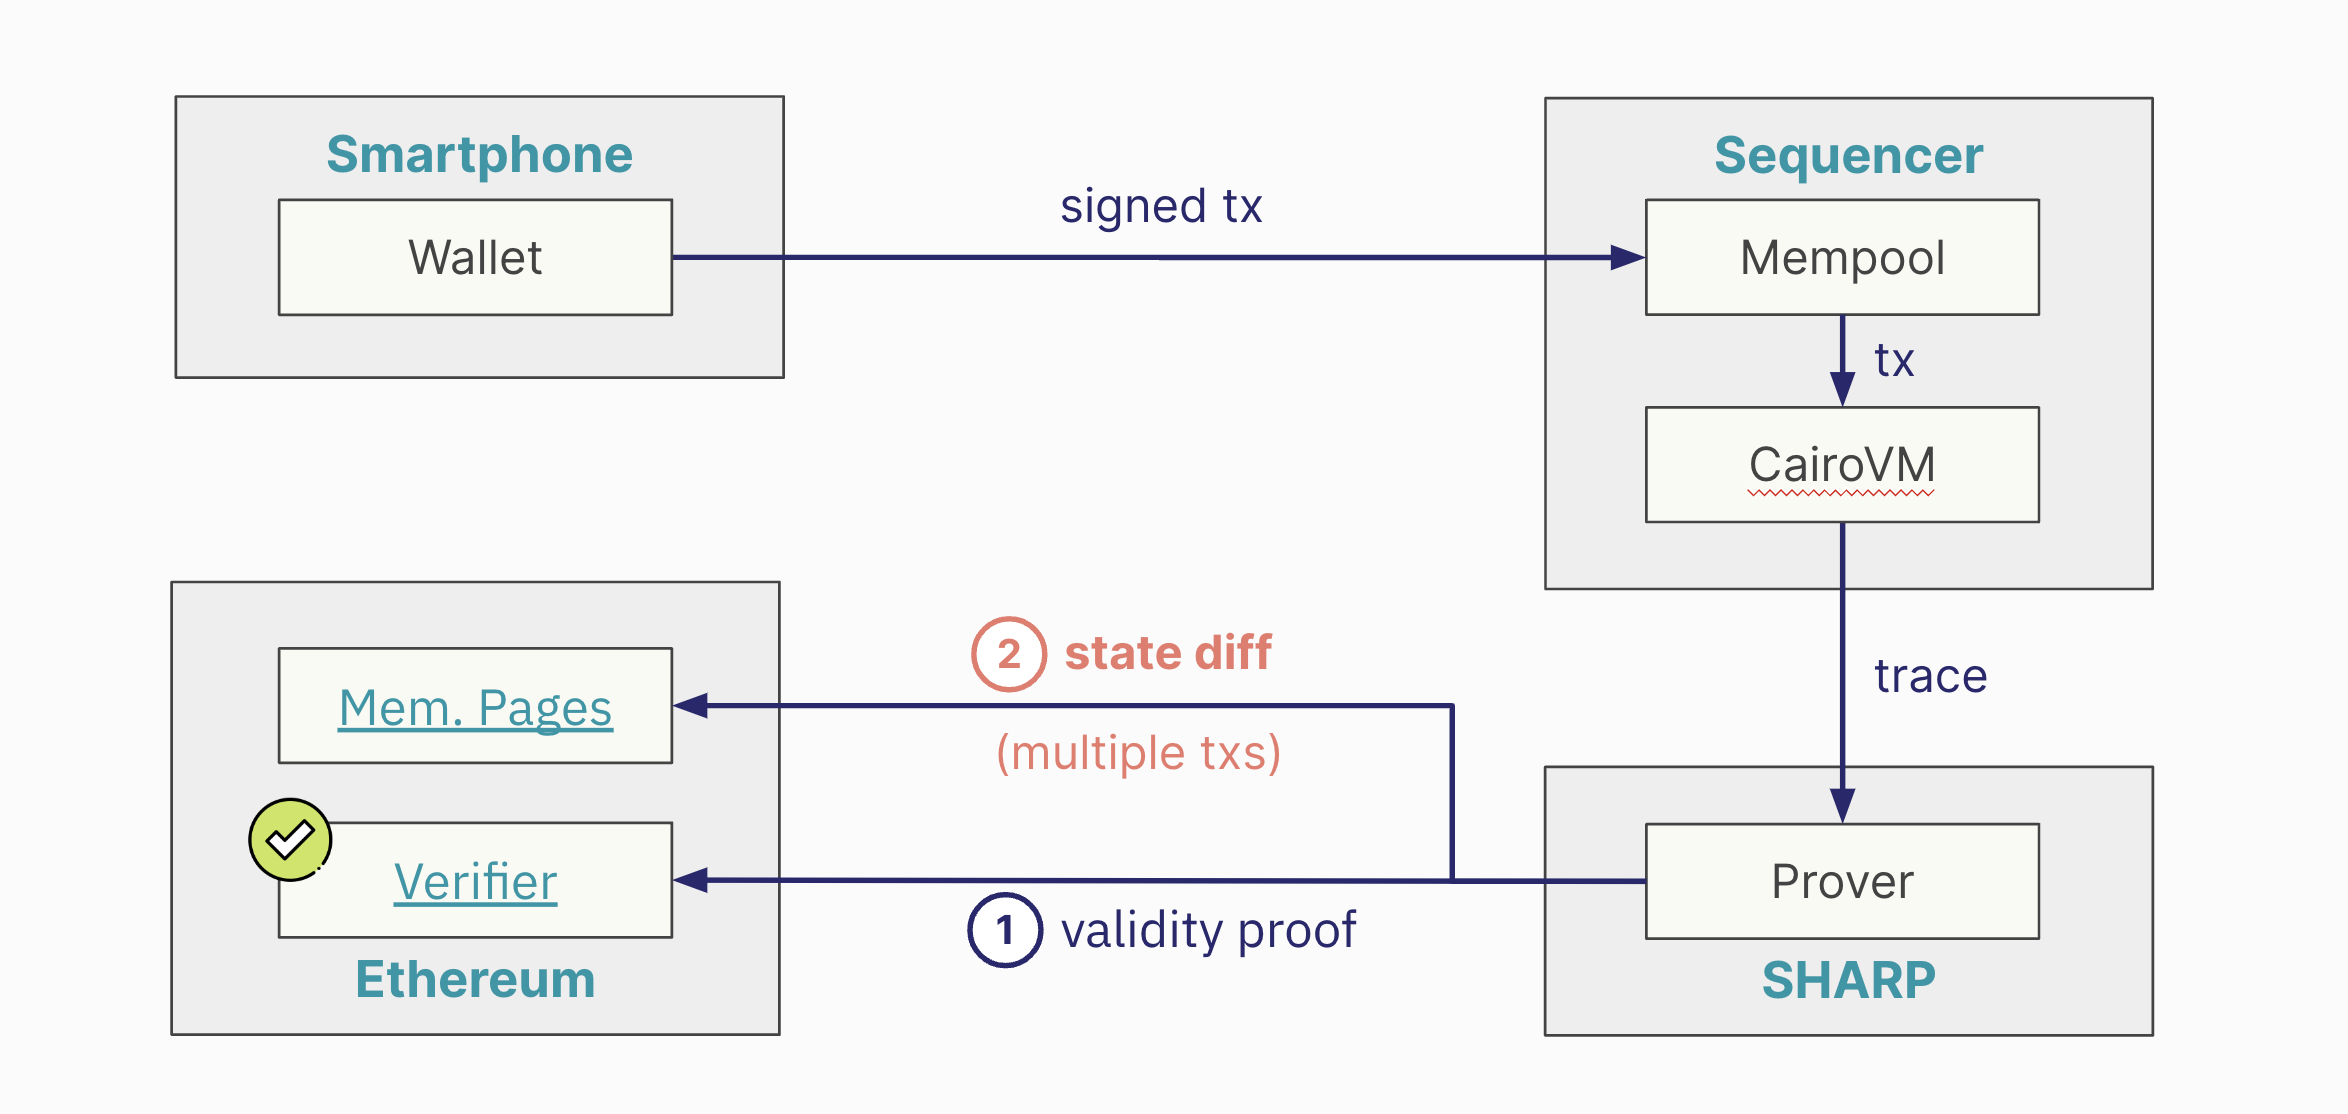
The state diff involves a substantial amount of data. To manage this, the data is sent as 'cold data' to Layer 1. It implies that the data isn't directly stored but is made available in a way that requires significant transactional capacity to transfer to Layer 1.
Data Availability and State Changes in Transactions
Transmitting Changes, Not Balances: What Starknet sends to Layer 1 for data availability are the changes in state, not the new balances. This involves capturing how each transaction within a validity proof alters the state.
-
Example 1: Consider a simple scenario with three participants: Jimmy, Rose, and Nick.
- Transaction Sequence: Jimmy sends one ETH to Rose, then Rose sends half an ETH to Nick.
- State Changes Sent to Layer 1: The data sent to Layer 1 would reflect that Jimmy has one ETH less, Rose has half an ETH more, and Nick also gains half an ETH.
-
Example 2: The net changes are what matter. For instance, if Jimmy and Rose send ETH back and forth, but the end result is Jimmy having half an ETH more and Rose half an ETH less, only these net changes are sent to Layer 1.
This approach means that even with multiple transactions, the actual data sent for availability can be less if the net state changes are minimal.
In cases where transactions between parties nullify each other (e.g., Rose sends one ETH to Nick, and then Nick sends it back), no change in the state occurs. Consequently, nothing is sent to Layer 1 for data availability, making it the cheapest form of transaction.
Since the cost of sending data to Ethereum as cold data constitutes about 90% of a Layer 2 transaction's cost, reducing the amount of data sent can significantly impact overall transaction costs. Projects on Starknet often use strategies to minimize state changes in their transactions, thereby reducing the data sent to Layer 1 and lowering transaction costs.
Reducing Data Availability Costs in Starknet
Two main mechanisms to reduce data availability costs are currently under consideration: the implementation of EIP 4844 and the concept of Volition. Both aim to optimize how data is stored and reduce the associated costs.
EIP 4844: Blob Data and Cost Reduction
EIP 4844 proposes a change in how data availability information is sent to Layer 1. Instead of using call data, the information would be sent as blobs. This mechanism is expected to be cheaper than the current method used by Starknet for posting data to Ethereum. Consequently, it would make Layer 2 transactions more affordable. A notable downside of this approach is the limited lifespan of blob data. Once posted to Ethereum, this data will only be available for one month before being pruned by Layer 1 nodes.
Starknet's adoption of this feature depends on its implementation on the Ethereum mainnet. It's anticipated to be incorporated into Starknet by mid-2024, following its activation on Ethereum.
Volition: Flexible Data Storage Options
Volition introduces the concept of choosing where to store data for transaction liveness. Users can opt to post data either to Ethereum or off-chain alternatives such as a data availability committee, systems like Celestia, or EigenDA. The cost of using Volition varies based on the chosen storage option. Off-chain options are expected to be cheaper than using EIP 4844.
The timeline for enabling Volition on Starknet is not yet determined, but it's certain to follow the support of EIP 4844.
While EIP 4844's blob data approach will be beneficial for multiple rollups, Volition offers a unique advantage for Starknet by providing more flexibility in data storage and potentially lowering costs further. The implementation of Volition requires having a virtual machine that is not limited by the adherence to emulate the EVM, so a custom virtual machine like Cairo is required.
Recreating Starknet's State
This process is a contingency plan for extreme scenarios where the sequencer and Layer 2 full nodes become unavailable.
-
Starknet, like any blockchain network, started with an empty state and a genesis block. Over time, it has processed multiple blocks, leading to changes in its state.
-
Periodically, Starknet sends a validity proof to Layer 1. This proof attests to the computations of all the blocks processed since the last proof was sent.
-
Along with the validity proof, Starknet sends the state difference. This state difference details the changes from the empty state to the current state, as a result of executing transactions in all these blocks. The state difference is transmitted to Layer 1.
-
As Starknet continues to produce more blocks on Layer 2, the process repeats. At some point, a new validity proof, along with a new set of transactions for data availability and the new state difference, is sent to Layer 1.
-
By applying the state differences in order, as they are sent to Layer 1, it's possible to reconstruct the Layer 2 state. This means that the entire history and current state of Starknet can be pieced together from the data available on Layer 1. This is the role of the Layer 1 indexer.
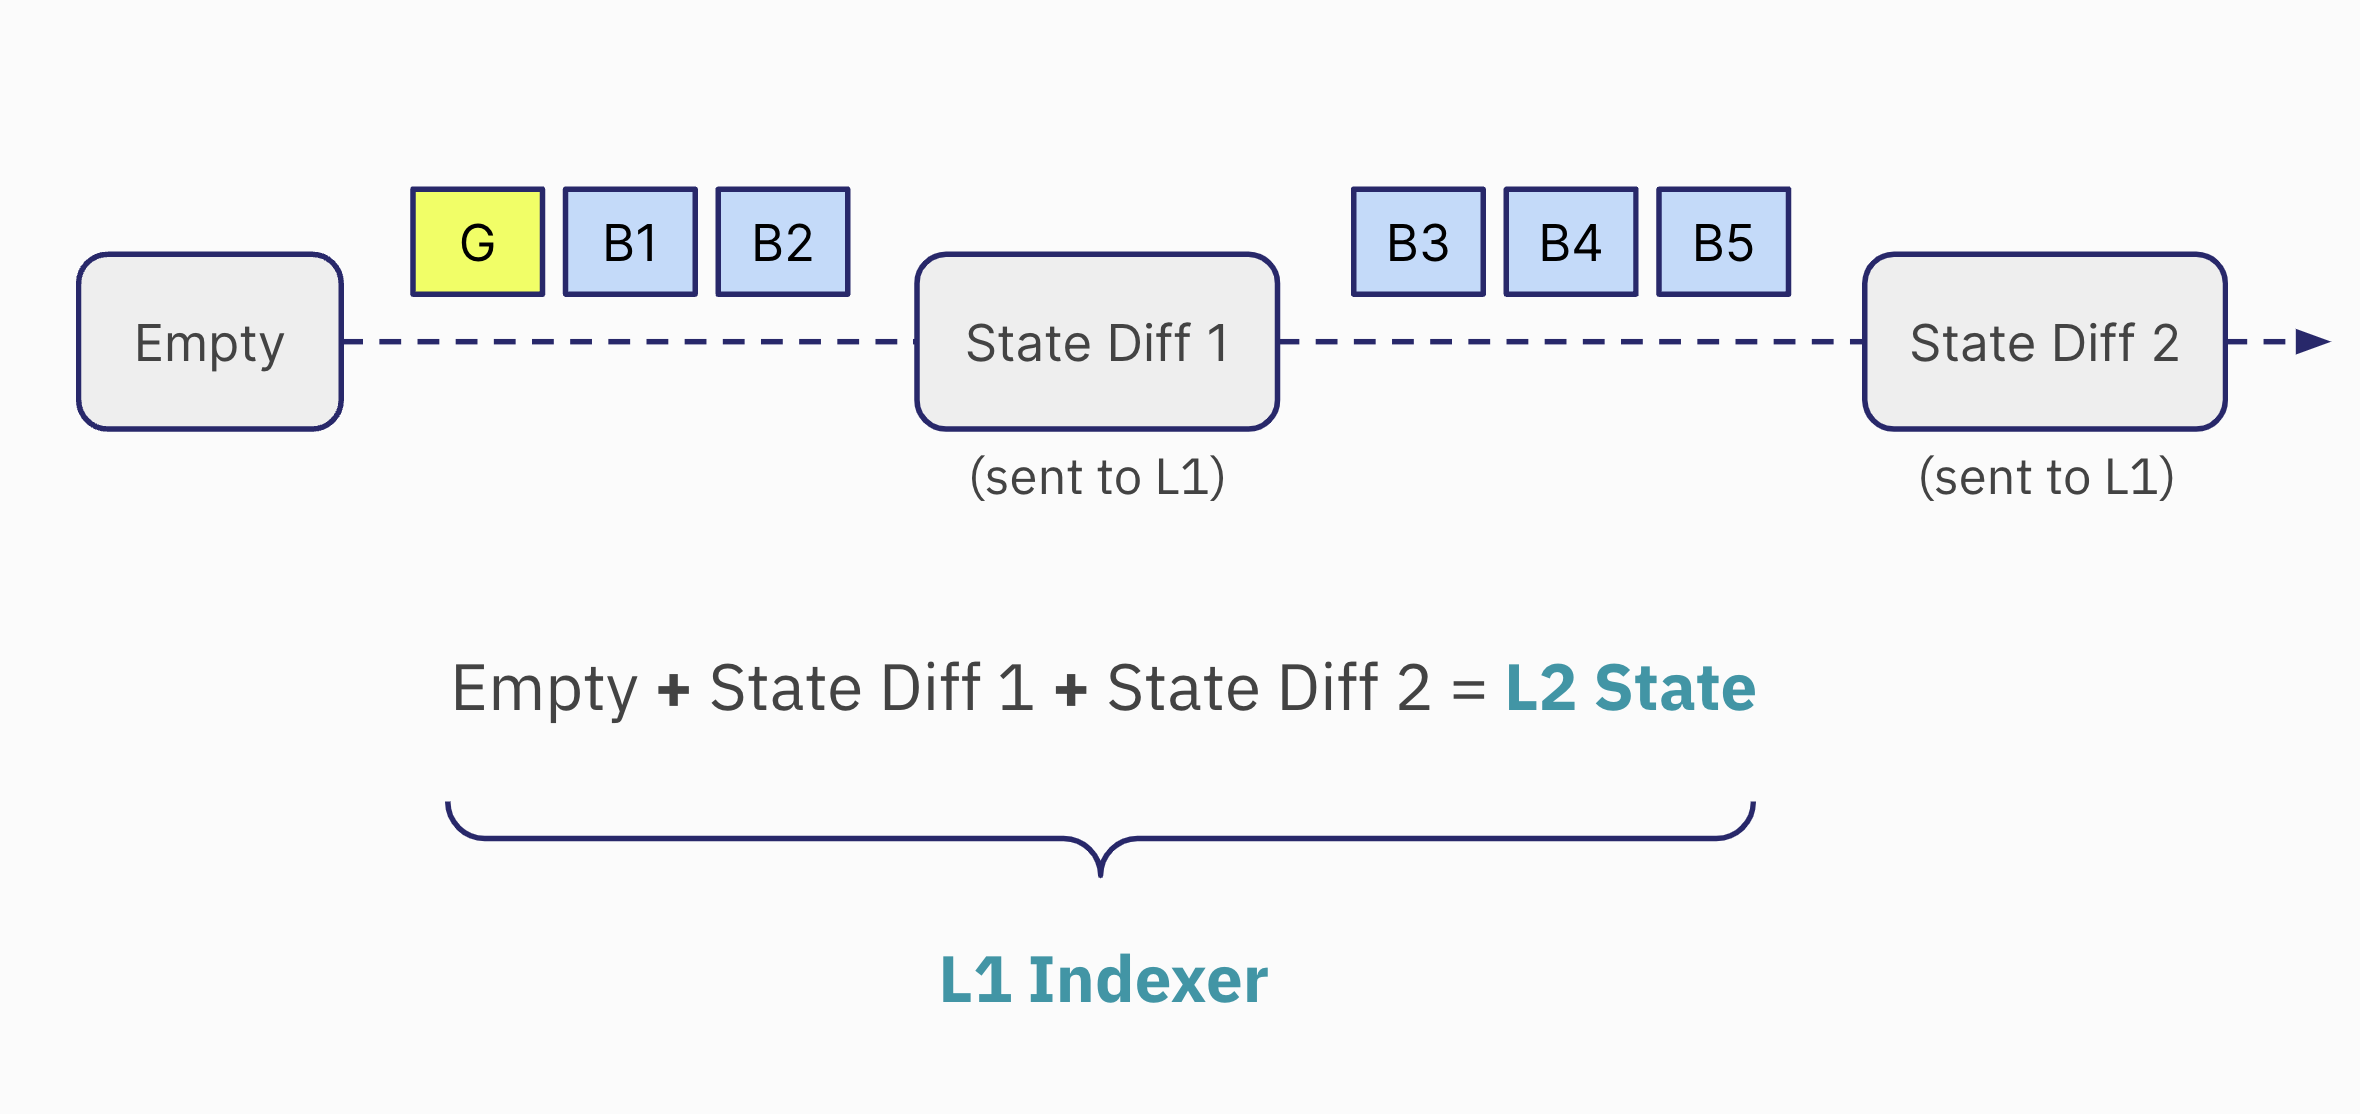
This process ensures that the network's state is never lost and can always be recovered from Layer 1 data.
The StarknetOS
The StarknetOS, the last step inside the Sequencer, plays a crucial role in determining why the state diff is the output of the SHARP and how it interacts with the network's state. The StarknetOS is based on Cairo Zero, an older version of the Cairo programming language.
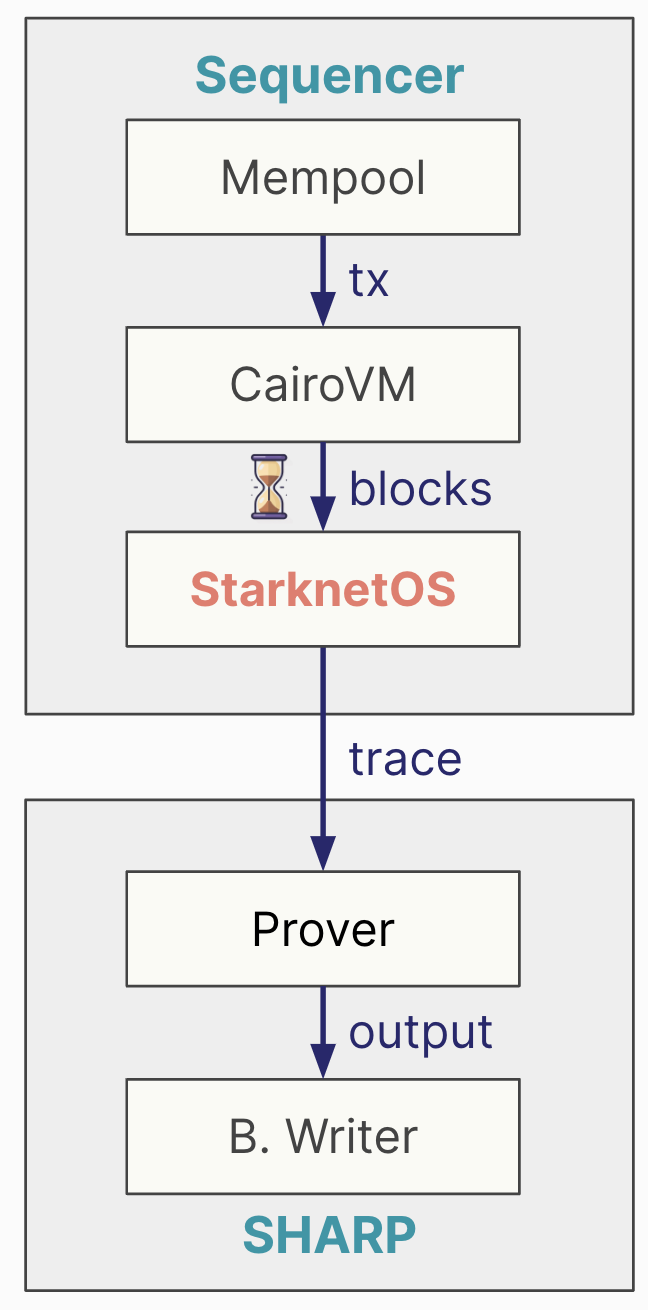
The StarknetOS receives four main inputs:
- The current state of the network.
- New blocks created since the last validity proof was sent to Layer 1. These include declare_account and invoke transactions.
- Class hashes resulting from declared transactions.
- Compiled class hashes resulting from declared transactions.
The StarknetOS takes the current state and processes the new transactions and blocks. It evaluates what changes occur in the state as a result of these transactions. The output from this process includes:
- The state diff: Changes in the state.
- Class hashes of newly declared smart contracts.
- Compiled class hashes of newly declared smart contracts.
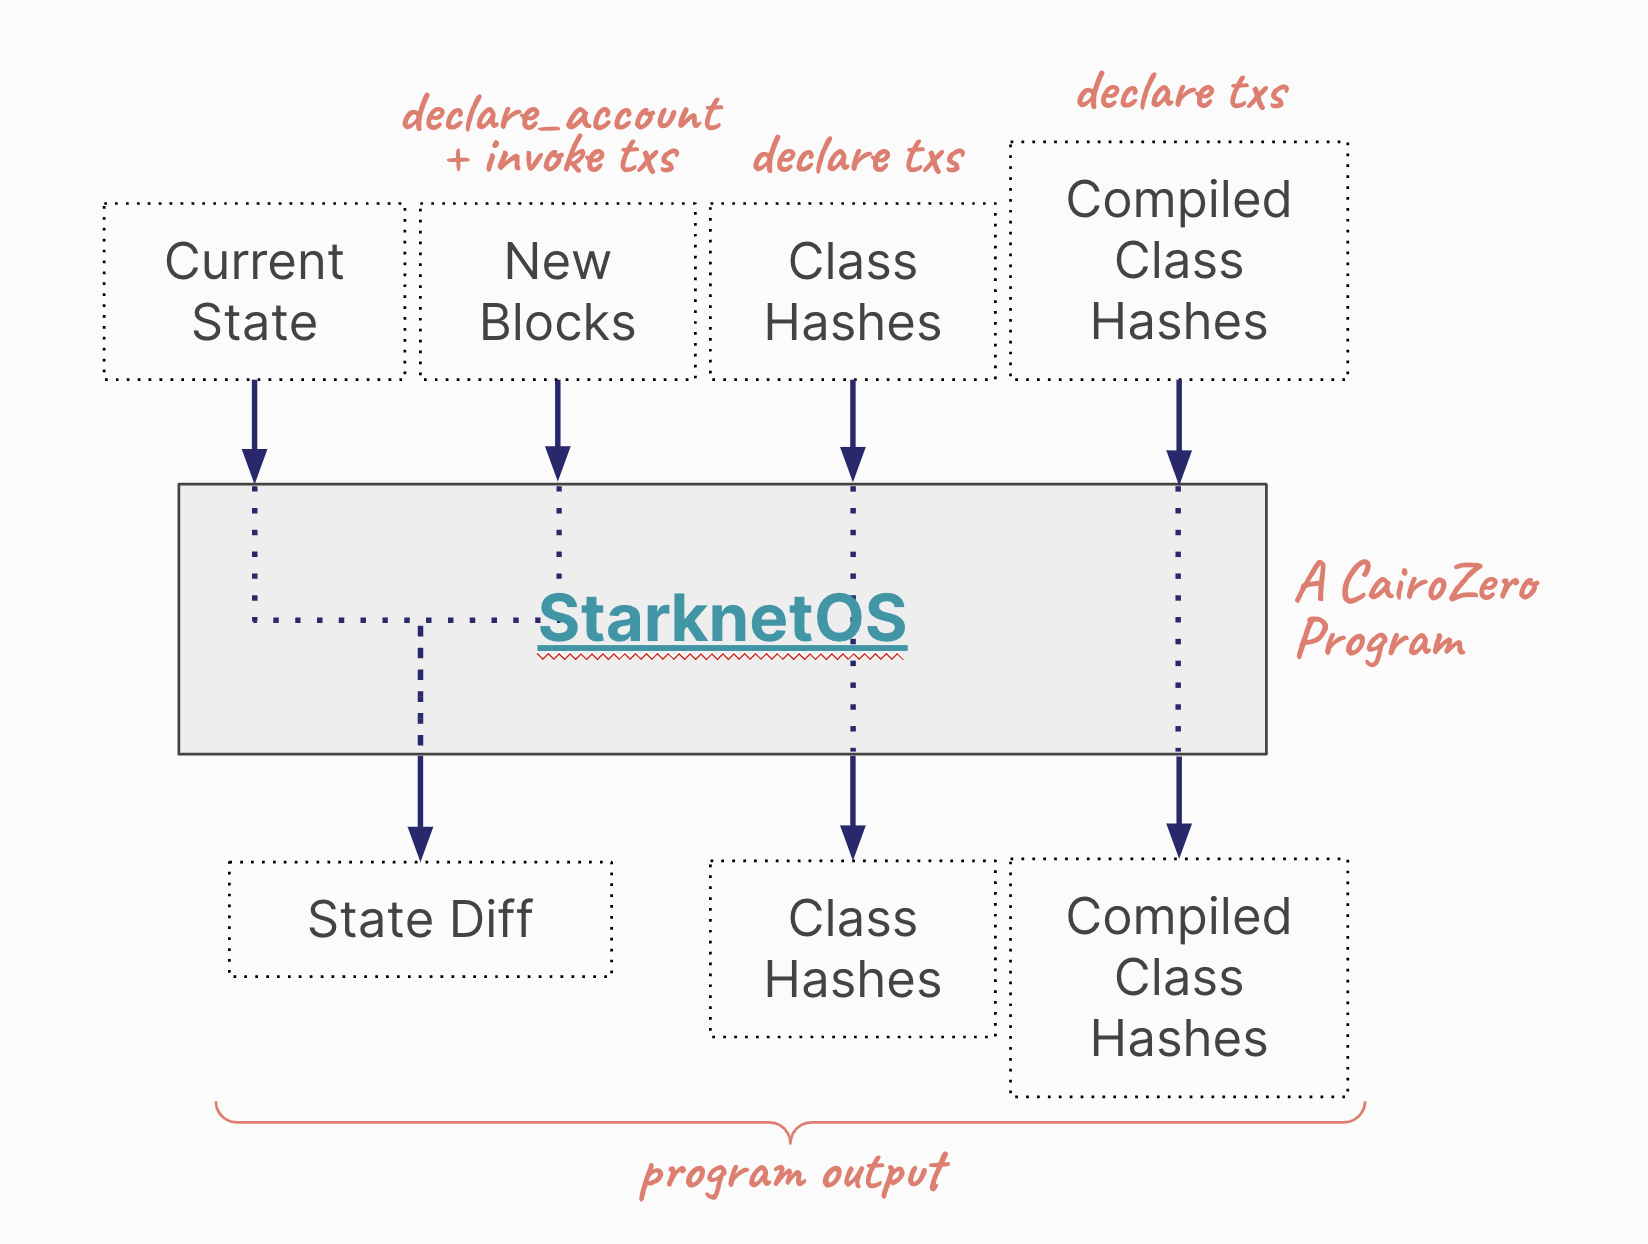
The sequencer executes numerous transactions and creates blocks. When enough blocks accumulate, they trigger the creation of a validity proof. These blocks are passed to the StarknetOS to calculate the state diff, class hashes, and compiled class hashes. This is the information that the Prover is tasked with proving. The output from the Blockchain Writer, therefore, includes these three elements: state diff, class hashes, and compiled class hashes. This output is what gets sent to the memory pages smart contract on Ethereum.
The Blockchain Writer Module
Contrary to a direct interaction between the Prover and the Ethereum Verifier, there's an intermediary process involving SHARP. The Prover in Starknet (currently the Stone Prover) is focused solely on proving the execution of a Cairo program. Its role is confined to generating proofs without concerning itself with Ethereum directly. The primary concern of the Prover is to accurately prove the execution of Cairo programs.
Internally, SHARP utilizes an Externally Owned Account (EOA) specifically for interacting with Ethereum. This account is responsible for conducting transactions on the Ethereum network.
-
Handling Validity Proofs and State Diff: The actual module within SHARP that sends the validity proof and state diff to the memory pages on Ethereum is known as the Blockchain Writer. This module bridges the gap between the internal workings of Starknet and the Ethereum blockchain.
-
Direct Interaction with Ethereum: The output from the Prover is directed to the Blockchain Writer. It is this Blockchain Writer that interacts with Ethereum, sending data to the appropriate location on the Layer 1.
-
Final Step in Data Transmission: The Blockchain Writer represents the final step in the process where the proven data from Starknet's internal operations is transmitted to Ethereum for storage and verification.
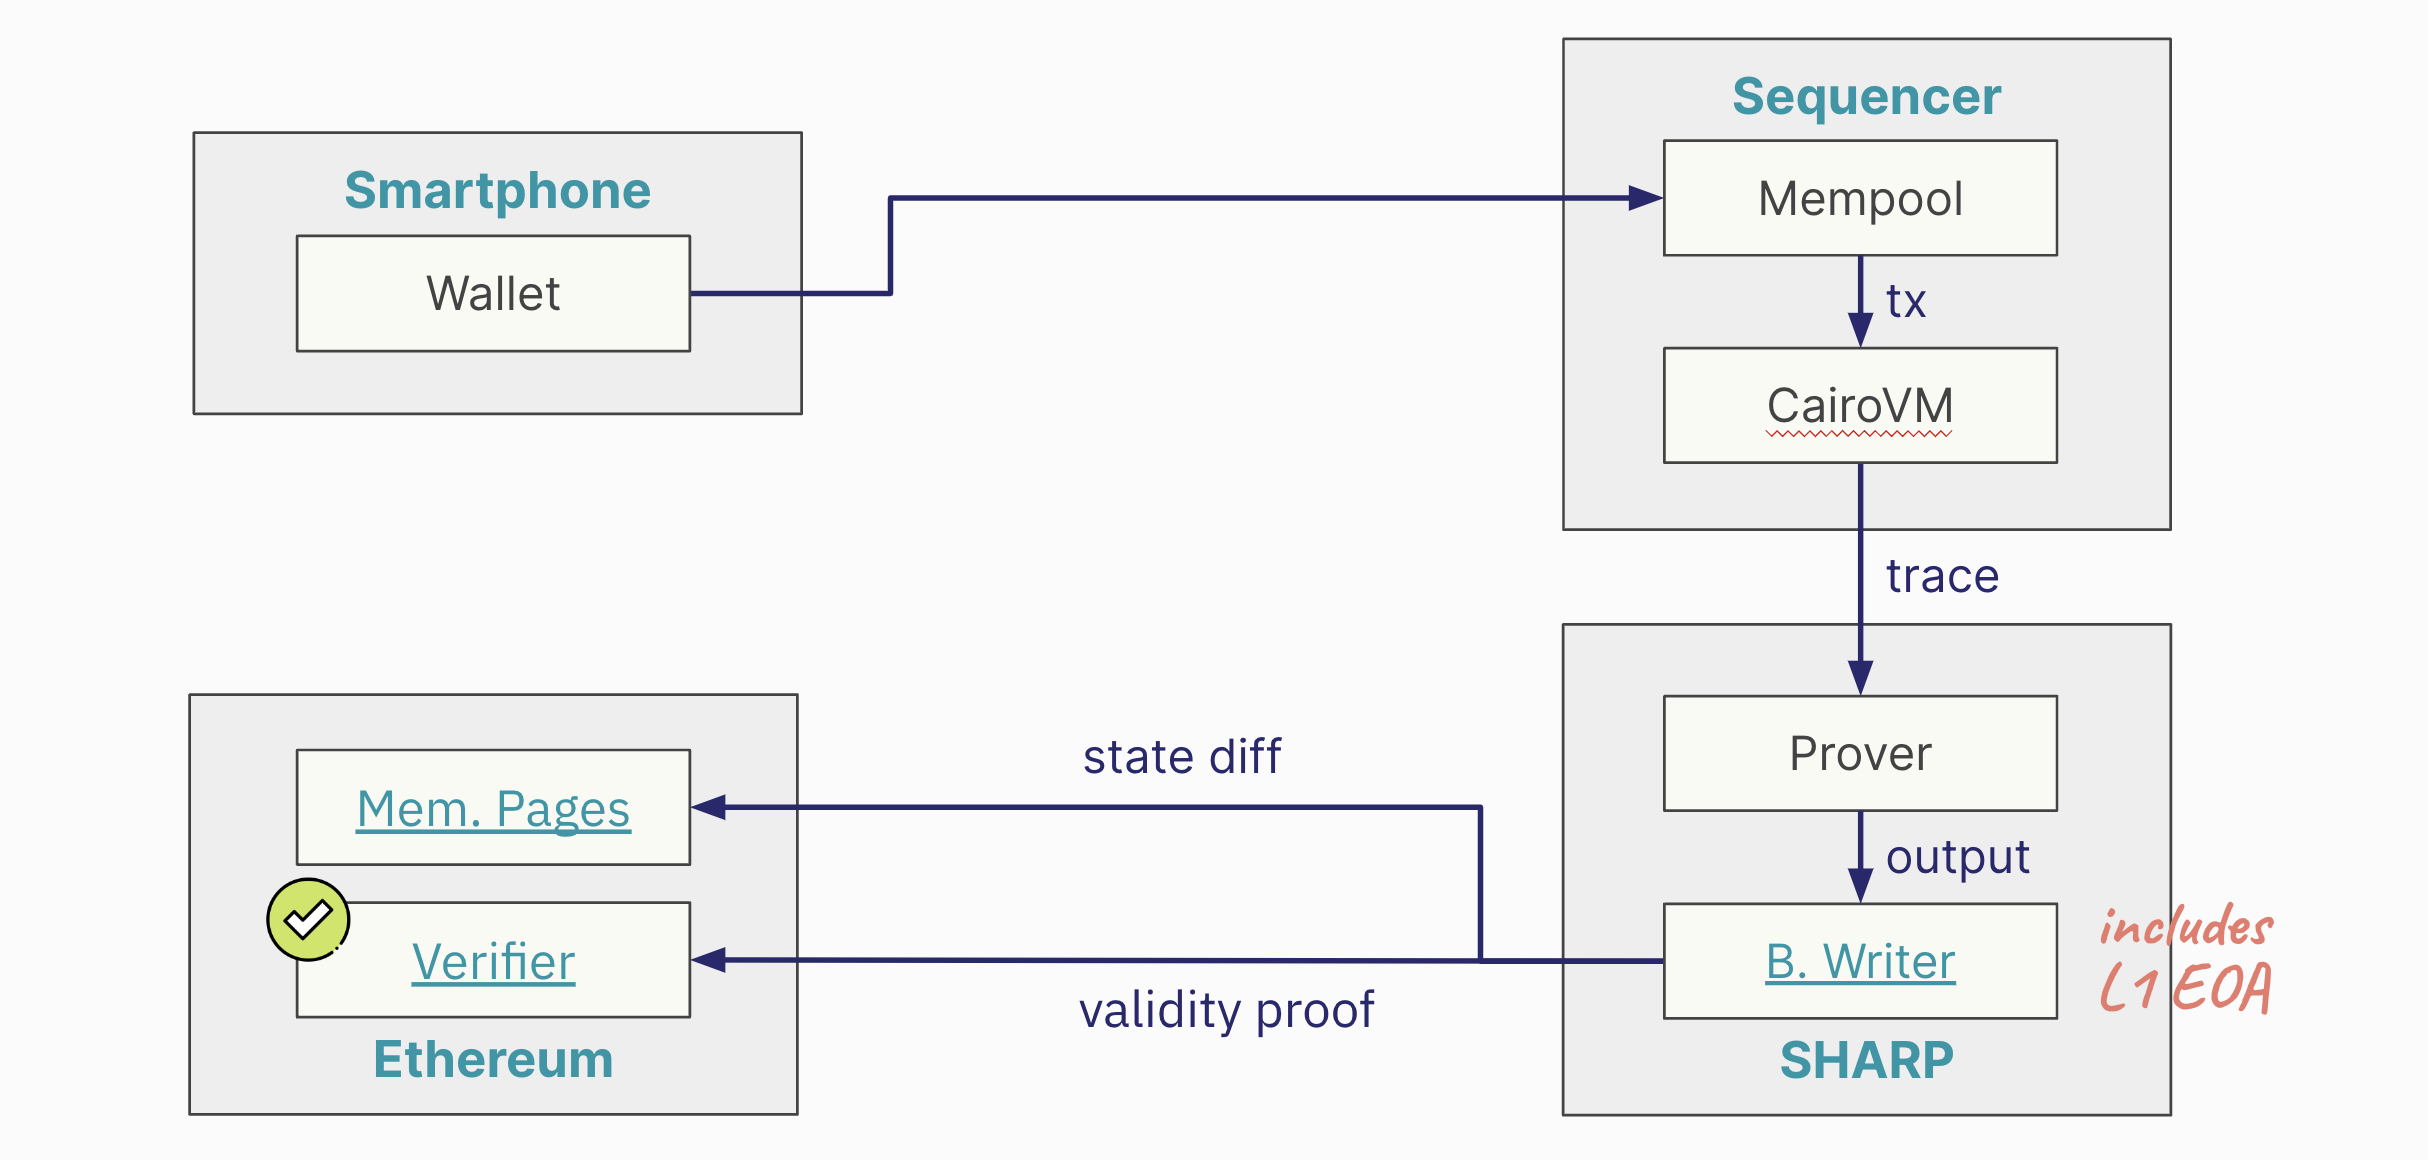
This is Ethereum address of the Blockchain Writer, which is by itself an EOA holding resources: 0x16d5783a96ab20c9157d7933ac236646b29589a4.
The cost for data availability in Starknet, as handled by SHARP, is a direct expense. There isn't any form of subsidy for these costs. SHARP bears the full financial responsibility for the block space required on Ethereum. The lack of subsidy in DA costs directly influences the fees users pay for transactions on Starknet.
A closer look at the transactions emanating from the Blockchain Writer, which are responsible for DA, reveals substantial costs. SHARP incurs millions of dollars in expenses for block space on Ethereum each month.
Data Availability Modes
Currently, there are three primary modes, with two already in use and a third on the horizon. These modes are Rollup, Validium, and Volition.
1. Rollup Mode
- Definition and Characteristics: The data for DA is posted directly on Ethereum. This approach is what classifies a Layer 2 solution as a Rollup.
- Advantages: The primary benefit of Rollup mode is enhanced liveness due to the reliability and track record of Ethereum. It provides robust guarantees about data availability.
- Cost Implications: This mode tends to be more expensive due to the cost associated with posting data on Ethereum. However, future implementations like EIP 4844 may reduce these costs.
- Example: Starknet, which sends data to the memory pages smart contract, is an example of a Rollup.
2. Validium Mode
- Definition and Characteristics: Characterized by Layer 2 networks not utilizing Ethereum for DA. Instead, data is stored off-chain.
- Advantages: The primary advantage of Validium is cost efficiency. Transactions in Validiums are typically much cheaper than in Rollups.
- Liveness Guarantees: The trade-off for reduced cost is weaker liveness guarantees compared to Ethereum-based DA.
- Example: StarkEx is an example of Validium, known for its significantly lower transaction costs compared to Rollups.
3. Volition Mode (Upcoming)
- Definition and Characteristics: Volition mode is a hybrid DA mode that combines aspects of both Rollup and Validium. It offers users the choice of where to store data, either on-chain (Ethereum) or off-chain.
- User Choice: The key feature of Volition mode is the flexibility it provides users in deciding their data storage preferences, balancing between cost and liveness guarantees.
- Implementation Timeline: Volition mode is expected to be introduced to networks like Starknet in the near future, potentially within a year or so.
The following table summarizes the key characteristics of each mode:
| Mode | Definition | Advantages | Cost | Example |
|---|---|---|---|---|
| Rollup | Data posted on Ethereum; a Layer 2 solution. | Reliable, robust data availability. | Higher cost. | Starknet |
| Validium | Data stored off-chain, not on Ethereum. | Lower transaction costs. | Lower cost. | StarkEx |
| Volition | Hybrid mode, choice of on-chain or off-chain. | Balance between cost and data availability. | - | - |
Sequencers
Before diving in, make sure to check out the Architecture chapter for a quick exploration of Starknet’s sequencers, provers and nodes.
Three main layers exist in blockchain: data availability, ordering, and execution. Sequencers have evolved within this evolving modular landscape of blockchain technology. Most L1 blockchains, like Ethereum, handle all these tasks. Initially, blockchains served as distributed virtual machines focused on organizing and executing transactions. Even roll-ups running on Ethereum today often centralize sequencing (ordering) and execution while relying on Ethereum for data availability. This is the current state of Starknet, which uses Ethereum for data availability and a centralized Sequencer for ordering and execution. However, it is possible to decentralize sequencing and execution, as Starknet is doing.
Each of these layers plays a crucial role in achieving consensus. First, the data must be available. Second, it needs to be put in a specific order. That’s the main job of a Sequencer, whether run by a single computer or a decentralized protocol. Lastly, you execute transactions in the order they’ve been sequenced. This final step, done by the Sequencer too, determines the system’s current state and keeps all connected clients on the same page.
Introduction to Sequencers
The advent of Layer Two (L2) solutions like Roll-Ups has altered the blockchain landscape, improving scalability and efficiency. But what about transaction order? Is it still managed by the base layer (L1), or is an external system involved? Enter Sequencers. They ensure transactions are in the correct order, regardless of whether they’re managed by L1 or another system.
In essence, sequencing has two core tasks: sequencing (ordering) and executing (validation). First, it orders transactions, determining the canonical sequence of blocks for a given chain fork. It then appends new blocks to this sequence. Second, it executes these transactions, updating the system’s state based on a given function.
To clarify, we see sequencing as the act of taking a group of unordered transactions and producing an ordered block. Sequencers also confirm the resulting state of the machine. However, the approach explained here separates these tasks. While some systems handle both ordering and state validation simultaneously, we advocate for treating them as distinct steps.
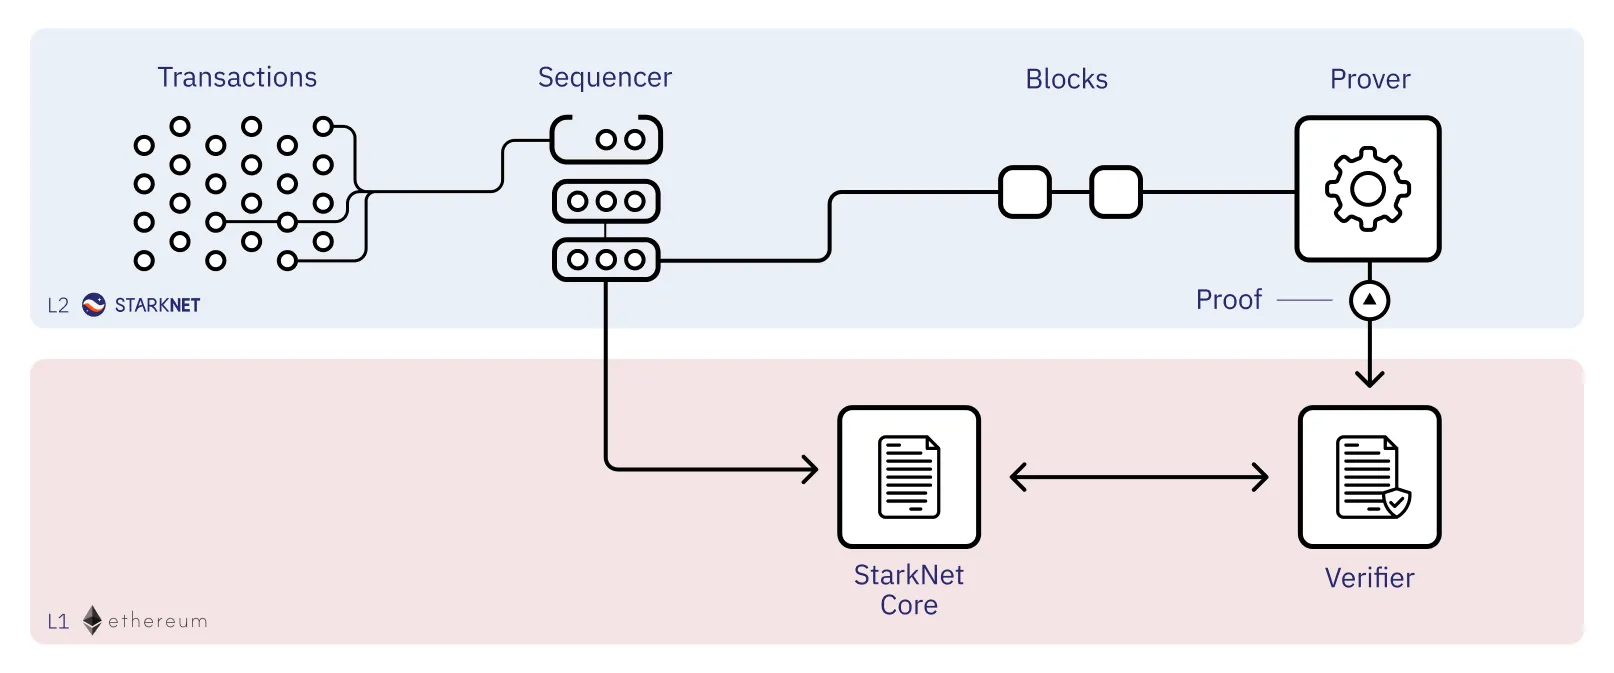
Sequencer role in the Starknet network
Sequencers in Starknet
Let’s delve into Sequencers by focusing on Madara and Kraken, two high-performance Starknet Sequencers. A Sequencer must, at least, do two things: order and execute transactions.
-
Ordering: Madara handles the sequencing process, supporting methods from simple FCFS and PGA to complex ones like Narwhall & Bullshark. It also manages the mempool, a critical data structure that holds unconfirmed transactions. Developers can choose the consensus protocol through Madara’s use of Substrate, which offers multiple built-in options.
-
Execution: Madara lets you choose between two execution crates: Blockifier and Starknet_in_Rust. Both use the Cairo VM for their framework.
We also have the Kraken Sequencer as another option.
-
Ordering: It employs Narwhall & Bullshark for mempool management. You can choose from multiple consensus methods, like Bullshark, Tendermint, or Hotstuff.
-
Execution: Runs on Starknet_in_Rust. Execution can be deferred to either Cairo Native or Cairo VM.
| Feature | Madara | Kraken |
|---|---|---|
Ordering Method |
FCFS, PGA, Narwhall & Bullshark |
Narwhall & Bullshark |
Mempool Management |
Managed by Madara |
Managed using Narwhall & Bullshark |
Consensus Options |
Developer’s choice through Substrate |
Bullshark, Tendermint or Hotstuff |
Execution Crates |
Blockifier, Starknet_in_rust |
Starknet_in_rust |
Execution Framework |
Understanding the Execution Layer
-
Blockifier, a Rust component in Starknet Sequencers, generates state diffs and blocks. It uses Cairo VM. Its goal is to become a full Starknet Sequencer.
-
Starknet_in_Rust is another Rust component for Starknet that also generates state diffs and blocks. It uses Cairo VM.
-
Cairo Native stands out by converting Cairo’s Sierra code to MLIR. See an example here.
The Need for Decentralized Sequencers
For more details on the Decentralization of Starknet, refer to the dedicated subchapter in this Chapter.
Proving transactions doesn’t require to be decentralized (although in the near future Starknet will operate with decentralized provers). Once the order is set, anyone can submit a proof; it’s either correct or not. However, the process that determines this order should be decentralized to maintain a blockchain’s original qualities.
In the context of Ethereum’s Layer 1 (L1), Sequencers can be likened to Ethereum validators. They are responsible for creating and broadcasting blocks. This role is divided under the concept of "Proposer-Builder Separation" (PBS) (Hasu, 2023). Block builders form blocks (order the transactions), while block proposers, unaware of the block’s content, choose the most profitable one. This separation prevents transaction censorship at the protocol level. Currently, most Layer 2 (L2) Sequencers, including Starknet, perform both roles, which can create issues.
The drive toward centralized Sequencers mainly stems from performance issues like high costs and poor user experience on Ethereum for both data storage and transaction ordering. The challenge is scalability: how to expand without sacrificing decentralization. Opting for centralization risks turning the blockchain monopolistic, negating its unique advantages like network-effect services without monopoly.
With centralization, blockchain loses its core principles: credible neutrality and resistance to monopolization. What’s wrong with a centralized system? It raises the risks of censorship (via transaction reordering).
A centralized validity roll-up looks like this:
-
User Interaction & Selection: Users send transactions to a centralized Sequencer, which selects and orders them.
-
Block Formation: The Sequencer packages these ordered transactions into a block.
-
Proof & Verification: The block is sent to a proving service, which generates a proof and posts it to Layer 1 (L1) for verification.
-
Verification: Once verified on L1, the transactions are considered finalized and integrated into the L1 blockchain.
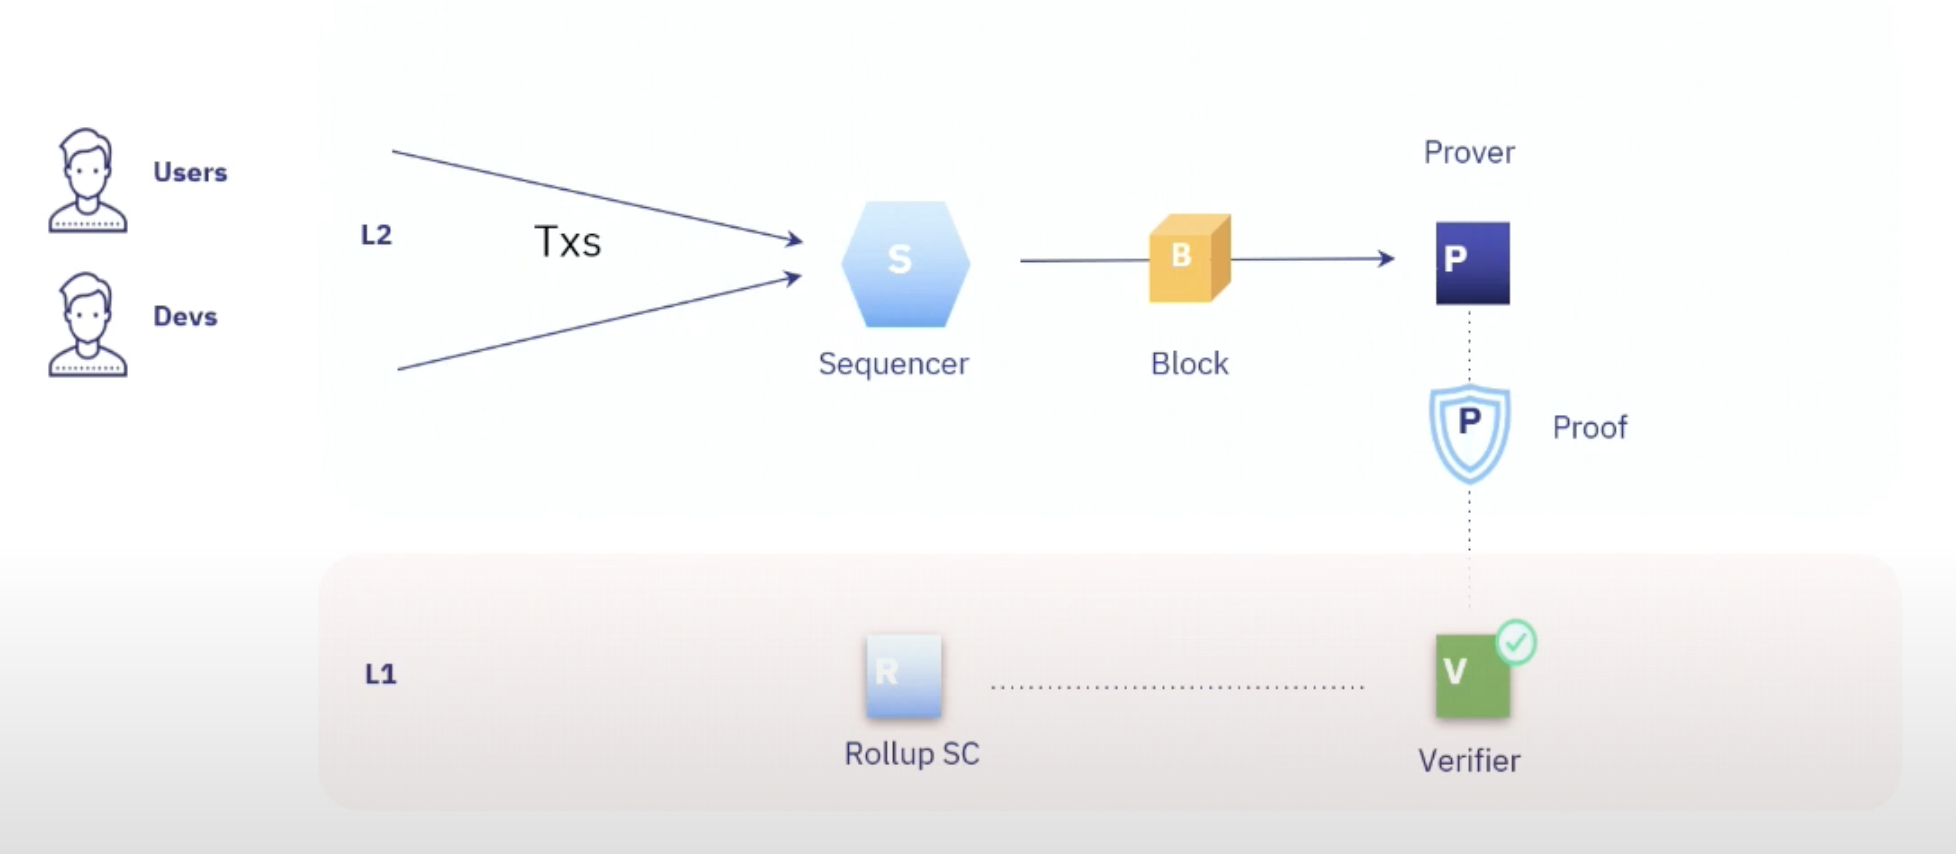
Centralized rollup
While centralized roll-ups can provide L1 security, they come with a significant downside: the risk of censorship. Hence, the push for decentralization in roll-ups.
Conclusion
This chapter has dissected the role of Sequencers in the complex ecosystem of blockchain technology, focusing on Starknet’s current state and future directions. Sequencers essentially serve two main functions: ordering transactions and executing them. While these tasks may seem straightforward, they are pivotal in achieving network consensus and ensuring security.
Given the evolving modular architecture of blockchain—with distinct layers for data availability, transaction ordering, and execution—Sequencers provide a crucial link. Their role gains more significance in the context of Layer 2 solutions, where achieving scalability without sacrificing decentralization is a pressing concern.
In Starknet, Sequencers like Madara and Kraken demonstrate the potential of high-performance, customizable solutions. These Sequencers allow for a range of ordering methods and execution frameworks, proving that there’s room for innovation even within seemingly rigid structures.
The discussion on "Proposer-Builder Separation" (PBS) highlights the need for role specialization to maintain a system’s integrity and thwart transaction censorship. This becomes especially crucial when we recognize that the current model of many L2 Sequencers, Starknet included, performs both proposing and building, potentially exposing the network to vulnerabilities.
To reiterate, Sequencers aren’t just a mechanism for transaction ordering and execution; they are a linchpin in blockchain’s decentralized ethos. Whether centralized or decentralized, Sequencers must strike a delicate balance between scalability, efficiency, and the overarching principle of decentralization.
As blockchain technology continues to mature, it’s worth keeping an eye on how the role of Sequencers evolves. They hold the potential to either strengthen or weaken the unique advantages that make blockchain technology so revolutionary.
Madara 🚧
Madara is a Starknet sequencer that operates on the Substrate framework, executing Cairo programs and Starknet smart contracts with the Cairo VM. Madara enables the launch and control of Starknet Appchains or L3s.
Get Started with Madara
In this section, we will guide you through the building process so you can start hacking on the Madara stack.
We will go from running your chain locally to changing the consensus algorithm and interacting with smart contracts on your own chain!
Let's start
Install dependencies
We first need to make sure you have everything needed to complete this tutorial.
| Dependency | Version | Installation |
|---|---|---|
| Rust | rustc 1.69.0-nightly | curl --proto '=https' --tlsv1.2 -sSf https://sh.rustup.rs \| sh rustup toolchain install nightly |
| nvm | latest | curl -o- https://raw.githubusercontent.com/nvm-sh/nvm/v0.39.3/install.sh \| bash |
| Cairo | 1.0 | curl -L https://github.com/franalgaba/cairo-installer/raw/main/bin/cairo-installer \| bash |
for macos ensure you have protobuf to avoid build time errors
brew install protobuf
Build the chain
We will spin up a CairoVM Rollup from the Madara Stack source code. You could use docker images, but this way we keep the option to modify component behavior if you need to do so. The Madara stack source code is a monorepo which can be found here
cd ~
git clone https://github.com/keep-starknet-strange/madara.git
Then let's build the chain in release mode
cd madara
cargo build --release
Single-Node Development Chain
This command will start the single-node development chain with non-persistent
run madara setup configuration:
./target/release/madara setup --chain dev --from-local ./configs
run madara node:
./target/release/madara --dev
Purge the development chain's state (only if you you want to keep the persist state of the node ):
./target/release/madara purge-chain --dev
Start the development chain with detailed logging:
RUST_BACKTRACE=1 ./target/release/madara -ldebug --dev
Node example
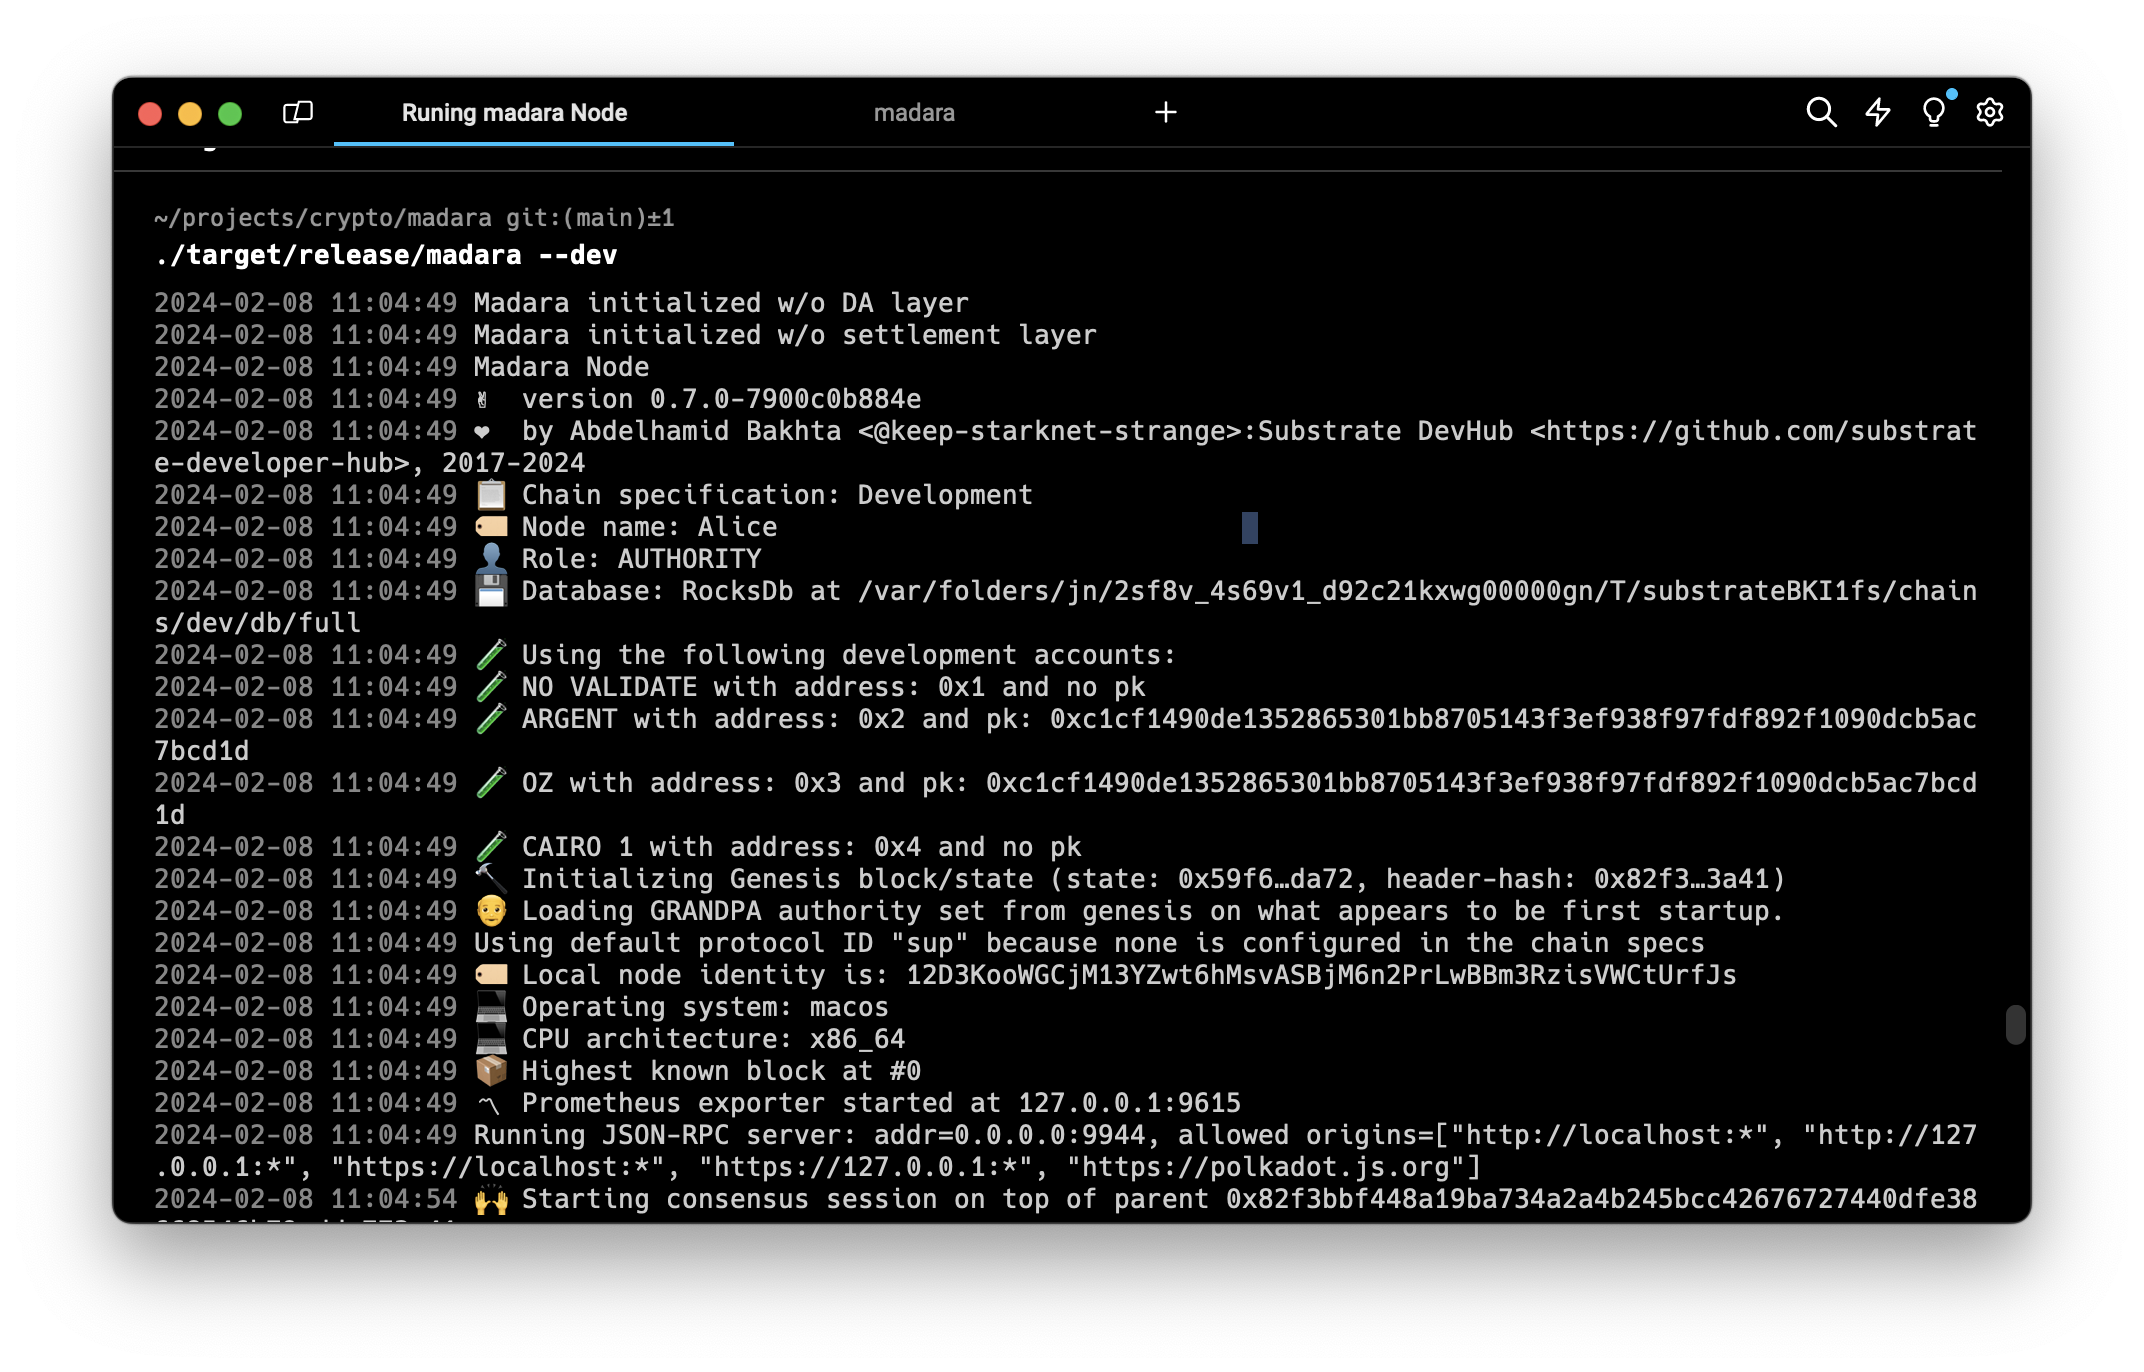 If everything works correctly, we can go to the next step and create our own genesis state!
By default, the chain will run with the following config :
- GRANDPA & AURA
- An
adminaccount contract at address0x0000000000000000000000000000000000000000000000000000000000000001 - A test contract at address
0x0000000000000000000000000000000000000000000000000000000000001111 - A fee token (ETH) at address
0x040e59c2c182a58fb0a74349bfa4769cbbcba32547591dd3fb1def8623997d00 - The
adminaccount address has aMAXbalance of fee token - An ERC20 contract at address
0x040e59c2c182a58fb0a74349bfa4769cbbcba32547591dd3fb1def8623997d00
This chain specification can be thought of as the main source of information that will be used when connecting to the chain.
(Not available yet) Deploy your settlement smart contracts
Connect with Polkadot-JS Apps Front-end
Once the node template is running locally, you can connect it with Polkadot-JS Apps front-end to interact with your chain. use polkadat frontend or madara zone frontend connecting the Apps to your local node template.
UI connection
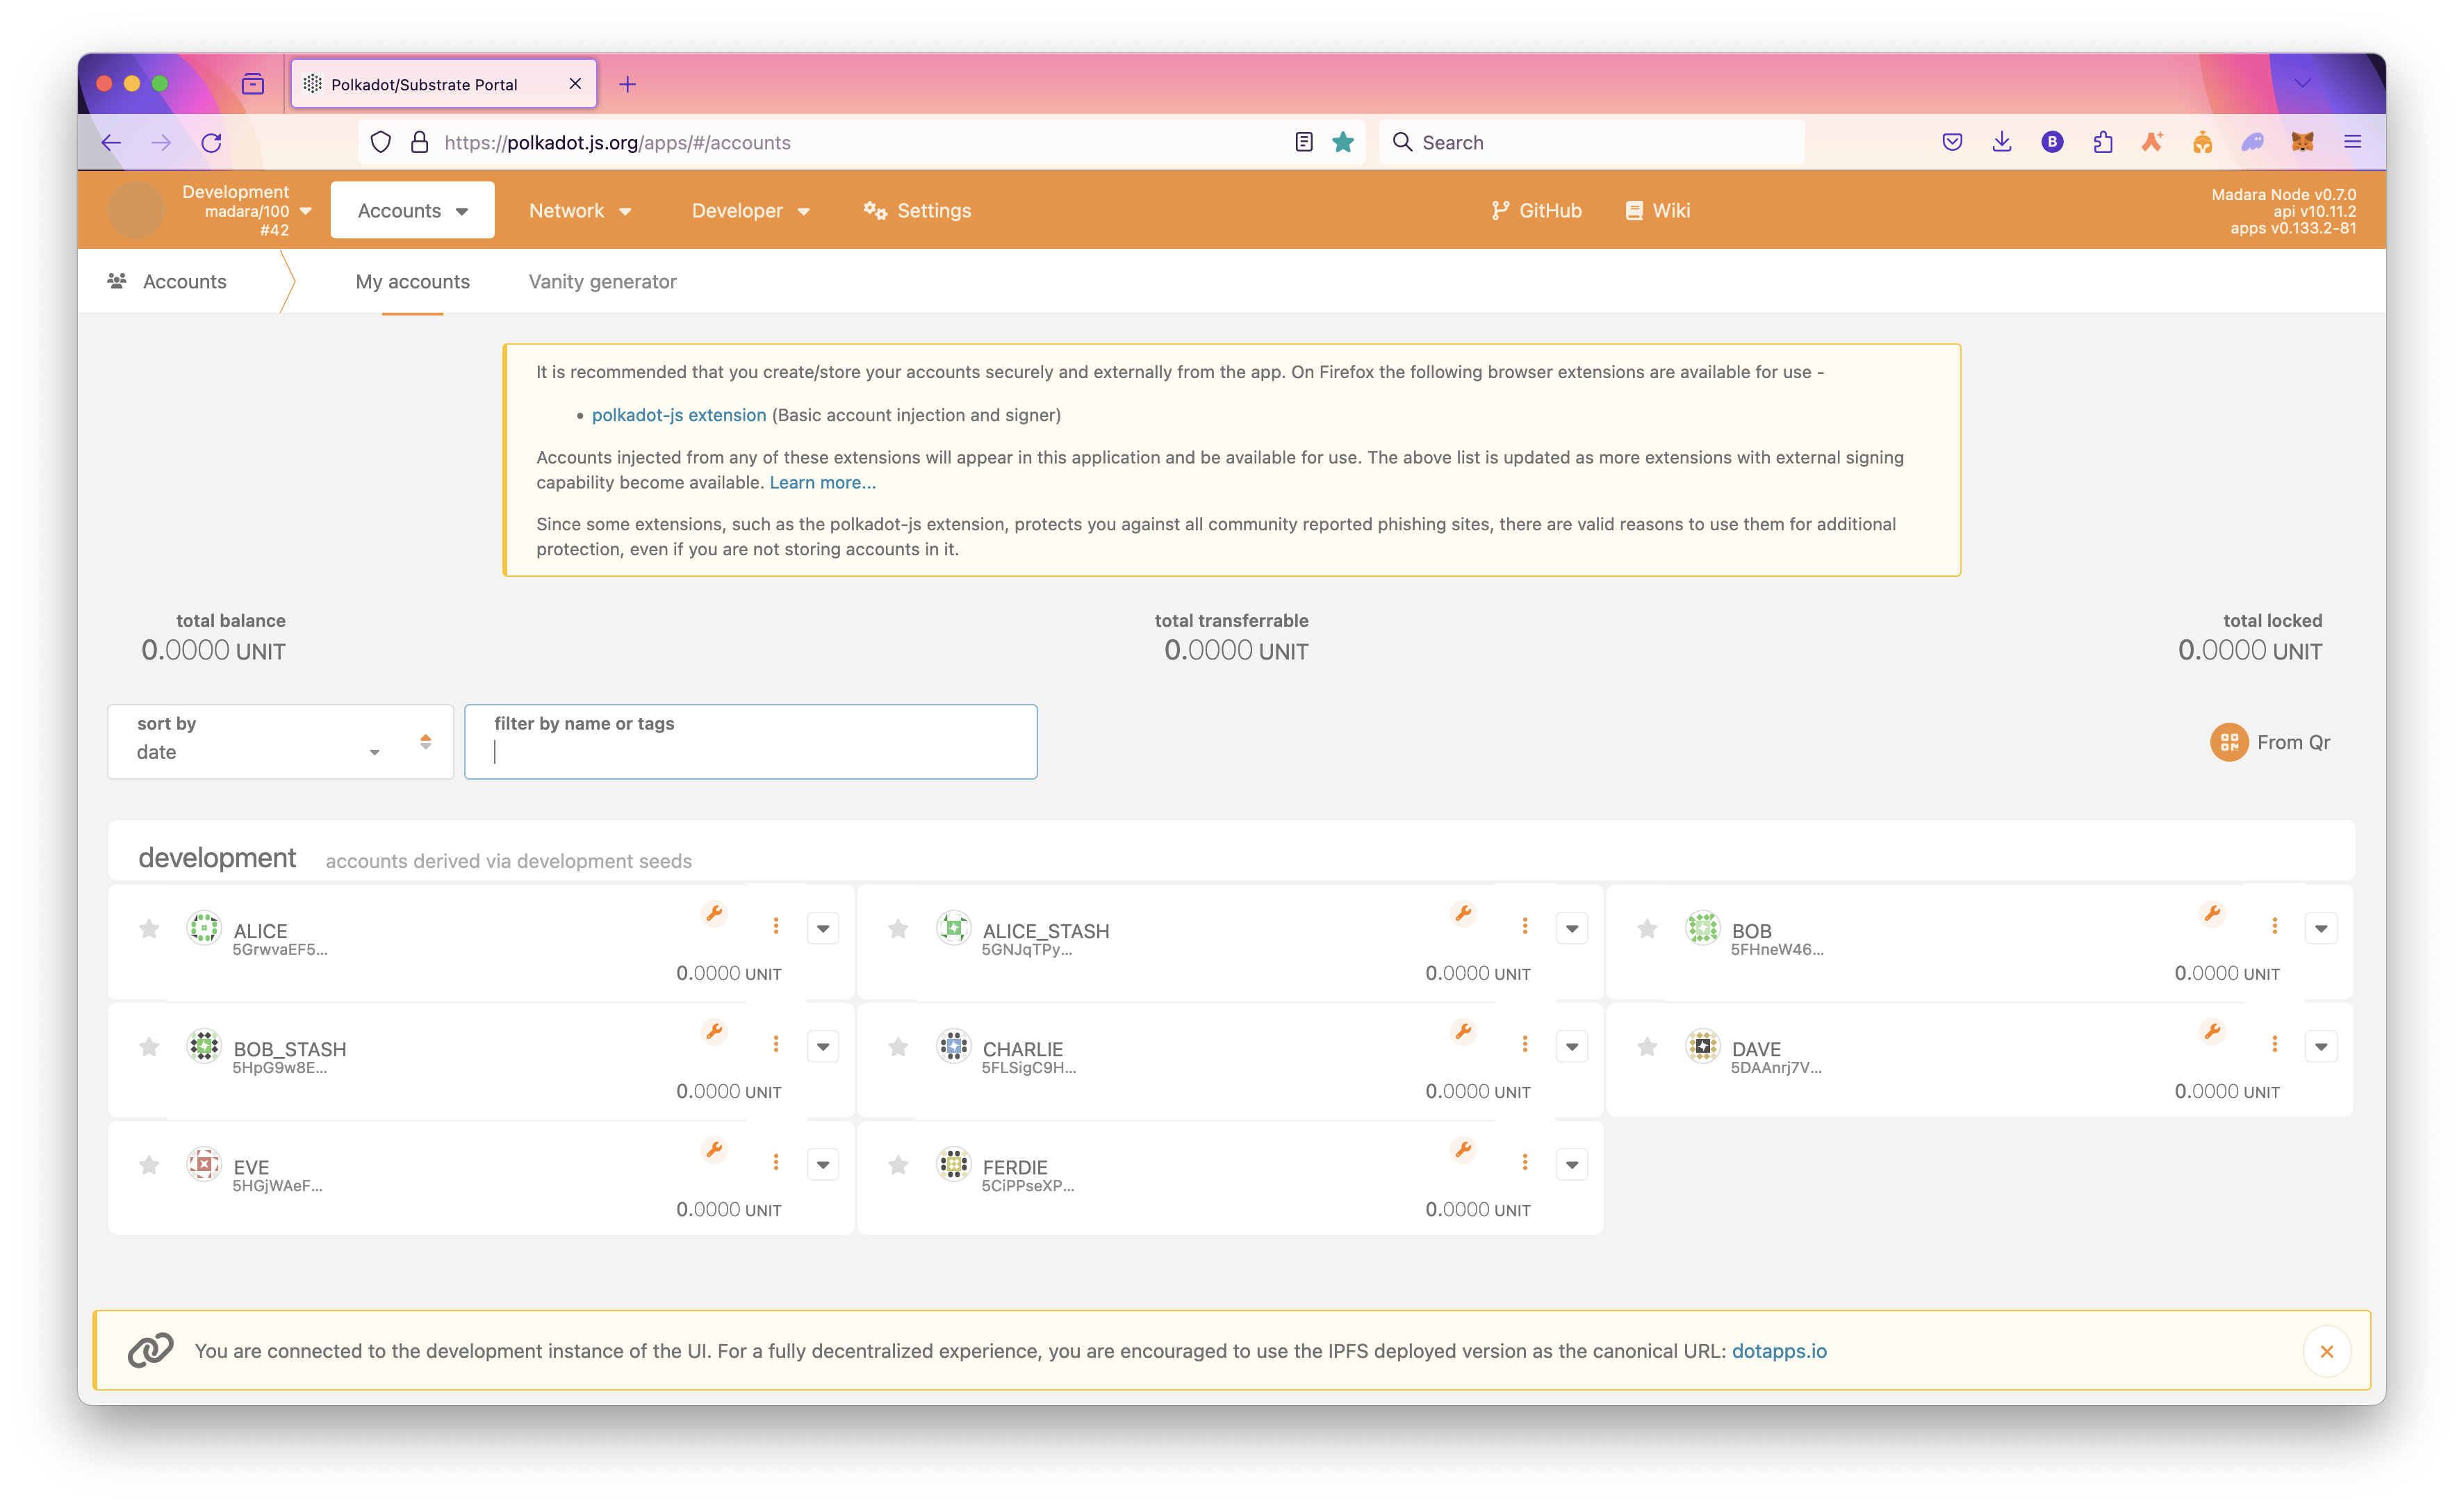
Start your chain
Now that we are all setup, we can finally run the chain!
There are a lot of ways you can run the chain depending on which role you want to take :
- Full node
Synchronizes with the chain to store the most recent block state and block headers for older blocks. When developing your chain, you can simply run it in developer mode :
./target/release/madara --dev --execution=native
- Archive node
Maintains all blocks starting from the genesis block with complete state available for every block.
If you want to keep the whole state of the chain in a `/tmp/ folder :
./target/release/madara --base-path /tmp/
In this case, note that you can purge the chain's state whenever you like by running :
./target/release/madara purge-chain --base-path /tmp
- RPC node
Exposes an RPC interface over HTTP or WebSocket ports for the chain so that users can read the blockchain state and submit transactions. There are often multiple RPC nodes behind a load balancer. If you only care about exposing the RPC you can run the following :
./target/release/madara setup --chain dev --from-local ./configs
run Madara app rpc :
./target/release/madara --dev --unsafe-rpc-external --rpc-methods Safe --rpc-max-connections 5000
you can now interact with madara rpc
Eg you can get the chain using the rpc
curl -X POST http://localhost:9944 \
-H 'Content-Type: application/json' \
-d '{
"jsonrpc": "2.0",
"method": "starknet_chainId",
"params": [],
"id": 1
}'
Madara rpc examples
Output example
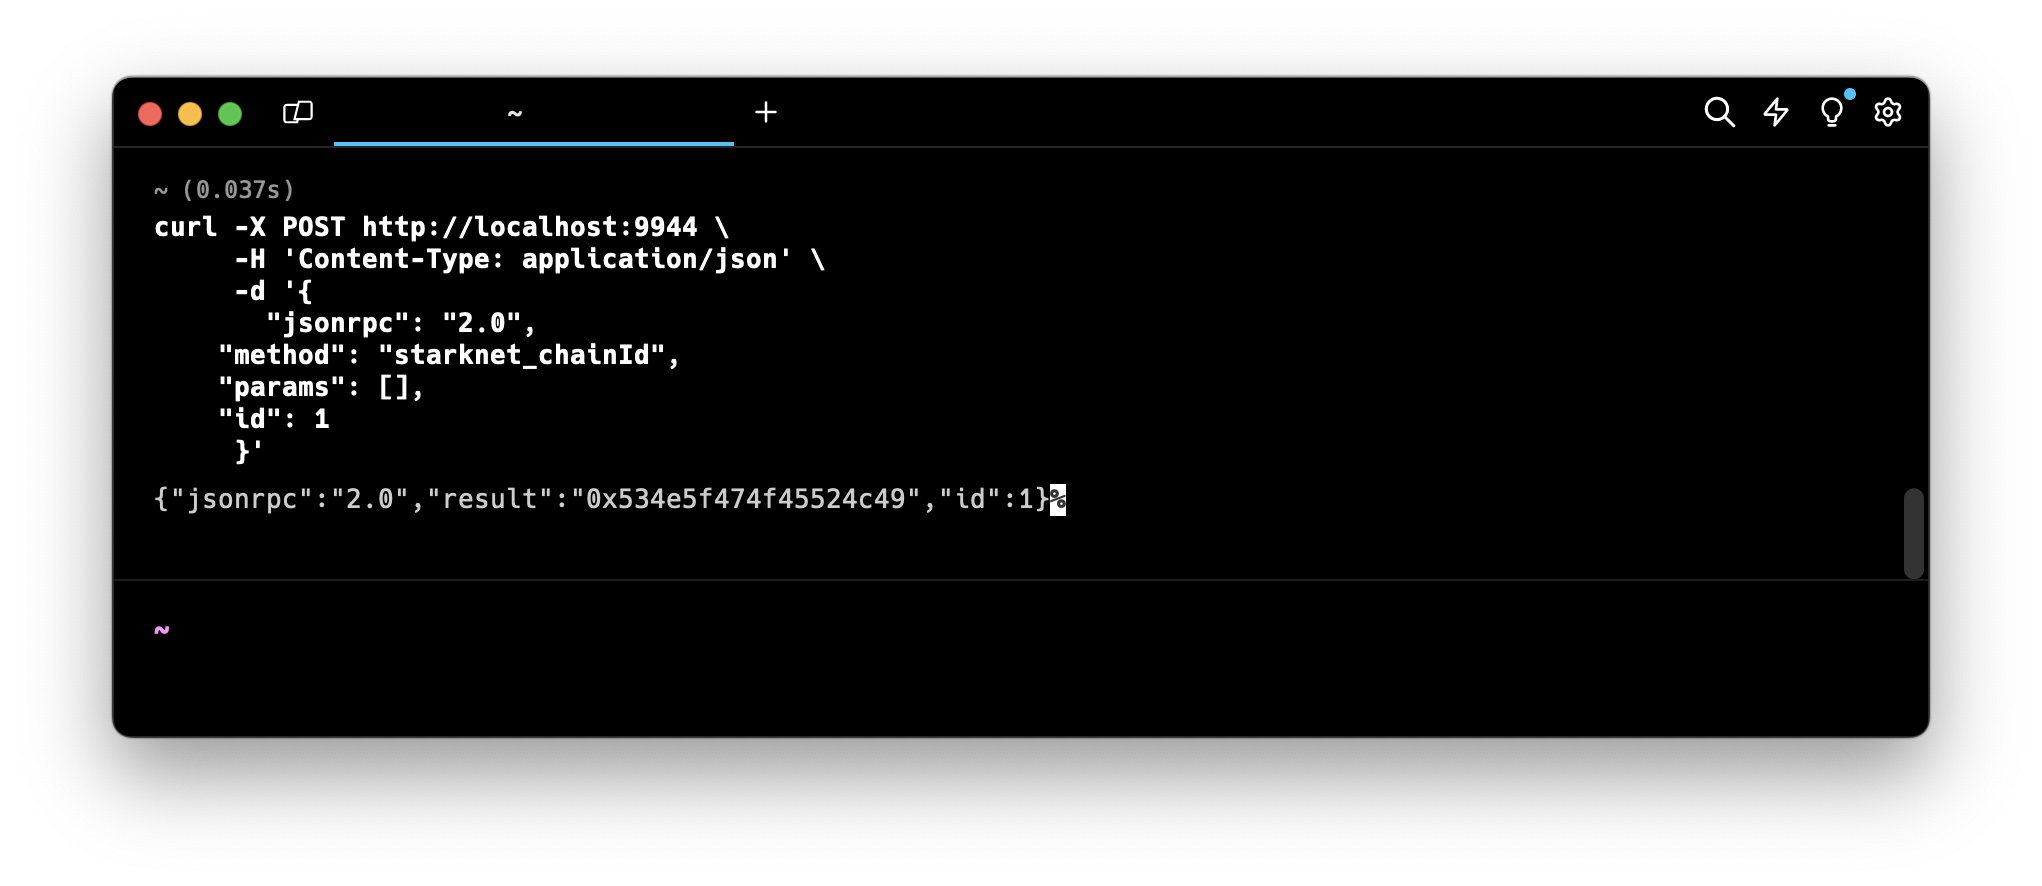
- Validator node
Secures the chain by staking some chosen asset and votes on consensus along with other validators.
Deploy an account on your chain
Ooook, now your chain is finally running. It's time to deploy your own account!
Example of curl commad
curl -X POST http://localhost:9944 \
-H 'Content-Type: application/json' \
-d '{
"jsonrpc": "2.0",
"method": "starknet_addDeployAccountTransaction",
"params": {
"deploy_account_transaction": {
"type": "DEPLOY_ACCOUNT",
"max_fee": "0x0",
"version": "0x1",
"signature": [
"0xd96bc7affb5648b601ddb49e9fd23f6ebfe59375e2ce5dd06b7db638d21b71",
"0x6582c1512c8515254a52deb5fef1320d4f5dd0cb8352b260a4e7a90c61510ba",
"0x5dec330eebf36c8672b60db4a718d44762d3ae6d1333e553197acb47ee5a062",
"0x0",
"0x0",
"0x0",
"0x0",
"0x0",
"0x0",
"0x0"
],
"nonce": "0x0",
"contract_address_salt": "0x61fcdc5594c726dc437ddc763265853d4dce51a57e25ff1d97b3e31401c7f4c",
"constructor_calldata": [
"0x5aa23d5bb71ddaa783da7ea79d405315bafa7cf0387a74f4593578c3e9e6570",
"0x2dd76e7ad84dbed81c314ffe5e7a7cacfb8f4836f01af4e913f275f89a3de1a",
"0x1",
"0x61fcdc5594c726dc437ddc763265853d4dce51a57e25ff1d97b3e31401c7f4c"
],
"class_hash": "0x3131fa018d520a037686ce3efddeab8f28895662f019ca3ca18a626650f7d1e"
}
},
"id": 1
}'
expected json result
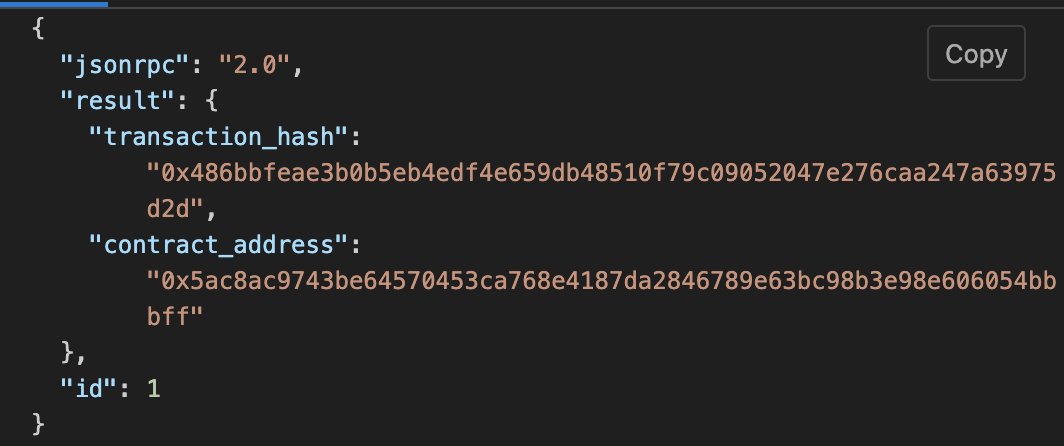
Building Madara App Chain Your Using madara appchain Template
clone the Madara appchain Template
git clone https://github.com/keep-starknet-strange/madara-app-chain-template.git
Getting Started
Ensure you have Required dependancies To run madara AppChain
Depending on your operating system and Rust version, there might be additional packages required to compile this template.
Check the Install instructions for your platform for the most common dependencies.
Alternatively, you can use one of the alternative installation options.
Build
Use the following command to build the node without launching it:
cargo build --release
Embedded Docs
After you build the project, you can use the following command to explore its parameters and subcommands:
./target/release/app-chain-node -h
You can generate and view the Rust Docs for this template with this command:
cargo +nightly doc --open
Single-Node Development Chain
Set up the chain with the genesis config. More about defining the genesis state is mentioned below.
./target/release/app-chain-node setup --chain dev --from-local ./configs
The following command starts a single-node development chain.
./target/release/app-chain-node --dev
You can specify the folder where you want to store the genesis state as follows
./target/release/app-chain-node setup --chain dev --from-local ./configs --base-path=<path>
If you used a custom folder to store the genesis state, you need to specify it when running
./target/release/app-chain-node --base-path=<path>
Please note, Madara overrides the default dev flag in substrate to meet its requirements. The following flags are automatically enabled with the --dev argument:
--chain=dev, --force-authoring, --alice, --tmp, --rpc-external, --rpc-methods=unsafe
To store the chain state in the same folder as the genesis state, run the following command. You cannot combine the base-path command
with --dev as --dev enforces --tmp which will store the db at a temporary folder. You can, however, manually specify all flags that
the dev flag adds automatically. Keep in mind, the path must be the same as the one you used in the setup command.
./target/release/app-chain-node --base-path <path>
To start the development chain with detailed logging, run the following command:
RUST_BACKTRACE=1 ./target/release/app-chain-node -ldebug --dev
Connect with Polkadot-JS Apps Front-End
After you start the app chain locally, you can interact with it using the hosted version of the Polkadot/Substrate Portal front-end by connecting to the local node endpoint. A hosted version is also available on IPFS (redirect) here or IPNS (direct) here. You can also find the source code and instructions for hosting your own instance on the polkadot-js/apps repository.
Multi-Node Local Testnet
If you want to see the multi-node consensus algorithm in action, see Simulate a network.
Template Structure
The app chain template gives you complete flexibility to modify exiting features of Madara and add new features as well.
Configuring appChain ID
Fetching your Chain ID:
The default chain ID on Madara is SN_GOERLI, to verify your chain ID, a POST call can be made to the RPC endpoint.
Initiate RPC Request:
- Execute the following POST request via curl to query the chain ID from your Madara node.
- Endpoint: http://localhost:9944 (replace with the appropriate remote URL).
curl --location 'http://localhost:9944' \
--header 'Content-Type: application/json' \
--data '{
"id": 0,
"jsonrpc": "2.0",
"method": "starknet_chainId",
"params": {}
}'
Parse Response:
Extract the chain ID in hex format from the "result" field within the JSON response.
{
"jsonrpc": "2.0",
"result": "0x534e5f474f45524c49",
"id": 0
}
Translate Hex:
Use a hex converter tool (e.g., https://stark-utils.vercel.app/converter) to obtain the readable string representation of the chain ID.
Setting a custom Chain ID:
The Chain ID for your Madara app chain is configured in crates/runtime/src/pallets.rs.
In Madara your chain ID is represented as the montgomery representation for a string.
To update this follow the below steps;
Define your Chain ID:
Choose a string to represent your app chain.
Convert Chain ID to felt
Navigate to https://stark-utils.vercel.app/converter and input your chosen string. The generated felt value is your hexadecimal representation for the string.
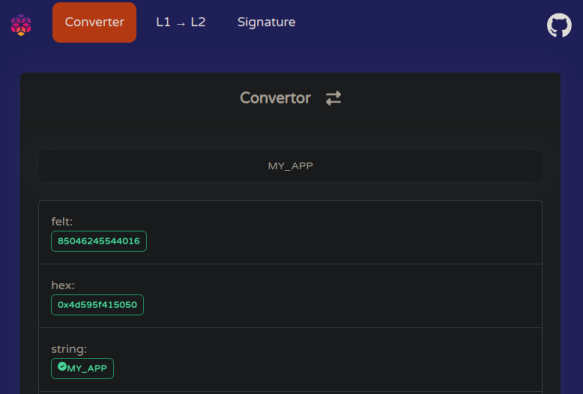
Generate montgomery representation:
Use Starkli to convert the felt value to a montgomery representation compatible with Madara.
starkli mont 85046245544016
[
18444022593852143105,
18446744073709551615,
18446744073709551615,
530195594727478800,
]
Update the Chain ID:
Open crates/primitives/chain-id/src/lib.rs and add your Chain ID alongside existing definitions:
#![allow(unused)] fn main() { pub const MY_APP_CHAIN_ID: Felt252Wrapper = Felt252Wrapper(starknet_ff::FieldElement::from_mont([ 18444025906882525153, 18446744073709551615, 18446744073709551615, 530251916243973616, ])); }
Update pallets.rs:
- Modify the import statement in
crates/runtime/src/pallets.rsto include your new Chain ID definition (refer to https://github.com/keep-starknet-strange/madara/blob/main/crates/runtime/src/pallets.rs#L13 for reference). - Update the usage of the Chain ID within the code itself (refer to https://github.com/keep-starknet-strange/madara/blob/main/crates/runtime/src/pallets.rs#L164 for reference).
Rebuild your Madara app chain with the updated pallets.rs file. Your app chain will now operate with your custom Chain ID.
appchain tooling
Madara is made to be 100% Starknet compatible out of the box. This means that you can leverage all existing Starknet tools (detailed list here). In these docs, we cover some famous tools for you
Argent X Overview
Argent X is an open-source Starknet wallet.
Installing Argent X
Follow the official Argent X installation instructions.
Use Argent X with Madara
Argent X includes the Mainnet, Sepolia, and Goerli networks by default, but connecting with your local Madara chain requires manual configuration. This involves adding a custom network within Argent X's settings.
Configuring Argent X for Madara appchain
Open the Argent X wallet and navigate to Settings.
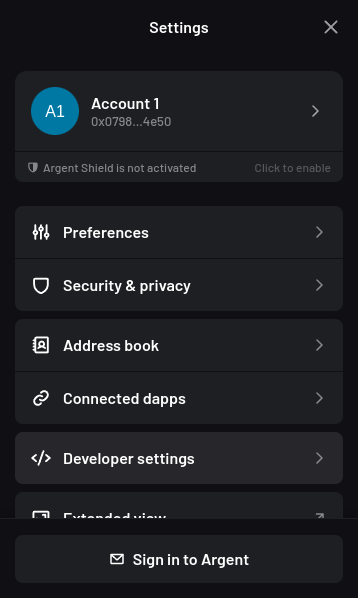
Select "Developer settings" and then "Manage networks".
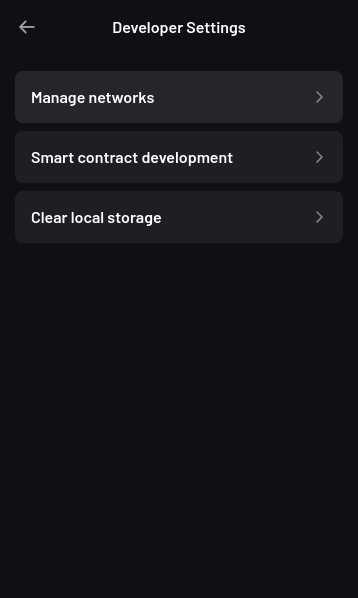
Click the plus button on the top right to add a network.
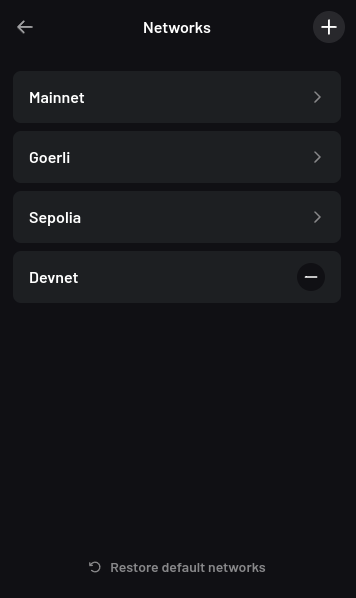
Fill in the following fields:
-
Network Name: A friendly name for the Madara network.
-
Chain ID: The default chain ID on Madara is
SN_GOERLI, to retrieve your chain ID or to set a custom chain ID, refer to the Chain ID section of Madara documentation. -
RPC URL:
http://localhost:9944 -
Sequencer URL:
http://localhost:9944
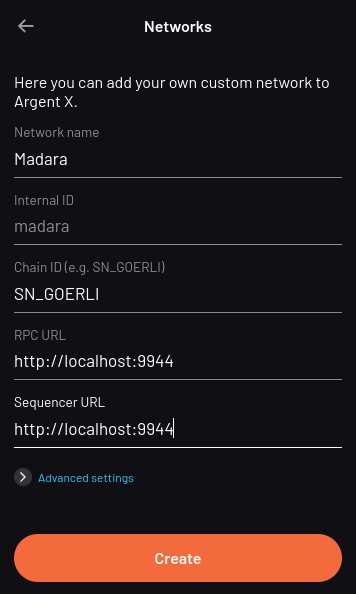
Save the new network configuration.
Once you have added Madara as a network, you can now connect to it.
Deploying your Starknet wallet
Upon creation, an Argent X wallet generates a Starknet address. However, this address exists in an "undeployed" state until you initiate your first transaction.
Argent X manages the activation process under the hood; your first outgoing transaction acts as the trigger. This transaction initiates the deployment of your smart contract on the Madara chain. This deployment incurs a one-time fee.
Resources
Braavos Overview
Braavos is a Starknet wallet.
Installing Braavos
Follow the official Braavos installation instructions.
Use Braavos with Madara appchain
Braavos includes the Mainnet, Sepolia, and Goerli networks by default, but connecting with your local Madara chain requires manual configuration. This involves adding a custom network within Braavos's settings.
Configuring Braavos for Madara
Access Network Tab
Open the Braavos wallet and navigate to the "Network" tab.
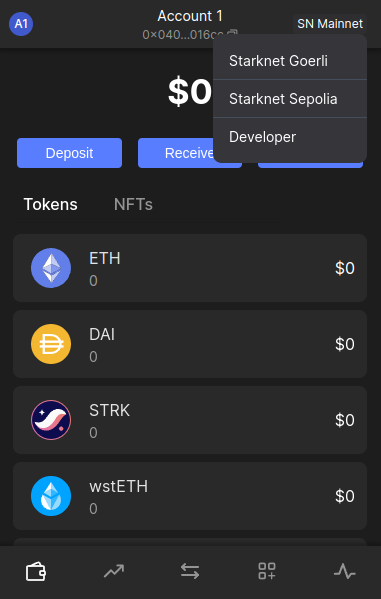
Enable Developer Mode
Locate the "Developer" option and select it. If prompted, choose "Add Account" to proceed.
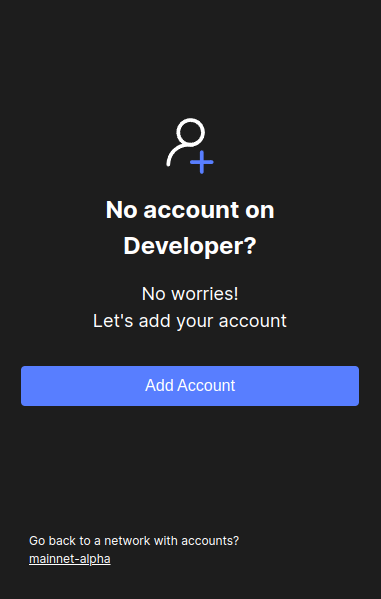
Access General Configuration:
Click on the account icon, on the top left side and navigate to the General tab.
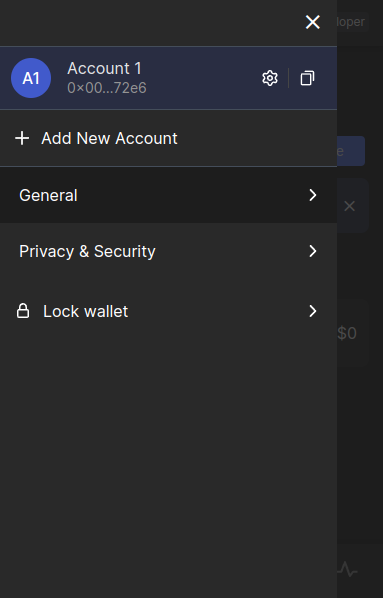
Switch to the Developer Tab
Within the "General" section, switch to the "Developer" tab.
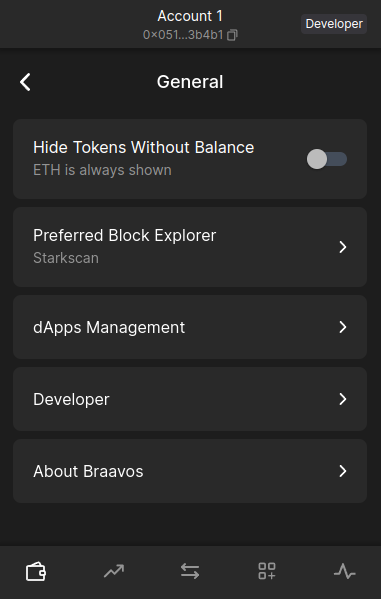
Configure RPC Connection
- Enable the "Use RPC provider" checkbox.
- Set the "Node host" field to localhost.
- Set the "Node port" field to 9944, assuming you're using the default Madara port.
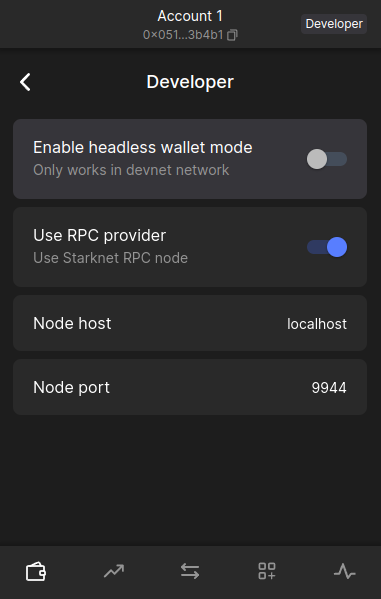
Once you have added Madara as a network, you can now connect to it.
Starkli Overview
Starkli is a command-line interface (CLI) tool designed to streamline interaction with your Madara chain. It simplifies managing accounts, deploying and interacting with smart contracts, and accessing network data.
Installing Starkli
Install starkli v0.1.20
Madara currently is only compatible with starkli v0.1.20. Active development is underway to ensure the latest version is supported. Run starkliup to install starkli v0.1.20
starkliup -v 0.1.20
Starkli should now be installed. Restart the terminal
Verify Starkli installation
starkli --version
The output should display
0.1.20 (e4d2307)
Starkli allows you to perform all operations on your chain without leaving the command line.
Use Starkli in Madara
Before starting with configuring Starkli, add your Madara RPC URL to the env. By default, this would be http://localhost:9944
export STARKNET_RPC="http://localhost:9944/"
Configuring Starkli for Madara
The Starkli tutorial here should work with Madara. If you face issues
when deploying your smart contract, ensure you're Scarb 0.6.1. You can use asdf for the same as explained here.
Also, make sure you've added the following lines in your Scarb.toml
[dependencies]
starknet = ">=2.1.0"
[[target.starknet-contract]]
Resources
Deploying your Starknet wallet
Upon creation, a Braavos wallet generates a Starknet address. However, this address exists in an "undeployed" state until you initiate your first transaction.
Braavos manages the activation process under the hood; your first outgoing transaction acts as the trigger. This transaction initiates the creation and deployment of your personal smart contract on the Madara chain. This deployment incurs a one-time fee.
Resources
Starknet.js Overview
Starknet.js is a lightweight JavaScript/TypeScript library enabling interaction between your DApp and Starknet. Starknet.js allows you to interact with Starknet accounts, providers, and contracts.
Installing Starknet.js
Follow the official Starknet.js installation instructions: https://www.starknetjs.com/docs/guides/intro
Configuring Starknet.js for Madara
Connecting to your running Madara node requires you to point your provider to the Madara RPC URL.
const provider = new starknet.RpcProvider({
nodeUrl: "http://localhost:9944",
});
You can now use this provider to interact with the chain as explained in the Starknet.js docs.
Karnot has also developed ready-to-use scripts using Starknet.js to fund wallets, declare and deploy contracts and some other useful tasks. You can refer to them here.
Resources
Moreover, Madara is built upon Substrate so you can actually also leverage some popular substrate tooling like polkadot.js, telemetry, polkadot-api and others.
Existing Pallets
Madara comes with only one pallet - pallet_starknet. This pallet allows app chains to execute Cairo contracts and have 100% RPC compatabiltiy with Starknet mainnet. This means all Cairo tooling should work out of the box with the app chain. At the same time, the pallet also allows the app chain to fine tune specific parameters to meet their own needs.
DisableTransactionFee: If true, calculate and store the Starknet state commitmentsDisableNonceValidation: If true, check and increment nonce after a transactionInvokeTxMaxNSteps: Maximum number of Cairo steps for an invoke transactionValidateMaxNSteps: Maximum number of Cairo steps when validating a transactionMaxRecursionDepth: Maximum recursion depth for transactionsChainId: The chain id of the app chain
All these options can be configured inside crates/runtime/src/pallets.rs
How to add New Pallets
Before you can use a new pallet, you must add some information about it to the configuration file that the compiler uses to build the runtime binary.
For Rust programs, you use the Cargo.toml file to define the configuration settings and dependencies that determine what gets compiled in the resulting binary. Because the Substrate runtime compiles to both a native platform binary that includes standard library Rust functions and a WebAssembly (Wasm) binary that does not include the standard Rust library, the Cargo.toml file controls two important pieces of information:
- The pallets to be imported as dependencies for the runtime, including the location and version of the pallets to import.
- The features in each pallet that should be enabled when compiling the native Rust binary. By enabling the standard (std) feature set from each pallet, you can compile the runtime to include functions, types, and primitives that would otherwise be missing when you build the WebAssembly binary.
For information about adding dependencies in Cargo.toml files, see Dependencies in the Cargo documentation. For information about enabling and managing features from dependent packages, see Features in the Cargo documentation.
To add the dependencies for the Nicks pallet to the runtime:
-
Open a terminal shell and change to the root directory for the Madara Appchain template.
-
Open the runtime/Cargo.toml configuration file in a text editor.
-
Locate the [dependencies] section and note how other pallets are imported.
-
Copy an existing pallet dependency description and replace the pallet name with pallet-nicks to make the pallet available to the node template runtime. For example, add a line similar to the following:
pallet-nicks = { version = "4.0.0-dev", default-features = false, git = "https://github.com/paritytech/polkadot-sdk.git", branch = "polkadot-v1.0.0" }
This line imports the pallet-nicks crate as a dependency and specifies the following:
- Version to identify which version of the crate you want to import.
- The default behavior for including pallet features when compiling the runtime with the standard Rust libraries.
- Repository location for retrieving the pallet-nicks crate.
- Branch to use for retrieving the crate. Be sure to use the same version and branch information for the Nicks pallet as you see used for the other pallets included in the runtime.
These details should be the same for every pallet in any given version of the node template.
Add the pallet-nicks/std features to the list of features to enable when compiling the runtime.
[features]
default = ["std"]
std = [
...
"pallet-aura/std",
"pallet-balances/std",
"pallet-nicks/std",
...
]
If you forget to update the features section in the Cargo.toml file, you might see cannot find function errors when you compile the runtime binary.
You can read more about it here.
Runtime configuration
Similar to new pallets, runtime configurations can be just like they're done in Substrate. You can edit all the available parameters inside crates/runtime/src/config.rs.
For example, to change the block time, you can edit the MILLISECS_PER_BLOCK variable.
Alternatives Installations
Instead of installing dependencies and building this source directly, consider the following alternatives.
Nix
Install nix, and optionally direnv and lorri for a fully plug-and-play experience for setting up the development environment.
To get all the correct dependencies, activate direnv direnv allow and lorri lorri shell.
Docker
building madara in docker
First, install Docker and Docker Compose.
pulling predeployed madara docker image
docker pull ghcr.io/keep-starknet-strange/madara:main
runining docker container
docker run --rm main --dev
Please use the Madara Dockerfile as a reference to build the Docker container with your App Chain node as a binary.
Provers
SHARP is like public transportation for proofs on Starknet, aggregating multiple Cairo programs to save costs and boost efficiency. It uses recursive proofs, allowing parallelization and optimization, making it more affordable for all users. Critical services like the gateway, validator, and Prover work together with a stateless design for flexibility. SHARP’s adoption by StarkEx, Starknet, and external users (through the Cairo Playground) highlights its significance and potential for future optimization.
This chapter will discuss SHARP, how it has evolved to incorporate recursive proofs, and its role in reducing costs and improving efficiency within the Starknet network.
What is SHARP?
SHARP, which stands for "Shared Prover", is a mechanism used in Starknet that aggregates multiple Cairo programs from different users, each containing different logic. These Cairo programs are then executed together, generating a single proof common to all the programs. Rather than sending the proof directly to the Solidity Verifier in Ethereum, it is initially sent to a STARK Verifier program written in Cairo. The STARK Verifier generates a new proof to confirm that the initial proofs were verified, which can be sent back into SHARP and the STARK Verifier. This recursive proof process will be discussed in more detail later in this chapter. Ultimately, the last proof in the series is sent to the Solidity Verifier on Ethereum. In other words, there are many proofs generated until we reach Ethereum and the Solidity Verifier.
The primary benefit of SHARP system lies in its ability to decrease costs and enhance efficiency within the Starknet network. It achieves this by aggregating multiple Cairo jobs, which are individual sets of computations. This aggregation allows the protocol to leverage the exponential amortization offered by STARK proofs.
Exponential amortization means that as the computational load of the proofs increases, the cost of verifying those proofs rises at a slower logarithmic rate than the computation increase. In other words, the computation itself grows slower than the verification cost. As a result, the cost of each transaction within the aggregated set is significantly reduced, making the overall process more cost-effective and accessible for users.
In SHARP and Cairo context, "jobs" refer to the individual Cairo programs or tasks submitted by different users. These jobs contain specific logic or computations that must be executed on the Starknet network.
Additionally, SHARP allows smaller users with limited computation to benefit from joining other jobs and share the cost of generating the proofs. This collaborative approach is similar to using public transportation instead of a private car, where the cost is distributed among all participants, making it more affordable for everyone.
Recursive Proofs in SHARP
One of the most powerful features of SHARP is its use of recursive proofs. Rather than directly sending the generated proofs to the Solidity Verifier, they are first sent to a STARK Verifier program written in Cairo. This Verifier, which is also a Cairo Program, receives the proof and creates a new Cairo job that is sent to the Prover. The Prover then generates a new proof to confirm that the initial proofs were verified. These new proofs can be sent back into SHARP and the STARK Verifier, restarting the process.
This process continues recursively, with each new proof being sent to the Cairo Verifier until a trigger is reached. At this point, the last proof in the series is sent to the Solidity Verifier on Ethereum. This approach allows for greater parallelization of the computation and reduces the time and cost associated with generating and verifying proofs.
Generated Proofs
|
V
STARK Verifier program (in Cairo)
|
V
Cairo Job
|
V
Prover
|
V
New Proof Generated
|
V
Repeat Process
|
V
Trigger Reached (last proof)
|
V
Solidity Verifier
At first glance, recursive proofs may seem more complex and time-consuming. However, there are several benefits to this approach:
-
Parallelization: Recursive proofs allow for work parallelization, reducing user latency and improving SHARP efficiency.
-
Cheaper on-chain costs: Parallelization enables SHARP to create larger proofs, which would have previously been limited by the availability of large cloud machines (which are rare and limited). As a result, on-chain costs are reduced.
-
Lower cloud costs: Since each job is shorter, the required memory for processing is reduced, resulting in lower cloud costs.
-
Optimization: Recursive proofs enable SHARP to optimize for various factors, including latency, on-chain costs, and time to proof.
-
Cairo support: Recursive proofs only require support in Cairo, without the need to add support in the Solidity Verifier.
Latency in Starknet encompasses the time taken for processing, confirming, and including transactions in a block. It is affected by factors like network congestion, transaction fees, and system efficiency. Minimizing latency ensures faster transaction processing and user feedback.
Time to proof, however, specifically pertains to the duration required to generate and verify cryptographic proofs for transactions or operations.
SHARP Backend Architecture and Data Pipeline
SHARP back end architecture consists of several services that work together to process Cairo jobs and generate proofs. These services include:
-
Gateway: Cairo jobs enter SHARP through the gateway.
-
Job Creator: It prevents job duplication and ensures that the system operates consistently, regardless of multiple identical requests.
-
Validator: This is the first important step. The validator service runs validation checks on each job, ensuring they meet the requirements and can fit within the prover machines. Invalid jobs are tagged as such and do not proceed to the Prover.
-
Scheduler: The scheduler service creates "trains" that aggregate jobs and send them to the Prover. Recursive jobs are paired and sent to the Prover together.
-
Cairo Runner: This service runs Cairo for the Prover’s needs. The Cairo Runner service runs Cairo programs, executing the necessary computations and generating the execution trace as an intermediate result. The Prover then uses this execution trace.
-
Prover: The Prover computes the proofs for each train (that contains a few jobs).
-
Dispatcher: The Dispatcher serves two functions in the SHARP system.
-
In the case of a recursive proof, the Dispatcher runs the Cairo Verifier program on the proof it has received from the Prover, resulting in a new Cairo job that goes back to the Validator.
-
In the case of a proof that needs to go on chain (e.g., to Ethereum), the Dispatcher creates "packages" from the proof, which can then be sent to the Blockchain Writer.
-
-
Blockchain Writer: Once the packages have been created by the Dispatcher, they are sent to the Blockchain Writer. The Blockchain Writer is responsible for sending the packages to the appropriate blockchain (e.g., Ethereum) for verification. This is an important step in the SHARP system, as it ensures that the proofs are properly verified and that the transactions are securely recorded on the blockchain.
-
Catcher: The Catcher monitors blockchain (e.g., Ethereum) transactions to ensure that they have been accepted. While the Catcher is relevant for internal monitoring purposes, it is important to note that if a transaction fails, the fact won’t be registered on-chain in the fact registry. As a result, the soundness of the system is still preserved even without the catcher.
SHARP is designed to be stateless (each Cairo job is executed in its own context and has no dependency on other jobs), allowing for greater flexibility in processing jobs.
Current SHARP Users
Currently, the primary users of SHARP include:
-
StarkEx
-
Starknet
-
External users who use the Cairo Playground
Challenges and Optimization
Optimizing the Prover involves numerous challenges and potential projects on which the Starkware team and the community are currently working:
-
Exploring more efficient hash functions: SHARP is constantly exploring more efficient hash functions for Cairo, the Prover, and Solidity.
-
Investigating smaller fields: Investigating smaller fields for recursive proof steps could lead to more efficient computations.
-
Adjusting various parameters: SHARP is continually adjusting various parameters of the STARK protocol, such as FRI parameters and block factors.
-
Optimizing the Cairo code: SHARP is optimizing the Cairo code to make it faster, resulting in a faster recursive prover.
-
Developing dynamic layouts: This will allow Cairo programs to scale resources depending on their needs.
-
Improving scheduling algorithm: This is another optimization path that can be taken. It is not within the Prover itself.
In particular, dynamic layouts (you can learn more about layouts here (TODO)) will allow Cairo programs to scale resources depending on their needs. This can lead to more efficient computation and better utilization of resources. Dynamic layouts allow SHARP to determine the required resources for a specific job and adjust the layout accordingly instead of relying on predefined layouts with fixed resources. This approach can provide tailored solutions for each job, improving overall efficiency.
Conclusion
In conclusion, SHARP is a critical component of Starknet’s architecture, providing a more efficient and cost-effective solution for processing Cairo programs and verifying their proofs. By leveraging the power of STARK technology and incorporating recursive proofs, SHARP plays a vital role in improving the overall performance and scalability of the Starknet network. The stateless nature of SHARP and the reliance on the cryptographic soundness of the STARK proving system make it an innovative and valuable addition to the blockchain ecosystem.
Nodes
This chapter explores the role and functionality of nodes in the Starknet ecosystem, their interactions with sequencers, and their overall importance.
Contributing to the Guide
Your contributions can help enhance this guide. Specifically, you can add:
- Additional hardware options for running a Starknet node.
- Alternative methods to set up and operate a Starknet node.
To contribute, feel free to open a PR with your suggestions or additions.
Overview of Nodes in the Starknet Ecosystem
A node in the Starknet ecosystem is a computer equipped with Starknet software, contributing significantly to the network's operations. Nodes are vital for the Starknet ecosystem's functionality, security, and overall health. Without nodes, the Starknet network would not be able to function effectively.
Nodes in Starknet are categorized into two types:
-
Full Nodes: Store the entire Starknet state and validate all transactions, crucial for the network's integrity.
-
Light Nodes: Do not store the entire Starknet state but rely on full nodes for information. They are faster and more efficient but offer less security than full nodes.
Core Functions of Nodes
Nodes are fundamental to the Starknet network, performing a variety of critical functions:
-
Transaction Validation: Nodes ensure transactions comply with Starknet's rules, helping prevent fraud and malicious activities.
-
Block Creation and Propagation: They create and circulate blocks to maintain a consistent blockchain view across the network.
-
State Maintenance: Nodes track the Starknet network's current state, including user balances and smart contract code, essential for transaction processing and smart contract execution.
-
API Endpoint Provision: Nodes provide API endpoints, aiding developers in creating applications, wallets, and tools for network interaction.
-
Transaction Relay: They relay user transactions to other nodes, improving network performance and reducing congestion.
Interplay of Nodes, Sequencers, Clients, and Mempool in the Starknet Network
Nodes and Sequencers
Nodes and sequencers are interdependent:
-
Nodes and Block Production: Nodes depend on sequencers to create blocks and update the network state. Sequencers integrate the transactions validated by nodes into blocks, maintaining a consistent and current Starknet state.
-
Sequencers and Transaction Validation: Sequencers rely on nodes for transaction validation and network consensus. Prior to executing transactions, sequencers work with nodes to confirm transaction legitimacy, deterring fraudulent activities. Nodes also contribute to the consensus mechanism, ensuring uniformity in the blockchain state.
Nodes and Clients
The relationship between nodes and clients in the Starknet ecosystem is characterized by a client-server model:
-
Client Requests and Node Responses: Clients initiate by sending requests, like transaction submissions or state queries. Nodes process these, validating transactions, updating the network state, and furnishing clients with the requested data.
-
Client Experience: Clients receive node responses, updating their local view with the latest network information. This loop enables user interaction with Starknet DApps, with nodes maintaining network integrity and clients offering a user-friendly interface.
Nodes and the Mempool
The mempool acts as a holding area for unprocessed transactions:
-
Transaction Validation and Mempool Storage: Upon receiving a transaction, nodes validate it. Valid transactions are added to the mempool and broadcast to other network nodes.
-
Transaction Selection and Block Inclusion: Nodes select transactions from the mempool for processing, incorporating them into blocks that are added to the blockchain.
Node Implementations in Starknet
Starknet's node implementations bring unique strengths:
-
Pathfinder: By Equilibrium, Pathfinder is a Rust-written full node. It excels in high performance, scalability, and aligns with the Starknet Cairo specification.
-
Juno: Nethermind's Juno, another full node in Golang, is known for user-friendliness, ease of deployment, and Ethereum tool compatibility.
-
Papyrus: StarkWare's Papyrus, a Rust-based full node, focuses on security and robustness. It's integral to the upcoming Starknet Sequencer, expected to boost network throughput.
These implementations are under continuous improvement, with new features and enhancements. The choice of implementation depends on user or developer preferences and requirements.
Key characteristics of each node implementation are summarized below:
| Node Implementation | Language | Strengths |
|---|---|---|
| Pathfinder | Rust | High performance, scalability, Cairo specification adherence |
| Papyrus | Rust | Security, robustness, Starknet Sequencer foundation |
| Juno | Golang | User-friendliness, ease of deployment, Ethereum compatibility |
Implementing a Pathfinder Node
Hardware Recommendations for Pathfinder Node
To ensure optimal performance and reliability, the following hardware is recommended for running a Pathfinder node:
- CPU: Intel Core i7-9700 or AMD Ryzen 7 3700X
- Memory: 32GB
- Storage: 1TB SSD
- Network: Gigabit Ethernet
Estimated Costs for Recommended Hardware
The approximate pricing in USD for the recommended hardware is:
- CPU: $300
- Memory: $100
- Storage: $100
- Network Hardware: $50
Total estimated cost: Approximately $550.
Running Pathfinder Node Using Docker
For those who prefer a self-managed setup of all dependencies, refer to the comprehensive Installation from Source guide.
Prerequisites
- Ensure Docker is installed. For Ubuntu, use
sudo snap install docker.
Setup and Execution
- Prepare Data Directory:
Create a data directory, $HOME/pathfinder, to store persistent files used by pathfinder:
mkdir -p $HOME/pathfinder
- Start Pathfinder Node:
Run the pathfinder node using Docker with the following command:
sudo docker run \
--name pathfinder \
--restart unless-stopped \
--detach \
-p 9545:9545 \
--user "$(id -u):$(id -g)" \
-e RUST_LOG=info \
-e PATHFINDER_ETHEREUM_API_URL="https://goerli.infura.io/v3/<project-id>" \
-v $HOME/pathfinder:/usr/share/pathfinder/data \
eqlabs/pathfinder
- Monitoring Logs:
To view the node logs, use:
sudo docker logs -f pathfinder
- Stopping Pathfinder Node:
To stop the node, use:
sudo docker stop pathfinder
This setup ensures the Pathfinder node operates efficiently with automatic restarts and background running capabilities.
Updating the Pathfinder Docker Image
When a new Pathfinder release is available, the node will log a message like:
WARN New pathfinder release available! Please consider updating your node! release=0.4.5
Update Steps
- Pull the Latest Docker Image:
sudo docker pull eqlabs/pathfinder
- Stop and Remove the Current Container:
sudo docker stop pathfinder
sudo docker rm pathfinder
- Re-create the Container with the New Image:
Use the same command as before to start the node
sudo docker run \
--name pathfinder \
--restart unless-stopped \
--detach \
-p 9545:9545 \
--user "$(id -u):$(id -g)" \
-e RUST_LOG=info \
-e PATHFINDER_ETHEREUM_API_URL="https://goerli.infura.io/v3/<project-id>" \
-v $HOME/pathfinder:/usr/share/pathfinder/data \
eqlabs/pathfinder
Docker Image Availability
The :latest docker image corresponds with the latest Pathfinder release, not the main branch.
Using Docker Compose
Alternatively, docker-compose can be used.
- Setup:
Create the folder pathfinder where your docker-compose.yaml is.
mkdir -p pathfinder
# replace the value by of PATHFINDER_ETHEREUM_API_URL by the HTTP(s) URL pointing to your Ethereum node's endpoint
cp example.pathfinder-var.env pathfinder-var.env
docker-compose up -d
- Check logs:
docker-compose logs -f
Database Snapshots
Re-syncing the whole history for either the mainnet or testnet networks might take a long time. To speed up the process you can use database snapshot files that contain the full state and history of the network up to a specific block.
The database files are hosted on Cloudflare R2. There are two ways to download the files:
- Using the Rclone tool
- Via the HTTPS URL: we've found this to be less reliable in general
Rclone setup
We recommend using RClone. Add the following to your RClone configuration file ($HOME/.config/rclone/rclone.conf):
[pathfinder-snapshots]
type = s3
provider = Cloudflare
env_auth = false
access_key_id = 7635ce5752c94f802d97a28186e0c96d
secret_access_key = 529f8db483aae4df4e2a781b9db0c8a3a7c75c82ff70787ba2620310791c7821
endpoint = https://cbf011119e7864a873158d83f3304e27.r2.cloudflarestorage.com
acl = private
You can then download a compressed database using the command:
rclone copy -P pathfinder-snapshots:pathfinder-snapshots/testnet_0.9.0_880310.sqlite.zst .
Uncompressing database snapshots
To avoid issues please check that the SHA2-256 checksum of the compressed file you've downloaded matches the value we've published.
We're storing database snapshots as SQLite database files compressed with zstd. You can uncompress the files you've downloaded using the following command:
zstd -T0 -d testnet_0.9.0_880310.sqlite.zst -o goerli.sqlite
This produces uncompressed database file goerli.sqlite that can then be used by pathfinder.
Available database snapshots
| Network | Block | Pathfinder version required | Filename | Download URL | Compressed size | SHA2-256 checksum of compressed file |
|---|---|---|---|---|---|---|
| testnet | 880310 | >= 0.9.0 | testnet_0.9.0_880310.sqlite.zst | Download | 102.36 GB | 55f7e30e4cc3ba3fb0cd610487e5eb4a69428af1aacc340ba60cf1018b58b51c |
| mainnet | 309113 | >= 0.9.0 | mainnet_0.9.0_309113.sqlite.zst | Download | 279.85 GB | 0430900a18cd6ae26465280bbe922ed5d37cfcc305babfc164e21d927b4644ce |
| integration | 315152 | >= 0.9.1 | integration_0.9.1_315152.sqlite.zst | Download | 8.45 GB | 2ad5ab46163624bd6d9aaa0dff3cdd5c7406e69ace78f1585f9d8f011b8b9526 |
Configuration
The pathfinder node options can be configured via the command line as well as environment variables.
The command line options are passed in after the docker run options, as follows:
sudo docker run --name pathfinder [...] eqlabs/pathfinder:latest <pathfinder options>
Using --help will display the pathfinder options, including their environment variable names:
sudo docker run --rm eqlabs/pathfinder:latest --help
Pending Support
Block times on mainnet can be prohibitively long for certain applications. As a workaround, Starknet added the concept of a pending block which is the block currently under construction. This is supported by pathfinder, and usage is documented in the JSON-RPC API with various methods accepting "block_id"="pending".
Note that pending support is disabled by default and must be enabled by setting poll-pending=true in the configuration options.
Logging
Logging can be configured using the RUST_LOG environment variable.
We recommend setting it when you start the container:
sudo docker run --name pathfinder [...] -e RUST_LOG=<log level> eqlabs/pathfinder:latest
The following log levels are supported, from most to least verbose:
trace
debug
info # default
warn
error
Network Selection
The Starknet network can be selected with the --network configuration option.
If --network is not specified, network selection will default to match your Ethereum endpoint:
- Starknet mainnet for Ethereum mainnet,
- Starknet testnet for Ethereum Goerli
Custom networks & gateway proxies
You can specify a custom network with --network custom and specifying the --gateway-url, feeder-gateway-url and chain-id options.
Note that chain-id should be specified as text e.g. SN_GOERLI.
This can be used to interact with a custom Starknet gateway, or to use a gateway proxy.
JSON-RPC API
You can interact with Starknet using the JSON-RPC API. Pathfinder supports the official Starknet RPC API and in addition supplements this with its own pathfinder specific extensions such as pathfinder_getProof.
Currently pathfinder supports v0.3, v0.4, and v0.5 versions of the Starknet JSON-RPC specification.
The path of the URL used to access the JSON-RPC server determines which version of the API is served:
- the
v0.3.0API is exposed on the/rpc/v0.3and/rpc/v0_3path - the
v0.4.0API is exposed on the/,/rpc/v0.4and/rpc/v0_4path - the
v0.5.1API is exposed on the/rpc/v0.5and/rpc/v0_5path - the pathfinder extension API is exposed on
/rpc/pathfinder/v0.1
Note that the pathfinder extension is versioned separately from the Starknet specification itself.
Pathfinder extension API
You can find the API specification here.
Monitoring API
Pathfinder has a monitoring API which can be enabled with the --monitor-address configuration option.
Health
/health provides a method to check the health status of your pathfinder node, and is commonly useful in Kubernetes docker setups. It returns a 200 OK status if the node is healthy.
Readiness
pathfinder does several things before it is ready to respond to RPC queries. In most cases this startup time is less than a second, however there are certain scenarios where this can be considerably longer. For example, applying an expensive database migration after an upgrade could take several minutes (or even longer) on testnet. Or perhaps our startup network checks fail many times due to connection issues.
/ready provides a way of checking whether the node's JSON-RPC API is ready to be queried. It returns a 503 Service Unavailable status until all startup tasks complete, and then 200 OK from then on.
Metrics
/metrics provides a Prometheus metrics scrape endpoint. Currently the following metrics are available:
RPC related counters
rpc_method_calls_total,rpc_method_calls_failed_total,
You must use the label key method to retrieve a counter for a particular RPC method, for example:
rpc_method_calls_total{method="starknet_getStateUpdate"}
rpc_method_calls_failed_total{method="starknet_chainId"}
You may also use the label key version to specify a particular version of the RPC API, for example:
rpc_method_calls_total{method="starknet_getEvents", version="v0.3"}
Feeder Gateway and Gateway related counters
gateway_requests_totalgateway_requests_failed_total
Labels:
method, to retrieve a counter for a particular sequencer request typetag- works with:
get_block,get_state_update - valid values:
pendinglatest
- works with:
reason- works with:
gateway_requests_failed_total - valid values:
decodestarknetrate_limiting
- works with:
Valid examples:
gateway_requests_total{method="get_block"}
gateway_requests_total{method="get_block", tag="latest"}
gateway_requests_failed_total{method="get_state_update"}
gateway_requests_failed_total{method="get_state_update", tag="pending"}
gateway_requests_failed_total{method="get_state_update", tag="pending", reason="starknet"}
gateway_requests_failed_total{method="get_state_update", reason="rate_limiting"}
These will not work:
gateway_requests_total{method="get_transaction", tag="latest"},tagis not supported for thatmethodgateway_requests_total{method="get_transaction", reason="decode"},reasonis only supported for failures.
Sync related metrics
current_blockcurrently sync'd block height of the nodehighest_blockheight of the block chainblock_timetimestamp difference between the current block and its parentblock_latencydelay between current block being published and sync'd locallyblock_downloadtime taken to download current block's data excluding classesblock_processingtime taken to process and store the current block
Build info metrics
pathfinder_build_inforeports curent version as aversionproperty
Build from source
See the guide.
The above guide is inspired by Pathfinder
Layer 3 (App Chains)
App chains let you create a blockchain designed precisely for your application’s needs. These specialized blockchains allow customization in various aspects, such as hash functions and consensus algorithms. Moreover, they inherit the security features of the Layer 1 or Layer 2 blockchains they are built upon.
Example:
Layer 3 blockchains can exist on top of Layer 2 blockchains. You can even build additional layers (Layer 4 and so on) on top of Layer 3 for more complex solutions. A sample layout is shown in the following diagram.
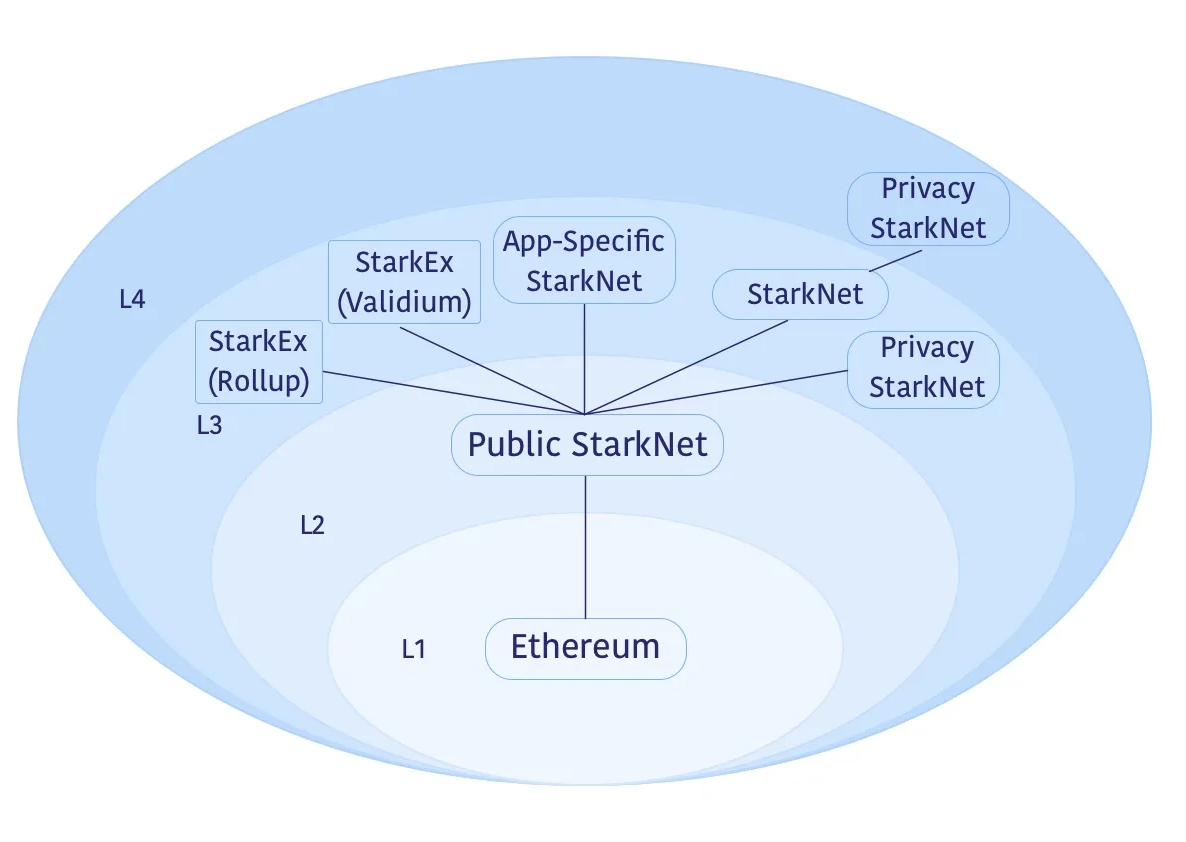
Example of an environment with a Layers 3 and 4
In this example ecosystem, Layer 3 options include:
-
The Public Starknet (L2), which is a general-purpose blockchain for decentralized applications.
-
A L3 Starknet optimized for cost-sensitive applications.
-
Customized L3 Starknet systems designed for enhanced performance, using specific storage structures or data compression techniques.
-
StarkEx systems used by platforms like dYdX and Sorare, offering proven scalability through data availability solutions like Validium or Rollup.
-
Privacy-focused Starknet instances, which could also function as a Layer 4, for conducting transactions without including them in public Starknets.
Benefits of Layer 3
Layer 3 app chains (with Madara as an apt sequencer or other option), offer a variety of advantages due to its modularity and flexibility. Here’s an overview of the key benefits:
-
Quick Iteration: App chains enable rapid protocol changes, freeing you from the constraints of the public Layer 2 roadmap. For example, you could rapidly deploy new DeFi algorithms tailored to your user base.
-
Governance Independence: You maintain complete control over feature development and improvements, avoiding the need for decentralized governance consensus. This enables, for example, quick implementation of user-suggested features.
-
Cost Efficiency: Layer 3 offers substantial cost reductions, potentially up to 1 million times compared to Layer 1, making it economically feasible to run more complex applications.
-
Security: While there may be some trade-offs, such as reduced censorship resistance, the core security mechanisms remain strong.
-
Congestion Avoidance: App chains are shielded from network congestion, providing a more stable transaction environment, crucial for real-time applications like gaming.
-
Privacy Enhancements: Layer 3 can serve as a testing ground for privacy-centric features, which could include anonymous transactions or encrypted messaging services.
-
Innovation Platform: App chains act as experimental fields where novel features can be developed and tested. For instance, they could serve as a testbed for new consensus algorithms before these are considered for Layer 2.
In summary, Layer 3 provides the flexibility, cost-efficiency, and environment conducive for innovation, without significant compromise on security.
Madara as a Framework for Layer 3 App Chains
Madara is a framework that simplifies the development of modular app chains on Starknet. With Madara, you can leverage the Starknet stack’s scalability and security advantages while tailoring your chain to the specific requirements of your dApp.
Key benefits of developing with Madara: Comprehensive Control: With Madara, you can customise essential components, such as your prover and compiler version. Madara's flexibility allows integration of experimental features, ensuring your chain precisely meets your dApp's demands.
Reduced Congestion: Your app chain serves your dApp exclusively, guaranteeing predictable performance and a smooth user experience.
Chain Sovereignty: Maintaining full decision-making power over the canonical chain is crucial, especially during potential security incidents or disagreements, ensuring you retain control. It's important to acknowledge, however, that this approach can have its drawbacks, warranting careful consideration.
Fee Collection: Manage your app chain's fee structure and retain all of the revenue generated by your application.
Karnot: Rollup-as-a-Service for Madara App Chains
Karnot, a leading Rollup-as-a-Service provider, simplifies Madara app chain deployment. Leveraging their extensive experience in building scalable infra and their role as core contributors to the Madara framework, Karnot delivers powerful, expertly crafted solutions for your app chain development experience.
Highly scalable infrastructure: Intelligent auto-scaling nodes guarantee your app chain's availability, even during unexpected traffic surges.
Secure bridges: Karnot manages your bridges, mirroring Starknet contracts for efficient integration.
Protected faucets: Robust faucets powered by spam and bot protection for smooth testing environments.
Top-tier security: Rigorous measures safeguard your keys without compromising autonomy.
Comprehensive monitoring: Real-time dashboards offer a centralized view of your app chain activity, empowering data-driven decision-making.
Solidity Verifier
Before exploring this chapter, review the Starknet Architecture chapter for foundational knowledge. Familiarity with concepts such as Sequencers, Provers, SHARP, and Sharp Jobs is assumed.
Starknet's Solidity Verifier plays a pivotal role in the rollup landscape, ensuring the truth of transactions and smart contracts.
Quick Overview: SHARP and Sharp Jobs
NOTE: For a more detailed explanation of SHARP and Sharp Jobs, refer to the Provers subchapter in the Starknet Architecture chapter. This is a brief review.
SHARP, or Shared Prover, in Starknet, aggregates various Cairo programs from distinct users. These programs, each with unique logic, run together, producing a common proof for all, optimizing cost and efficiency.
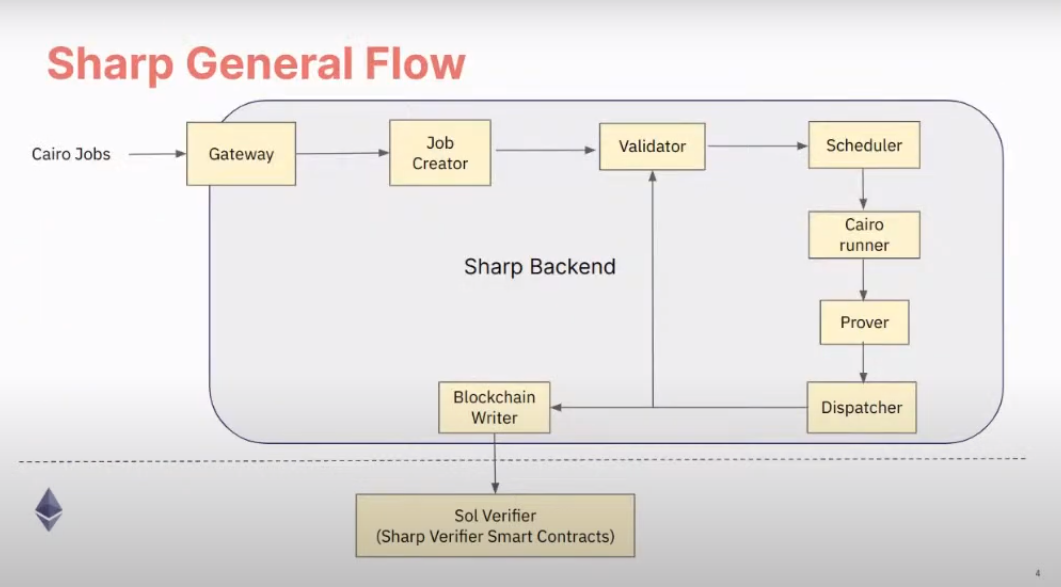
Sharp Workflow
Furthermore, SHARP supports combining multiple proofs into one, enhancing its efficiency by allowing parallel proof processing and verification.
SHARP verifies numerous Starknet transactions, like transfers, trades, and state updates. It also confirms smart contract executions.
To illustrate SHARP: Think of commuting by bus. The bus driver, the prover, transports passengers, the Cairo programs. The driver checks only the tickets of passengers alighting at the upcoming stop, much like SHARP. The prover forms a single proof for all Cairo programs in a batch, but verifies only the proofs of programs executing in the succeeding block.
Sharp Jobs. Known as Shared Prover Jobs, Sharp Jobs let multiple users present their Cairo programs for combined execution, distributing the proof generation cost. This shared approach makes Starknet more economical for users, enabling them to join ongoing jobs and leverage economies of scale.
Solidity Verifiers
A Solidity verifier is an L1 smart contract, crafted in Solidity, designed to validate STARK proofs from SHARP (Shared Prover).
Previous Architecture: Monolithic Verifier
Historically, the Solidity Verifier was a monolithic contract, both initiated and executed by the same contract. For illustration, the operator would invoke the update state function on the main contract, providing the state to be modified and confirming its validity. Subsequently, the main contract would present the proof to both the verifier and the validium committee. Once they validated the proof, the state would be updated in the main contract.
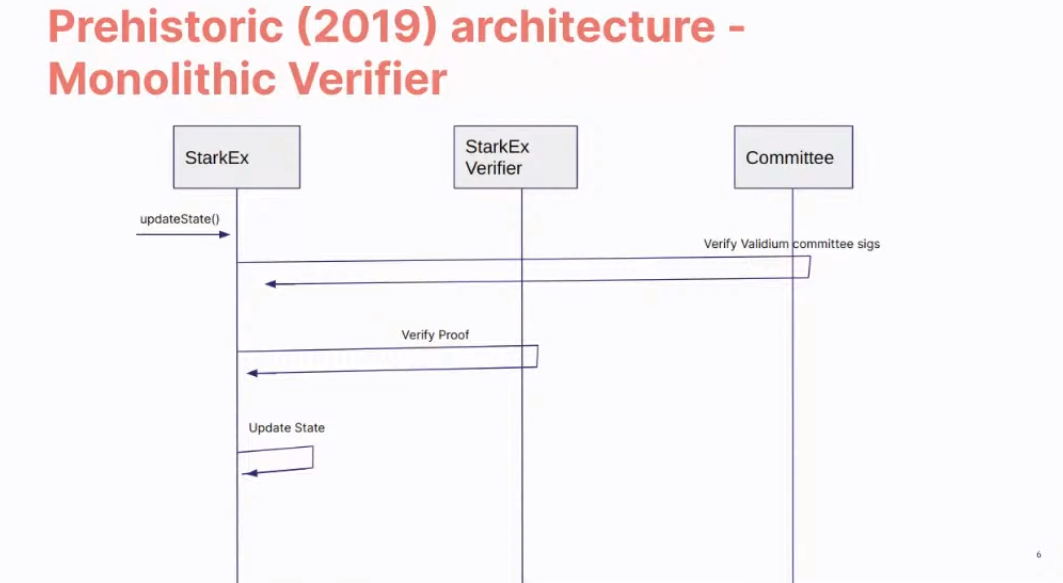
Previous Architecture
However, this architecture faced several constraints:
- Batching transactions frequently surpassed the original geth32kb transaction size limit (later adjusted to 128kb) due to accumulating excessive transactions.
- The gas required often outstripped the block size (e.g., 8 Mgas), as the block couldn't accommodate a complete batch of proof.
- A prospective constraint was that the verifier wouldn't support proof bundling, which is fundamental for SHARP.
Current Architecture: Multiple Smart Contracts
The current verifier utilizes multiple smart contracts rather than being a singular, monolithic structure.
Here are some key smart contracts associated with the verifier:
GpsStatementVerifier: This is the primary contract of the Sharp verifier. It verifies a proof and then registers the related facts usingverifyProofAndRegister. It acts as an umbrella for various layouts, each namedCpuFrilessVerifier. Every layout has a unique combination of built-in resources.
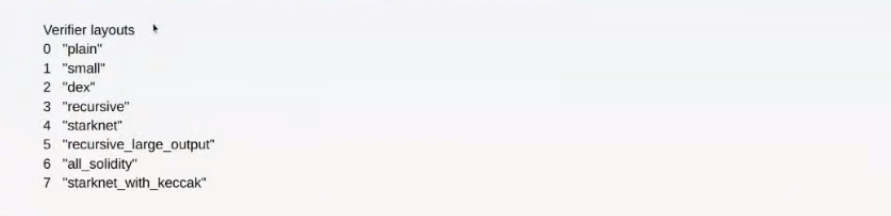
The system routes each proof to its relevant layout.
-
MemoryPageFactRegistry: This registry maintains facts for memory pages, primarily used to register outputs for data availability in rollup mode. The Fact Registry is a separate smart contract ensuring the verification and validity of attestations or facts. The verifier function is separated from the main contract to ensure each segment works optimally within its limits. The main proof segment relies on other parts, but these parts operate independently. -
MerkleStatementContract: This contract verifies merkle paths. -
FriStatementContract: It focuses on verifying the FRI layers.
Sharp Verifier Contract Map
The Sharp Verifier Contract Map contains roughly 40 contracts, detailing various components of the Solidity verifier. The images below display the contracts and their Ethereum Mainnet addresses.
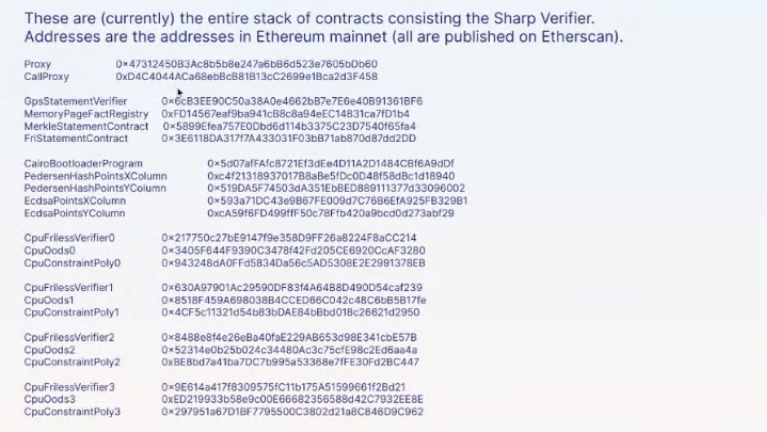
Sharp Verifier Contract Map
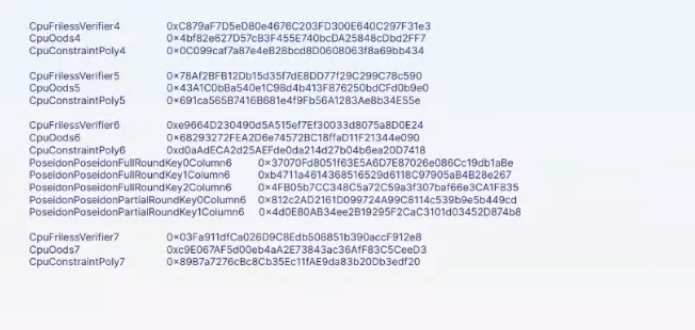
Sharp Verifier Contract Map (Continued)
These contracts function as follows:
- Proxy: This contract facilitates upgradability. It interacts with the
GpsStatementVerifiercontract using thedelegate_callmethod. Notably, the state resides in theGpsStatementVerifiercontract, not in the proxy. - CallProxy: Positioned between the
Proxyand theGpsStatementVerifiercontracts, it functions like a typical proxy. However, it avoids thedelegate_callmethod and calls the function in the implementation contract directly. - CairoBootloaderProgram: Comprising numerical Cairo programs, it validates the Cairo program of a statement. The bootloader manages the logic executing Cairo programs to generate proof and program hash.
- PedersenHashPoints (X & Y Column): These lookup tables store vast amounts of data. Validation functions consult them to compute the Pedersen hash.
- EcdsaPoints (X & Y Column): Similar to the Pedersen hash, these tables assist in calculating the elliptic curve.
- CpuFrilessVerifier/CpuOods/CpuConstantPoly (0 - 7): These verifier contracts vary in layout as shown in the
GpsStatementVerifierlayout image. Each layout encompasses resources, built-ins, constraints, and more, designed for a specific task. Each has unique parameters for its constructor. - PoseidonPoseidon: These contracts back the new Poseidon built-in and contain Poseidon-specific lookup tables.
Constructor Parameters of Key Contracts
When constructing the primary verifier contracts, specific parameters are employed to facilitate functionality. These parameters reference other auxiliary contracts, decentralizing the logic and ensuring the main contract remains under the 24kb deployment limit.
Below is a visual representation of these parameters in relation to key contracts CpuFrilessVerifiers and GpsStatementVerifier:
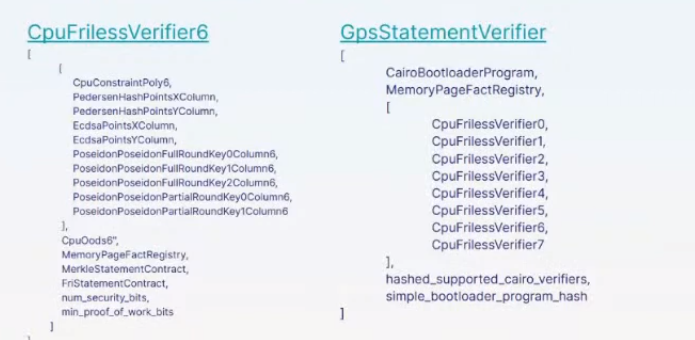 Constructor Parameters
CpuFrilessVerifier Constructor Parameters
CpuFrilessVerifiers is designed to handle a diverse range of tasks. Its parameters encompass:
- Auxiliary Polynomial Contracts: These include
CpuConstraintPoly,PedersenHashPointsxColumn,PedersenHashPointsYColumn,EcdsaPointsXColumn, andEcdsaPointsYColumn. - Poseidon-Related Contracts: Several
PoseidonPoseidonFullRoundKeyandPoseidonPoseidonPartialRoundKeycontracts. - Sampling and Memory: The contract uses
CpuOodsfor out-of-domain sampling andMemoryPageFactRegistryfor memory-related tasks. - Verification: It integrates with
MerkleStatementContractfor merkle verification andFriStatementContractfor Fri-related tasks. - Security: The
num_security_bitsandmin_proof_of_work_bitscontracts ensure secure operation.
NOTE: For instances like CpuFrilessVerifier0, specific contracts (e.g., CpuConstraintPoly0, PoseidonPoseidonFullRoundKeyColumn0, CpuOods0) become particularly relevant.
GpsStatementVerifier Constructor Parameters
The GpsStatementVerifier functions as the hub of verifier operations, necessitating various parameters for effective functioning:
- Bootloader: It references the
CairoBootloaderProgramto initiate the system. - Memory Operations: This is facilitated by the
MemoryPageFactRegistrycontract. - Sub-Verifiers: It integrates a series of sub-verifiers (
CpuFrilessVerifier0throughCpuFrilessVerifier7) to decentralize tasks. - Verification: The hashes,
hashed_supported_cairo_verifiersandsimple_bootloader_program_hash, are essential for validation processes.
Interconnection of Contracts
The GpsStatementVerifier serves as the primary verifier contract, optimized for minimal logic to fit within deployment size constraints. To function effectively:
- It relies on smaller verifier contracts, which are already deployed and contain varied verification logic.
- These smaller contracts, in turn, depend on other contracts, established during their construction.
In essence, while the diverse functionalities reside in separate contracts for clarity and size efficiency, they are all interlinked within the GpsStatementVerifier.
For future enhancements or adjustments, the proxy and callproxy contracts facilitate upgradability, allowing seamless updates to the GpsStatementVerifier without compromising its foundational logic.
Sharp Verification Flow
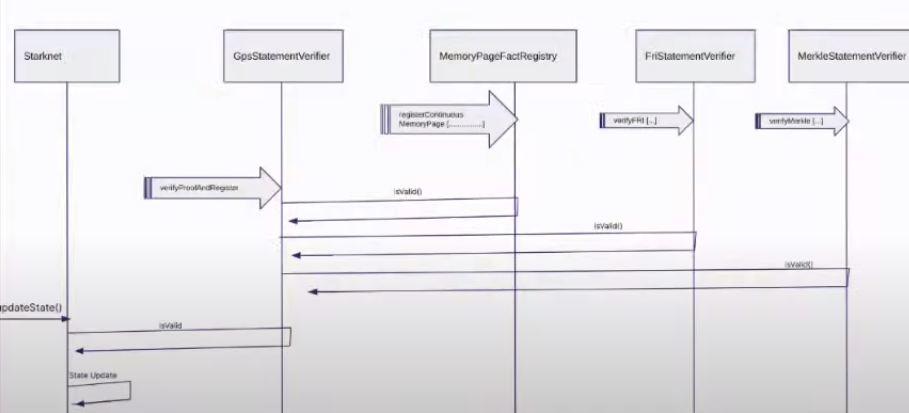
Sharp Verification Flow
-
The Sharp dispatcher transmits all essential transactions for verification, including: a.
MemoryPages(usually many). b.MerkleStatements(typically between 3 and 5). c.FriStatements(generally ranging from 5 to 15). -
The Sharp dispatcher then forwards the proof using
verifyProofAndRegister. -
Applications, such as the Starknet monitor, validate the status. Once verification completes, they send an
updateStatetransaction.
Conclusion
Starknet transformed the Solidity Verifier from a single unit to a flexible, multi-contract system, highlighting its focus on scalability and efficiency. Using SHARP and refining verification steps, Starknet makes sure the Solidity Verifier stays a strong cornerstone in its setup.
Decentralization 🚧
Smart Contracts
Starknet contracts, are programs written in cairo and can run on the starknet virtual machine, they have access to the starknet state, and can interact with other contracts.
This Chapter will introduce you to starknet smart contracts, their components, smart contract declaration, deployment and interaction using starkli.
Smart Contract Example
Having explained what starknet smart contracts are, we'll be writing a moderately simple contract called a Piggy Bank contract, this example will demonstrate how to write a smart contract using the factory pattern and also how to integrate the starknet component system into your smart contracts.
The piggy bank contract is a factory contract model that allows users to create their own personalized savings contract. At the point of creation, users are to specify their savings target, which could be towards a specific time or a specific amount, and a child contract is created and personalized to their savings target.
The factory contract keeps tabs on all the child contracts created and also maps a user to his personalized contract. The user, after creating a personalized savings contract, can then deposit and save towards his target. But if, for any reason, the user has to withdraw from his savings contract before meeting the savings target, then a fine worth 10% of the withdrawal amount would be paid by the user.
The contract uses a combination of functions and an ownership component to track and maintain the above explained functionality. Event’s are also emitted on each function call that modifies the contract's state. So a good understanding of the logic and implementation of this contract example would give you mastery of the components system in Cairo, the factory standard model, emitting events, and a whole lot of other methods useful in writing smart contracts on starknet.
Please note that during the course of this journey, I’ll be using interchangeably the terms child contract and personalized contract. Please note that the term child contract in this case refers to a personalized piggy bank contract created from the factory contract.
Piggy Bank Child Contract:
#![allow(unused)] fn main() { use starknet::ContractAddress; #[derive(Drop, Serde, starknet::Store)] enum target { blockTime: u128, amount: u128, } #[starknet::interface] trait IERC20<TContractState> { fn name(self: @TContractState) -> felt252; fn symbol(self: @TContractState) -> felt252; fn decimals(self: @TContractState) -> u8; fn total_supply(self: @TContractState) -> u256; fn balanceOf(self: @TContractState, account: ContractAddress) -> u256; fn allowance(self: @TContractState, owner: ContractAddress, spender: ContractAddress) -> u256; fn transfer(ref self: TContractState, recipient: ContractAddress, amount: u256) -> bool; fn transferFrom( ref self: TContractState, sender: ContractAddress, recipient: ContractAddress, amount: u256 ) -> bool; fn approve(ref self: TContractState, spender: ContractAddress, amount: u256) -> bool; } #[starknet::interface] trait piggyBankTrait<TContractState> { fn deposit(ref self: TContractState, _amount: u128); fn withdraw(ref self: TContractState, _amount: u128); fn get_balance(self: @TContractState) -> u128; fn get_Target(self: @TContractState) -> (u128 , piggyBank::targetOption) ; // fn get_owner(self: @TContractState) -> ContractAddress; fn viewTarget(self: @TContractState) -> target; } #[starknet::contract] mod piggyBank { use core::option::OptionTrait; use core::traits::TryInto; use starknet::{get_caller_address, ContractAddress, get_contract_address, Zeroable, get_block_timestamp}; use super::{IERC20Dispatcher, IERC20DispatcherTrait, target}; use core::traits::Into; use piggy_bank::ownership_component::ownable_component; component!(path: ownable_component, storage: ownable, event: OwnableEvent); #[abi(embed_v0)] impl OwnableImpl = ownable_component::Ownable<ContractState>; impl OwnableInternalImpl = ownable_component::InternalImpl<ContractState>; #[storage] struct Storage { token: IERC20Dispatcher, manager: ContractAddress, balance: u128, withdrawalCondition: target, #[substorage(v0)] ownable: ownable_component::Storage } #[derive(Drop, Serde)] enum targetOption { targetTime, targetAmount, } #[event] #[derive(Drop, starknet::Event)] enum Event { Deposit: Deposit, Withdraw: Withdraw, PaidProcessingFee: PaidProcessingFee, OwnableEvent: ownable_component::Event } #[derive(Drop, starknet::Event)] struct Deposit { #[key] from: ContractAddress, #[key] Amount: u128, } #[derive(Drop, starknet::Event)] struct Withdraw { #[key] to: ContractAddress, #[key] Amount: u128, #[key] ActualAmount: u128, } #[derive(Drop, starknet::Event)] struct PaidProcessingFee { #[key] from: ContractAddress, #[key] Amount: u128, } mod Errors { const Address_Zero_Owner: felt252 = 'Invalid owner'; const Address_Zero_Token: felt252 = 'Invalid Token'; const UnAuthorized_Caller: felt252 = 'UnAuthorized caller'; const Insufficient_Balance: felt252 = 'Insufficient balance'; } #[constructor] fn constructor(ref self: ContractState, _owner: ContractAddress, _token: ContractAddress, _manager: ContractAddress, target: targetOption, targetDetails: u128) { assert(!_owner.is_zero(), Errors::Address_Zero_Owner); assert(!_token.is_zero(), Errors::Address_Zero_Token); self.ownable.owner.write(_owner); self.token.write(super::IERC20Dispatcher{contract_address: _token}); self.manager.write(_manager); match target { targetOption::targetTime => self.withdrawalCondition.write(target::blockTime(targetDetails.into())), targetOption::targetAmount => self.withdrawalCondition.write(target::amount(targetDetails)), } } #[external(v0)] impl piggyBankImpl of super::piggyBankTrait<ContractState> { fn deposit(ref self: ContractState, _amount: u128) { let (caller, this, currentBalance) = self.getImportantAddresses(); self.balance.write(currentBalance + _amount); self.token.read().transferFrom(caller, this, _amount.into()); self.emit(Deposit { from: caller, Amount: _amount}); } fn withdraw(ref self: ContractState, _amount: u128) { self.ownable.assert_only_owner(); let (caller, this, currentBalance) = self.getImportantAddresses(); assert(self.balance.read() >= _amount, Errors::Insufficient_Balance); let mut new_amount: u128 = 0; match self.withdrawalCondition.read() { target::blockTime(x) => new_amount = self.verifyBlockTime(x, _amount), target::amount(x) => new_amount = self.verifyTargetAmount(x, _amount), }; self.balance.write(currentBalance - _amount); self.token.read().transfer(caller, new_amount.into()); self.emit(Withdraw { to: caller, Amount: _amount, ActualAmount: new_amount}); } fn get_balance(self: @ContractState) -> u128 { self.balance.read() } fn get_Target(self: @ContractState) -> (u128 , targetOption) { let condition = self.withdrawalCondition.read(); match condition { target::blockTime(x) => {return (x, targetOption::targetTime);}, target::amount(x) => {return (x, targetOption::targetAmount);}, } } fn viewTarget(self: @ContractState) -> target { self.withdrawalCondition.read() } } #[generate_trait] impl Private of PrivateTrait { fn verifyBlockTime(ref self: ContractState, blockTime: u128, withdrawalAmount: u128) -> u128 { if (blockTime <= get_block_timestamp().into()) { return withdrawalAmount; } else { return self.processWithdrawalFee(withdrawalAmount); } } fn verifyTargetAmount(ref self: ContractState, targetAmount: u128, withdrawalAmount: u128) -> u128 { if (self.balance.read() < targetAmount) { return self.processWithdrawalFee(withdrawalAmount); } else { return withdrawalAmount; } } fn processWithdrawalFee(ref self: ContractState, withdrawalAmount: u128) -> u128 { let withdrawalCharge: u128 = ((withdrawalAmount * 10) / 100); self.balance.write(self.balance.read() - withdrawalCharge); self.token.read().transfer(self.manager.read(), withdrawalCharge.into()); self.emit(PaidProcessingFee{from: get_caller_address(), Amount: withdrawalCharge}); return withdrawalAmount - withdrawalCharge; } fn getImportantAddresses(self: @ContractState) -> (ContractAddress, ContractAddress, u128) { let caller: ContractAddress = get_caller_address(); let this: ContractAddress = get_contract_address(); let currentBalance: u128 = self.balance.read(); (caller, this, currentBalance) } } } }
Piggy Bank Factory
#![allow(unused)] fn main() { use starknet::{ContractAddress, ClassHash}; use piggy_bank::piggy_bank::piggyBank::targetOption; use array::ArrayTrait; #[starknet::interface] trait IPiggyBankFactory<TContractState> { fn createPiggyBank(ref self: TContractState, savingsTarget: targetOption, targetDetails: u128) -> ContractAddress; fn updatePiggyBankHash(ref self: TContractState, newClasHash: ClassHash); fn getAllPiggyBank(self: @TContractState) -> Array<ContractAddress>; fn getPiggyBanksNumber(self: @TContractState) -> u128; fn getPiggyBankAddr(self: @TContractState, userAddress: ContractAddress) -> ContractAddress; fn get_owner(self: @TContractState) -> ContractAddress; fn get_childClassHash(self: @TContractState) -> ClassHash; } #[starknet::contract] mod piggyFactory{ use core::starknet::event::EventEmitter; use piggy_bank::ownership_component::IOwnable; use core::serde::Serde; use starknet::{ContractAddress, ClassHash, get_caller_address, Zeroable}; use starknet::syscalls::deploy_syscall; use dict::Felt252DictTrait; use super::targetOption; use piggy_bank::ownership_component::ownable_component; component!(path: ownable_component, storage: ownable, event: OwnableEvent); #[abi(embed_v0)] impl OwnableImpl = ownable_component::Ownable<ContractState>; impl OwnableInternalImpl = ownable_component::InternalImpl<ContractState>; #[storage] struct Storage { piggyBankHash: ClassHash, totalPiggyBanksNo: u128, AllBanksRecords: LegacyMap<u128, ContractAddress>, piggyBankOwner: LegacyMap::<ContractAddress, ContractAddress>, TokenAddr: ContractAddress, #[substorage(v0)] ownable: ownable_component::Storage } #[event] #[derive(Drop, starknet::Event)] enum Event { BankCreated: BankCreated, HashUpdated: HashUpdated, OwnableEvent: ownable_component::Event } #[derive(Drop, starknet::Event)] struct BankCreated { #[key] for: ContractAddress, } #[derive(Drop, starknet::Event)] struct HashUpdated { #[key] by: ContractAddress, #[key] oldHash: ClassHash, #[key] newHash: ClassHash, } mod Errors { const Address_Zero_Owner: felt252 = 'Invalid owner'; } #[constructor] fn constructor(ref self: ContractState, piggyBankClassHash: ClassHash, tokenAddr: ContractAddress, _owner: ContractAddress) { self.piggyBankHash.write(piggyBankClassHash); self.ownable.owner.write(_owner); self.TokenAddr.write(tokenAddr); } #[external(v0)] impl piggyFactoryImpl of super::IPiggyBankFactory<ContractState> { fn createPiggyBank(ref self: ContractState, savingsTarget: targetOption, targetDetails: u128) -> ContractAddress { // Contructor arguments let mut constructor_calldata = ArrayTrait::new(); get_caller_address().serialize(ref constructor_calldata); self.TokenAddr.read().serialize(ref constructor_calldata); self.ownable.owner().serialize(ref constructor_calldata); savingsTarget.serialize(ref constructor_calldata); targetDetails.serialize(ref constructor_calldata); // Contract deployment let (deployed_address, _) = deploy_syscall( self.piggyBankHash.read(), 0, constructor_calldata.span(), false ) .expect('failed to deploy counter'); self.totalPiggyBanksNo.write(self.totalPiggyBanksNo.read() + 1); self.AllBanksRecords.write(self.totalPiggyBanksNo.read(), deployed_address); self.piggyBankOwner.write(get_caller_address(), deployed_address); self.emit(BankCreated{for: get_caller_address()}); deployed_address } fn updatePiggyBankHash(ref self: ContractState, newClasHash: ClassHash) { self.ownable.assert_only_owner(); self.piggyBankHash.write(newClasHash); self.emit(HashUpdated{by: self.ownable.owner(), oldHash: self.piggyBankHash.read(), newHash: newClasHash}); } fn getAllPiggyBank(self: @ContractState) -> Array<ContractAddress> { let mut piggyBanksAddress = ArrayTrait::new(); let mut i: u128 = 1; loop { if i > self.totalPiggyBanksNo.read() { break; } piggyBanksAddress.append(self.AllBanksRecords.read(i)); i += 1; }; piggyBanksAddress } fn getPiggyBanksNumber(self: @ContractState) -> u128 { self.totalPiggyBanksNo.read() } fn getPiggyBankAddr(self: @ContractState, userAddress: ContractAddress) -> ContractAddress { assert(!userAddress.is_zero(), Errors::Address_Zero_Owner); self.piggyBankOwner.read(userAddress) } fn get_owner(self: @ContractState) -> ContractAddress { self.ownable.owner() } fn get_childClassHash(self: @ContractState) -> ClassHash { self.piggyBankHash.read() } } } }
Deploying and Interacting With a Smart Contract
In this section we will be focussing on declaring, deploying and interacting with the piggy bank contract we wrote in the previous section.
Requirements:
To declare and deploy the piggy bank contract, it’s required that you have the following available; don't worry, we’ll point you to resources or links to get them sorted out.
-
Starkli: Starkli is a CLI tool that connects us to the Starknet blockchain. Installation steps can be found here.
-
Starknet testnet RPC: You need your personalized gateway to access the starknet network. Starkli utilizes this API gateway to communicate with the starknet network: you can get one from Blast here.
-
Deployer Account: To interact with the starknet network via Starkli, you need a cli account/ wallet. You can easily set that up by going through this page.
-
Sufficient gas fees to cover the declaration and deployment steps: you can get starknet Sepolia Eth either by bridging your Sepolia Eth on Ethereum to Starknet here.
Once you’ve been able to sort all that out, let's proceed with declaring and deploying the piggy bank contract.
Contract Declaration:
The first step in deploying a starknet smart contract is to build the contract. To do this, we cd into the root directory of the piggy bank project, and then in our terminal, we run the'scarb build` command. This command creates a new folder in our root directory folder, then generates two json files for each contract; the first is the compiled_contract_class.json file, while the second is the contract_clas.json file.

The next step is to declare the contract. A contract declaration in Starknet is a transaction that returns a class hash, which would be used to deploy a new instance of a contract. Being a transaction, declaration requires that the account being used for the declaration have sufficient gas fees to cover the cost of that transaction.
Also, it is important to understand that since we are deploying a factory contract, it's required that we declare the child contract as well as the factory contract, then deploy just the factory contract after which pass in the child contract class hash as a constructor argument to the factory contract, and from this instance of the clash hash, new child contracts would be deployed.
starkli declare target/dev/piggy_bank_piggyBank.contract_class.json --rpc https://starknet-sepolia.public.blastapi.io/rpc/v0_6 --account ~/.starkli-wallets/deployer/account0_account.json --keystore ~/.starkli-wallets/deployer/account0_keystore.json
To declare the piggy bank child contract, we use the above command (remember to replace the account keystore and account file name and path as its found on your own system). Next, we’re prompted to input the password set while preparing our CLI wallet, after which the contract is compiled, and we get a similar message below:

From the above snippet, our class hash is: 0x05f58aecd2781660741534140776b6a12bcc6d46ebda92ac851c1bad55d74006. With this class hash, other contracts would be deployed. Next would be to declare our factory contract.
starkli declare target/dev/piggy_bank_piggyFactory.contract_class.json --rpc https://starknet-sepolia.public.blastapi.io/rpc/v0_6 --account ~/.starkli-wallets/deployer/account0_account.json --keystore ~/.starkli-wallets/deployer/account0_keystore.json
This time, we get a response similar to the previous declaration containing a class hash: 0x026323e14ce298448d12e2504cb872f7ec6049a389230c2c0b3d9d99507e303d
These two class hashes could be found on any explorer. By pasting the clash hash on the search bar, we get details regarding the contract declaration.
Contract Deployment:
Since we’ve deployed the two contracts and also now have the class hash for the two contracts, our next step would be to deploy our factory contract and also pass in the class hash of the child contract to it so it can customize and create new instances of the class hash for users. To deploy the factory contract, we use a sample command as shown below:
starkli deploy 0x026323e14ce298448d12e2504cb872f7ec6049a389230c2c0b3d9d99507e303d 0x05f58aecd2781660741534140776b6a12bcc6d46ebda92ac851c1bad55d74006 0x049D36570D4e46f48e99674bd3fcc84644DdD6b96F7C741B1562B82f9e004dC7 0x076957612bA0927c9C3F6156Ffaa1A52Bc330256869d85A8A0D0999B3e4c6387 --rpc https://starknet-sepolia.public.blastapi.io/rpc/v0_6 --account ~/.starkli-wallets/deployer/argent_sepolia_account.json --keystore ~/.starkli-wallets/deployer/argent_sepolia_keystore.json
I understand this might look confusing, so let's use a simpler command structure to describe it:
starkli deploy <FACTORY CLASS HASH> <CHILD CONTRACT CLASS HASH> <ETH CONTRACT ADDRESS> <ADMIN CONTRACT ADDRESS> --rpc <RPC FROM BLAST> --account ~/.starkli-wallets/deployer/account0_account.json --keystore ~/.starkli-wallets/deployer/account0_keystore.json
From the above snippet, we first state the method we intend to use (deploy), then we pass in the class hash to be deployed (<FACTORY CLASS HASH>). Finally, we pass in the constructor argument in order of their appearance in our contract (<CHILD CONTRACT CLASS HASH> <ETH CONTRACT ADDRESS> <ADMIN CONTRACT ADDRESS>)

From the above snippet, our newly deployed contract address is 0x0137a70c3cda7037631f43e3c6a76ea30cf6ba53dbabaebb164b427dab8a8d16
Creating a Personalized Piggy Bank
To create a personal piggy bank, we interact with the factory contract. We'll be calling the createPiggyBank function and passing in the following arguments; a savings target type; we pass in 1 if we want to save towards a target amount; or we pass in 0 if we’ll be saving towards a target time. Finally, we pass in a target amount or a target time (epoch time). In this demo, we’ll be saving towards a target amount, so we’ll be passing in 1 and a target amount (0.0001 eth).
To interact with our piggy factory onchan, we use an invoke method as shown in the below command;
starkli invoke 0x0137a70c3cda7037631f43e3c6a76ea30cf6ba53dbabaebb164b427dab8a8d16 createPiggyBank 1 100000000000000000 --rpc https://starknet-sepolia.public.blastapi.io/rpc/v0_6 --account ~/.starkli-wallets/deployer/account0_account.json --keystore ~/.starkli-wallets/deployer/account0_keystore.json
After sending the above command, a transaction hash is returned to us. This hash, when scanned on an explorer, contains all the details of our invoke transaction and the status of the transaction, whether or not it has been accepted on L1.

Our transaction hash is 0x077a2d9f64f19da764957e88440bc4cca50f792c62bccd163ee114b8b9e59a67. Next, we need to get the contract address of our personalized piggy bank, so we make another call to our factory contract to get our piggy bank’s address. We use the below code to achieve this, we call the getPiggyBankAddr function, then pass in our contract address as an argument to that function.
starkli call 0x04f4c7a6a7de241e138f1c20b81d939a6e5807fdf8ea8845a86a61493e8de4ff getPiggyBankAddr 0x076957612bA0927c9C3F6156Ffaa1A52Bc330256869d85A8A0D0999B3e4c6387 --rpc https://starknet-sepolia.public.blastapi.io/rpc/v0_6
After calling this function using the command above, we get a response on our terminal containing the address of the child piggy bank personalized to the address we passed in as an argument, the first argument is the address of the factory contract while the second is the function name while the third is the address of the user which we intend to fetch his piggy bank address.

Interacting With Our Personalized Pigy Bank:
At this point, we have been able to create a piggy bank contract customized specifically to our savings target, and we have the address for that contract. We are now left with interacting with our contract by depositing Eth into it and also withdrawing from it.
But before we jump into depositing Eth into our contract, its important to note that Ether on starknet is actually a regular ERC20 token, so we’ll need to grant approval to our Piggy contract to be able to spend our Eth. We can achieve this by using the below command to call the approve function on the Eth contract address.
starkli invoke 0x049D36570D4e46f48e99674bd3fcc84644DdD6b96F7C741B1562B82f9e004dC7 approve 0x044a5cc1518cd4f4dc4b40c5d2e72de2a82c5c7c7e2c0f840182b79aacb9773b u256:100000000000000000 --rpc https://starknet-sepolia.public.blastapi.io/rpc/v0_6 --account ~/.starkli-wallets/deployer/account0_account.json --keystore ~/.starkli-wallets/deployer/account0_keystore.json
The first address is the address of the erc20 token then the second is the address of our personalized piggybank address. After running the above code, we get a transaction hash containing details about our approval transaction:

The next step would be to deposit into our piggy bank contract using this command;
starkli invoke 0x044a5cc1518cd4f4dc4b40c5d2e72de2a82c5c7c7e2c0f840182b79aacb9773b deposit 1000000000000000 --rpc https://starknet-sepolia.public.blastapi.io/rpc/v0_6 --account ~/.starkli-wallets/deployer/account0_account.json --keystore ~/.starkli-wallets/deployer/account0_keystore.json
As with other invoke function calls we’ve made, we also get a transaction hash for this transaction. Finally, after repeated calls to deposit ether into our contract, once we have saved up an amount of our choice, we can call the withdraw function to withdraw from our account.
starkli invoke 0x044a5cc1518cd4f4dc4b40c5d2e72de2a82c5c7c7e2c0f840182b79aacb9773b withdraw 1000000000000000 --rpc https://starknet-sepolia.public.blastapi.io/rpc/v0_6 --account ~/.starkli-wallets/deployer/account0_account.json --keystore ~/.starkli-wallets/deployer/account0_keystore.json
Finally, we get a transaction hash containing details regarding our withdrawal 0x0781103066cf3bfa07ce59c1082c802db8a46caa276a293d9fcbe8610b85c1a8.
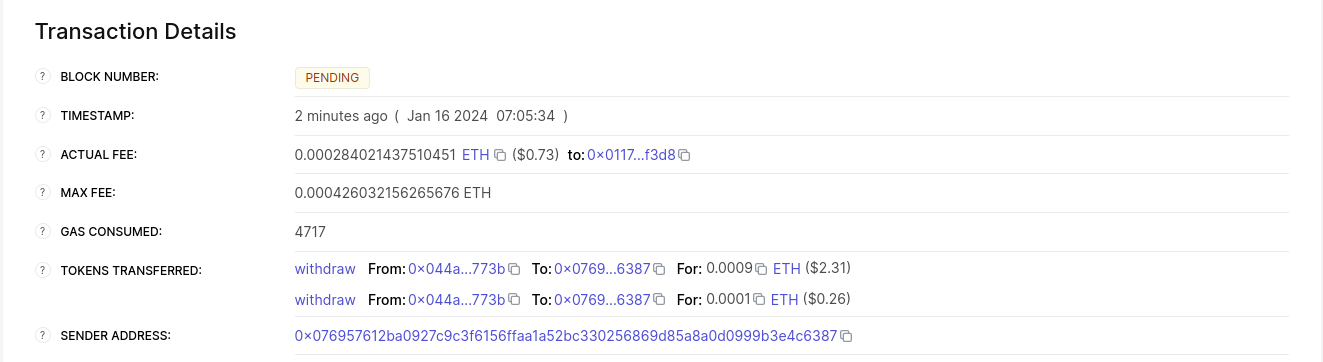
Scanning the above transaction hash on Voyager gives us the details contained in the image above; among other things, it contains a breakdown of how our withdrawal was distributed. Since we didn't deposit up to our target amount before withdrawing, 10% of our withdrawal amount was sent to the factory contract, while the remaining 90% was sent to our address.
Important Starknet Methods
The table below contains important methods used while building starknet smart contracts. It contains the name of the method, a keyword to import such a method, and finally a simple single line usage of each method. Also note that multiple method imports can be chained to make the codebase simpler and also avoid repetition, e.g., `use starknet::{get_contract_address, ContractAddress}.
Table 1.0
| METHODS | IMPORTATION | EXAMPLE USAGE | DESCRIPTION |
| get_contract_address() | use starknet::get_contract_address | let ThisContract = get_contract_address(); | Returns the contract address of the contract containing this method. |
| get_caller_address() | use starknet::get_caller_address | let user = get_caller_address(); | Returns the contract address of the user calling a certain function. |
| ContractAddress | use starknet::ContractAddress | let user: ContractAddress = get_caller_address(); | Allows for the usage of the contract address data type in a contract. |
| zero() | use starknet::ContractAddress | let addressZero: ContractAddress = zero(); | Returns address zero contract address |
| get_block_info() | use starknet::get_block_info | let blockInfo = get_block_info(); | It returns a struct containing the block number, block timestamp, and the sequencer address. |
| get_tx_info() | use starknet::get_tx_info | let txInfo = get_tx_info(); | Returns a struct containing transaction version, max fee, transaction hash, signature, chain ID, nonce, and transaction origin address. |
| get_block_timestamp() | use starknet::get_block_timestamp | let timeStamp = get_block_timestamp(); | Returns the block timestamp of the block containing the transaction. |
| get_block_number() | use starknet::get_block_number | Let blockNumber = get_block_number(); | Returns the block number of the block containing the transaction. |
| ClassHash | use starknet::ClassHash | let childHash: ClassHash = contractClassHash; | Allows for the use of the class Hash datatype to define variables that hold a class hash. |
Account Abstraction
Account Abstraction (AA) represents an approach to managing accounts and transactions in blockchain networks. It involves two key concepts:
-
Transaction Flexibility:
- Smart contracts validate their transactions, moving away from a universal validation model.
- Benefits include smart contracts covering gas fees, supporting multiple signers for one account, and using alternative cryptographic signatures.
-
User Experience Optimization:
- AA enables developers to design flexible security models, such as using different keys for routine and high-value transactions.
- It offers alternatives to seed phrases for account recovery, simplifying the user experience.
Technically, AA replaces Externally Owned Accounts (EOA) with a broader account concept. In this model, accounts are smart contracts, each with its unique rules and behaviors. These rules can govern transaction ordering, signatures, access controls, and more, offering extensive customization.
Key Definitions of AA:
- Definition 1: As described by Martin Triay at Devcon 6, AA allows smart contracts to pay for their transactions. This shifts away from traditional Externally Owned Accounts or Smart Wallets.
- Definition 2: Lightclient at Devcon 6 defines AA as validation abstraction. Unlike Ethereum's Layer 1 single validation method, AA permits various signature types, cryptographic methods, and execution processes.
Applications of Account Abstraction
Account Abstraction (AA) enhances the accessibility and security of self-custody in blockchain technology. Here are a few of the features that AA enables:
-
Hardware Signer:
- AA enables transaction signing with keys stored in a smartphone’s secure enclave, incorporating biometric identity for enhanced security and ease of use.
-
Social Recovery:
- In case of lost or compromised keys, AA allows for secure key replacement, removing the need for seed phrases and simplifying the user experience.
-
Key Rotation:
- If a key is compromised, it can be easily replaced without needing to transfer assets.
-
Session Keys:
- AA facilitates a sign in once feature for web3 applications, allowing transactions on your behalf and minimizing constant approvals.
-
Custom Transaction Validation Schemes:
- AA supports various signature schemes and security rules, enabling tailored security measures for individual needs.
AA also bolsters security in several ways:
-
Improved Key Management:
- Multiple devices can be linked to your wallet, ensuring account access even if one device is lost.
-
Diverse Signature and Validation Schemes:
- AA accommodates additional security measures like two-factor authentication for substantial transactions, catering to individual security needs.
-
Custom Security Policies:
- Security can be customized for different user types or devices, incorporating best practices from banking and web2 sectors.
Ethereum Account System
Understanding Ethereum's current account system is important to appreciating the benefits of Account Abstraction (AA). Ethereum's account system comprises two types:
-
Externally Owned Accounts (EOAs):
- Used by individuals, wallets, or entities external to the Ethereum network.
- Identified by addresses derived from the public key of a cryptographic signer, which includes a private key and a public key.
- The private key signs transactions or messages to prove ownership, while the public key verifies the signature.
- Transactions must be signed by the EOA's private key to modify the account state, ensuring security through unique cryptographic identity.
-
Contract Accounts (CAs):
- Essentially smart contracts on the Ethereum blockchain.
- Lack private keys and are activated by transactions or messages from EOAs.
- Their behavior is defined by their code.
Challenges in the current account model include:
-
Key Management:
- Loss of a private key means irreversible loss of account control and assets.
- If stolen, the thief gains complete access to the account and its assets.
-
User Experience:
- The Ethereum account model currently lacks user-friendly key or account recovery options.
- Complex interfaces like crypto wallets can deter non-technical users, limiting broader adoption.
-
Lack of Flexibility:
- The traditional model restricts custom transaction validation schemes, limiting potential security and access control enhancements.
AA aims to address these issues, presenting opportunities for improved security, scalability, and user experience.
Why Isn’t Account Abstraction Implemented in Ethereum’s Layer 1 Yet?
Ethereum's Layer 1 (L1) currently lacks support for Account Abstraction (AA) at the protocol level, not due to a lack of interest or recognition of its value, but rather because of the complexity involved in its integration.
Key challenges to implementing AA in Ethereum’s L1 include:
-
Entrenched Nature of Externally Owned Accounts (EOAs):
- EOAs are integral to Ethereum's core protocol.
- Modifying them to support AA is a daunting task, especially as Ethereum's value and usage continue to grow.
-
Limitations of the Ethereum Virtual Machine (EVM):
- The EVM, Ethereum's smart contract runtime environment, faces limitations that obstruct AA implementation.
- Despite several AA proposals since Ethereum's inception, they have been delayed due to prioritization of other critical updates and improvements.
However, the rise of Layer 2 (L2) solutions offers a new avenue for AA:
- Layer 2 Solutions:
- Focused on scalability and performance, L2 solutions are more accommodating for AA.
- Platforms like Starknet and ZKSync, inspired by EIP4337, are pioneering native AA implementations.
Due to the ongoing delays and complexities of integrating AA into Ethereum’s L1, many advocates, have shifted their focus:
- Shift to Layer 2 Advocacy:
- Instead of waiting for EOAs to phase out and AA to integrate into Ethereum's core, proponents now support the adoption of AA through L2 solutions.
- This approach aims to deliver AA benefits to users more quickly and maintain Ethereum's competitive edge in the fast-evolving crypto space.
Conclusion
In this subchapter, we've looked at Account Abstraction (AA) in Ethereum. AA makes transactions more flexible and improves how users manage their accounts. It's set to solve problems like key management and user experience in Ethereum, but its integration into Ethereum's main layer has been slow due to technical hurdles and established systems.
Layer 2 solutions, however, are opening doors for AA. Starknet is a key player here.
Next, we'll get practical. You'll learn to code AA contracts in Starknet.
Account Contracts
With a clearer understanding of the AA concept, let's proceed to code it in Starknet.
Account Contract Interface
Account contracts, being a type of smart contracts, are distinguished by specific methods. A smart contract becomes an account contract when it follows the public interface outlined in SNIP-6 (Starknet Improvement Proposal-6: Standard Account Interface). This standard draws inspiration from SRC-6 and SRC-5, similar to Ethereum's ERCs, which establish application conventions and contract standards.
#![allow(unused)] fn main() { /// @title Represents a call to a target contract /// @param to The target contract address /// @param selector The target function selector /// @param calldata The serialized function parameters struct Call { to: ContractAddress, selector: felt252, calldata: Array<felt252> } /// @title SRC-6 Standard Account trait ISRC6 { /// @notice Execute a transaction through the account /// @param calls The list of calls to execute /// @return The list of each call's serialized return value fn __execute__(calls: Array<Call>) -> Array<Span<felt252>>; /// @notice Assert whether the transaction is valid to be executed /// @param calls The list of calls to execute /// @return The string 'VALID' represented as felt when is valid fn __validate__(calls: Array<Call>) -> felt252; /// @notice Assert whether a given signature for a given hash is valid /// @param hash The hash of the data /// @param signature The signature to validate /// @return The string 'VALID' represented as felt when the signature is valid fn is_valid_signature(hash: felt252, signature: Array<felt252>) -> felt252; } /// @title SRC-5 Standard Interface Detection trait ISRC5 { /// @notice Query if a contract implements an interface /// @param interface_id The interface identifier, as specified in SRC-5 /// @return `true` if the contract implements `interface_id`, `false` otherwise fn supports_interface(interface_id: felt252) -> bool; } }
From the proposal, an account contract should have the __execute__, __validate__, and is_valid_signature methods from the ISRC6 trait.
The provided functions serve these purposes:
__validate__: Validates a list of calls intended for execution based on the contract's rules. Instead of a boolean, it returns a short string like 'VALID' within afelt252to convey validation results. In Cairo, this short string is the ASCII representation of a single felt. If verification fails, any felt other than 'VALID' can be returned. Often,0is chosen.is_valid_signature: Confirms the authenticity of a transaction's signature. It takes a transaction data hash and a signature, and compares it against a public key or another method chosen by the contract's author. The result is a short 'VALID' string within afelt252.__execute__: After validation,__execute__carries out a series of contract calls (asCallstructs). It gives back an array ofSpan<felt252>structs, showing the return values of those calls.
Moreover, the SNIP-5 (Standard Interface Detection) trait needs to be
defined with a function called supports_interface. This function
verifies whether a contract supports a specific interface, receiving an
interface ID and returning a boolean.
#![allow(unused)] fn main() { trait ISRC5 { fn supports_interface(interface_id: felt252) -> bool; } }
In essence, when a user dispatches an invoke transaction, the protocol initiates by invoking the __validate__ method. This verifies the associated signer's authenticity. For security reasons, particularly to safeguard the Sequencer from Denial of Service (DoS) attacks [1], there are constraints on the operations within the __validate__ method. If the signature is verified, the method yields a 'VALID' felt252 value. If not, it returns 0.
After the protocol verifies the signer, it proceeds to invoke the __execute__ function, passing an array of all desired operations—referred to as "calls"—as an argument. Each of these calls specifies a target smart contract address (to), the method to be executed (selector), and the arguments this method requires (calldata).
#![allow(unused)] fn main() { struct Call { to: ContractAddress, selector: felt252, calldata: Array<felt252> } trait ISRC6 { .... fn __execute__(calls: Array<Call>) -> Array<Span<felt252>>; .... } }
Executing a Call may yield a return value from the target smart contract. Whether it's a felt252, boolean, or a more intricate data structure like a struct or array, Starknet protocol serializes the return using Span<felt252>. Since Span captures a segment of an Array [2], the __execute__ function outputs an array of Span<felt252> elements. This array signifies the serialized feedback from every operation in the multicall.
The is_valid_signature method isn't mandated or employed by the Starknet protocol. Instead, it's a convention within the Starknet developer community. Its purpose is to facilitate user authentication in web3 applications. For instance, consider a user attempting to log into an NFT marketplace using their digital wallet. The web application prompts the user to sign a message, then it uses the is_valid_signature function to confirm the authenticity of the associated wallet address.
To ensure other smart contracts recognize the compliance of an account contract with the SNIP-6 public interface, developers should incorporate the supports_interface method from the ISRC5 introspection trait. This method requires the Interface ID of SNIP-6 as its argument.
#![allow(unused)] fn main() { struct Call { to: ContractAddress, selector: felt252, calldata: Array<felt252> } trait ISRC6 { // Implementations for __execute__, __validate__, and is_valid_signature go here. } trait ISRC5 { fn supports_interface(interface_id: felt252) -> bool; } }
The interface_id corresponds to the aggregated hash of the trait's selectors, as detailed in Ethereum's ERC165 [3]. Developers can either compute the ID using the src5-rs utility [4] or rely on the pre-calculated ID: 1270010605630597976495846281167968799381097569185364931397797212080166453709.
The fundamental structure for the account contract, aligning with the SNIP-G Interface standard, looks like this:
#![allow(unused)] fn main() { struct Call { to: ContractAddress, selector: felt252, calldata: Array<felt252> } trait ISRC6 { fn __execute__(calls: Array<Call>) -> Array<Span<felt252>>; fn __validate__(calls: Array<Call>) -> felt252; fn is_valid_signature(hash: felt252, signature: Array<felt252>) -> felt252; } trait ISRC5 { fn supports_interface(interface_id: felt252) -> bool; } }
Expanding the Interface
While the components mentioned earlier lay the foundation for an account contract in alignment with the SNIP-6 standard, developers can introduce more features to enhance the contract's capabilities.
For example, integrate the __validate_declare__ function if the contract declares other contracts and handles the corresponding gas fees. This offers a way to authenticate the contract declaration. For those keen on counterfactual smart contract deployment, the __validate_deploy__ function can be included.
Counterfactual deployment lets developers set up an account contract without depending on another account contract for gas fees. This method is valuable when there's no desire to link a new account contract with its deploying address, ensuring a fresh start.
This approach involves:
- Locally determining the potential address of our account contract without actual deployment, feasible with the Starkli [5] tool.
- Transferring sufficient ETH to the predicted address to cover the deployment costs.
- Sending a
deploy_accounttransaction to Starknet containing our contract's compiled code. The sequencer then activates the account contract at the estimated address, compensating its gas fees from the transferred ETH. Nodeclareaction is needed beforehand.
For better compatibility with tools like Starkli later on, expose the signer's public_key through a view function in the public interface. Below is the augmented account contract interface:
#![allow(unused)] fn main() { /// @title IAccountAddon - Extended account contract interface trait IAccountAddon { /// @notice Validates if a declare transaction can proceed /// @param class_hash Hash of the smart contract under declaration /// @return 'VALID' string as felt, if valid fn __validate_declare__(class_hash: felt252) -> felt252; /// @notice Validates if counterfactual deployment can proceed /// @param class_hash Hash of the account contract under deployment /// @param salt Modifier for account address /// @param public_key Account signer's public key /// @return 'VALID' string as felt, if valid fn __validate_deploy__(class_hash: felt252, salt: felt252, public_key: felt252) -> felt252; /// @notice Fetches the signer's public key /// @return Public key fn public_key() -> felt252; } }
In conclusion, a comprehensive account contract incorporates the SNIP-5, SNIP-6, and the Addon interfaces.
#![allow(unused)] fn main() { // Cheat sheet struct Call { to: ContractAddress, selector: felt252, calldata: Array<felt252> } trait ISRC6 { fn __execute__(calls: Array<Call>) -> Array<Span<felt252>>; fn __validate__(calls: Array<Call>) -> felt252; fn is_valid_signature(hash: felt252, signature: Array<felt252>) -> felt252; } trait ISRC5 { fn supports_interface(interface_id: felt252) -> bool; } trait IAccountAddon { fn __validate_declare__(class_hash: felt252) -> felt252; fn __validate_deploy__(class_hash: felt252, salt: felt252, public_key: felt252) -> felt252; fn public_key() -> felt252; } }
Recap
We've broken down the distinctions between account contracts and basic smart contracts, particularly focusing on the methods laid out in SNIP-6.
-
Introduced the
ISRC6trait, spotlighting essential functions:__validate__: Validates transactions.is_valid_signature: Verifies signatures.__execute__: Executes contract calls.
-
Discussed the
ISRC5trait and highlighted the importance of thesupports_interfacefunction in confirming interface support. -
Detailed the
Callstruct to represent a single contract call, explaining its components:to,selector, andcalldata. -
Touched on advanced features for account contracts, such as the
__validate_declare__and__validate_deploy__functions.
Coming up, we'll craft a basic account contract and deploy it on Starknet, offering hands-on insight into their functionality and interactions.
Hello World! Account Contract
This section guides you through the creation of the simplest possible account contract, adhering to the SNIP-6 standard. The account contract will be the simplest implementation of an account contract, with the following features:
- Signature validation for transactions will be not enforced. In other words, every transaction will be considered valid no matter who signed it; there will be no pivate key.
- It will make a single call and not multicall in the execution phase.
- It will only implement the SNIP-6 standard which is the minimum to be considered an account contract.
We will deployed using starknet.py and use it to deploy other contracts.
Setting Up Your Project
For deploying an account contract to Starknet's testnet or mainnet, use Scarb version 2.3.1, which is compatible with the Sierra 1.3.0 target supported by both networks. For the latest information, review the Starknet Release Notes. As of November 2023, Scarb version 2.3.1 is the recommended choice.
To check your current Scarb version, run:
scarb --version
To install or update Scarb, refer to the Basic Installation instructions in Chapter 2, covering macOS and Linux environments:
curl --proto '=https' --tlsv1.2 -sSf https://docs.swmansion.com/scarb/install.sh | sh
Starting a New Scarb Project
Begin by creating a new project (more details in the Scarb subchapter in Chapter 2):
scarb new hello_account
Check the generated project structure:
$ tree .
.
└── hello_account
├── Scarb.toml
└── src
└── lib.cairo
By default, Scarb sets up for vanilla Cairo. Add Starknet capacities by editing Scarb.toml to include the starknet dependency:
[package]
name = "hello_account"
version = "0.1.0"
[dependencies]
starknet = ">=2.3.0"
[[target.starknet-contract]]
sierra = true
casm = true
casm-add-pythonic-hints = true
Replace the code in src/lib.cairo with the Hello World account contract:
#![allow(unused)] fn main() { use starknet::account::Call; // IERC6 obtained from Open Zeppelin's cairo-contracts/src/account/interface.cairo #[starknet::interface] trait ISRC6<TState> { fn __execute__(self: @TState, calls: Array<Call>) -> Array<Span<felt252>>; fn __validate__(self: @TState, calls: Array<Call>) -> felt252; fn is_valid_signature(self: @TState, hash: felt252, signature: Array<felt252>) -> felt252; } #[starknet::contract] mod HelloAccount { use starknet::VALIDATED; use starknet::account::Call; use starknet::get_caller_address; #[storage] struct Storage {} // Empty storage. No public key is stored. #[external(v0)] impl SRC6Impl of super::ISRC6<ContractState> { fn is_valid_signature( self: @ContractState, hash: felt252, signature: Array<felt252> ) -> felt252 { // No signature is required so any signature is valid. VALIDATED } fn __validate__(self: @ContractState, calls: Array<Call>) -> felt252 { let hash = 0; let mut signature: Array<felt252> = ArrayTrait::new(); signature.append(0); self.is_valid_signature(hash, signature) } fn __execute__(self: @ContractState, calls: Array<Call>) -> Array<Span<felt252>> { let sender = get_caller_address(); assert(sender.is_zero(), 'Account: invalid caller'); let Call{to, selector, calldata } = calls.at(0); let _res = starknet::call_contract_syscall(*to, *selector, calldata.span()).unwrap(); let mut res = ArrayTrait::new(); res.append(_res); res } } } }
Compile your project to ensure the setup is correct:
scarb build
SNIP-6 Standard
To define an account contract, implement the ISRC6 trait:
#![allow(unused)] fn main() { #[starknet::interface] trait ISRC6<TState> { fn __execute__(self: @TState, calls: Array<Call>) -> Array<Span<felt252>>; fn __validate__(self: @TState, calls: Array<Call>) -> felt252; fn is_valid_signature(self: @TState, hash: felt252, signature: Array<felt252>) -> felt252; } }
The __execute__ and __validate__ functions are designed for exclusive use by the Starknet protocol to enhance account security. Despite their public accessibility, only the Starknet protocol can invoke these functions, identified by using the zero address. In this minimal account contract we will not enforce this restriction, but we will do it in the next examples.
Validating Transactions
The is_valid_signature function is responsible for this validation, returning VALIDATED if the signature is valid. The VALIDATED constant is imported from the starknet module.
#![allow(unused)] fn main() { use starknet::VALIDATED; }
Notice that the is_valid_signature function accepts all the transactions as valid. We are not storing a public key in the contract, so we cannot validate the signature. We will add this functionality in the next examples.
#![allow(unused)] fn main() { fn is_valid_signature( self: @ContractState, hash: felt252, signature: Array<felt252> ) -> felt252 { // No signature is required so any signature is valid. VALIDATED } }
The __validate__ function calls the is_valid_signature function with a dummy hash and signature. The __validate__ function is called by the Starknet protocol to validate the transaction. If the transaction is not valid, the execution of the transaction is aborted.
#![allow(unused)] fn main() { fn __validate__(self: @ContractState, calls: Array<Call>) -> felt252 { let hash = 0; let mut signature: Array<felt252> = ArrayTrait::new(); signature.append(0); self.is_valid_signature(hash, signature) } }
In other words we have implemented a contract that accepts all the transactions as valid. We will add the signature validation in the next examples.
Executing Transactions
The __execute__ function is responsible for executing the transaction. In this minimal account contract we will only execute a single call. We will add the multicall functionality in the next examples.
#![allow(unused)] fn main() { fn __execute__(self: @ContractState, calls: Array<Call>) -> Array<Span<felt252>> { let Call{to, selector, calldata } = calls.at(0); let _res = starknet::call_contract_syscall(*to, *selector, calldata.span()).unwrap(); let mut res = ArrayTrait::new(); res.append(_res); res } }
The __execute__ function calls the call_contract_syscall function from the starknet module. This function executes the call and returns the result. The call_contract_syscall function is a Starknet syscall, which means that it is executed by the Starknet protocol. The Starknet protocol is responsible for executing the call and returning the result. The Starknet protocol will also validate the call, so we do not need to validate the call in the __execute__ function.
Deploying the Contract
[TODO]
Standard Account Contract
This section guides you through the creation of a standard account contract, adhering to the SNIP-6 and SRC-5 standards. Previously, we created a simple account contract that lacked signature validation and multicall execution. This time, we'll implement a more robust account contract that includes these features and adheres to the standards of an account contract.
Setting Up Your Project
For deploying an account contract to Starknet's testnet or mainnet, use Scarb version 2.3.1, which is compatible with the Sierra 1.3.0 target supported by both networks. For the latest information, review the Starknet Release Notes. As of November 2023, Scarb version 2.3.1 is the recommended choice.
To check your current Scarb version, run:
scarb --version
To install or update Scarb, refer to the Basic Installation instructions in Chapter 2, covering macOS and Linux environments:
curl --proto '=https' --tlsv1.2 -sSf https://docs.swmansion.com/scarb/install.sh | sh
Starting a New Scarb Project
Begin by creating a new project (more details in the Scarb subchapter in Chapter 2):
scarb new aa
Check the generated project structure:
$ tree .
.
└── aa
├── Scarb.toml
└── src
└── lib.cairo
By default, Scarb sets up for vanilla Cairo. Add Starknet capacities by editing Scarb.toml to include the starknet dependency:
[package]
name = "aa"
version = "0.1.0"
cairo-version = "2.3.0"
[dependencies]
starknet = ">=2.3.0"
[[target.starknet-contract]]
sierra = true
casm = true
Replace the code in src/lib.cairo with an account contract scaffold:
#![allow(unused)] fn main() { #[starknet::contract] mod Account { #[storage] struct Storage { public_key: felt252 } } }
To validate signatures, store the public key associated with the signer's private key.
#![allow(unused)] fn main() { #[storage] struct Storage { public_key: felt252 } }
Compile your project to ensure the setup is correct:
scarb build
Implementing SNIP-6 Standard
To define an account contract, implement the ISRC6 trait:
#![allow(unused)] fn main() { trait ISRC6 { fn __execute__(calls: Array<Call>) -> Array<Span<felt252>>; fn __validate__(calls: Array<Call>) -> felt252; fn is_valid_signature(hash: felt252, signature: Array<felt252>) -> felt252; } }
The #[external(v0)] attribute marks functions with unique selectors for external interaction. The Starknet protocol exclusively uses __execute__ and __validate__, whereas is_valid_signature is available for web3 applications to validate signatures.
The trait IAccount<T>** with #[starknet::interface] attribute groups publicly accessible functions, like is_valid_signature. Functions __execute__ and __validate__, though public, are accessible only indirectly.
#![allow(unused)] fn main() { use starknet::account::Call; #[starknet::interface] trait IAccount<T> { fn is_valid_signature(self: @T, hash: felt252, signature: Array<felt252>) -> felt252; } #[starknet::contract] mod Account { use super::Call; #[storage] struct Storage { public_key: felt252 } #[external(v0)] impl AccountImpl for super::IAccount<ContractState> { fn is_valid_signature(self: @ContractState, hash: felt252, signature: Array<felt252>) -> felt252 { ... } } // These functions are protocol-specific and not intended for direct external use. #[external(v0)] #[generate_trait] impl ProtocolImpl for ProtocolTrait { fn __execute__(ref self: ContractState, calls: Array<Call>) -> Array<Span<felt252>> { ... } fn __validate__(self: @ContractState, calls: Array<Call>) -> felt252 { ... } } } }
Restricted Function Access for Security
The __execute__ and __validate__ functions are designed for exclusive use by the Starknet protocol to enhance account security. Despite their public accessibility, only the Starknet protocol can invoke these functions, identified by using the zero address.
#![allow(unused)] fn main() { #[starknet::contract] mod Account { use starknet::get_caller_address; use zeroable::Zeroable; // Enforces Starknet protocol-only access to specific functions #[external(v0)] #[generate_trait] impl ProtocolImpl of ProtocolTrait { // Executes protocol-specific operations fn __execute__(ref self: ContractState, calls: Array<Call>) -> Array<Span<felt252>> { self.only_protocol(); // Verifies protocol-level caller // ... (implementation details) } // Validates protocol-specific operations fn __validate__(self: @ContractState, calls: Array<Call>) -> felt252 { self.only_protocol(); // Verifies protocol-level caller // ... (implementation details) } } // Defines a private function to check for protocol-level access #[generate_trait] impl PrivateImpl of PrivateTrait { fn only_protocol(self: @ContractState) { // ... (access validation logic) } } } }
Enhanced Security Through Protocol-Exclusive Functions
Starknet enhances the security of accounts by restricting the callability of certain functions. The __execute__ and __validate__ functions, though publicly visible, are callable solely by the Starknet protocol. This protocol asserts its unique calling rights by using a designated zero address—a special value that signifies protocol-level operations.
#![allow(unused)] fn main() { #[starknet::contract] mod Account { use starknet::get_caller_address; use zeroable::Zeroable; // Implements function access control for Starknet protocol #[external(v0)] #[generate_trait] impl ProtocolImpl of ProtocolTrait { // The __execute__ function is a protocol-exclusive operation fn __execute__(ref self: ContractState, calls: Array<Call>) -> Array<Span<felt252>> { self.only_protocol(); // Validates the caller as the Starknet protocol // ... (execution logic) } // The __validate__ function ensures the integrity of protocol-level calls fn __validate__(self: @ContractState, calls: Array<Call>) -> felt252 { self.only_protocol(); // Ensures the caller is the Starknet protocol // ... (validation logic) } } // A private function, only_protocol, to enforce protocol-level access #[generate_trait] impl PrivateImpl of PrivateTrait { // only_protocol checks the caller's address against the zero address fn only_protocol(self: @ContractState) { // If the caller is not the zero address, access is denied // This guarantees that only the Starknet protocol can call the function // ... (access control logic) } } } }
The is_valid_signature function, by contrast, is not bounded by only_protocol, maintaining its availability for broader use.
Transaction Signature Validation
To verify transaction signatures, the account contract stores the public key of the signer. The constructor method initializes this public key during the contract's deployment.
#![allow(unused)] fn main() { #[starknet::contract] mod Account { // Persistent storage for account-related data #[storage] struct Storage { public_key: felt252 // Stores the public key for signature validation } // Sets the public key during contract deployment #[constructor] fn constructor(ref self: ContractState, public_key: felt252) { self.public_key.write(public_key); // Records the signer's public key } // ... Additional implementation details } }
The is_valid_signature function outputs VALID for an authentic signature and 0 for an invalid one. Additionally, the is_valid_signature_bool internal function provides a Boolean result for the signature's validity.
#![allow(unused)] fn main() { #[starknet::contract] mod Account { // Import relevant cryptographic and data handling modules use array::ArrayTrait; use ecdsa::check_ecdsa_signature; use array::SpanTrait; // Facilitates the use of the span() method // External function to validate the transaction signature #[external(v0)] impl AccountImpl of super::IAccount<ContractState> { fn is_valid_signature(self: @ContractState, hash: felt252, signature: Array<felt252>) -> felt252 { // Converts the signature array into a span for processing let is_valid = self.is_valid_signature_bool(hash, signature.span()); if is_valid { 'VALID' } else { 0 } // Returns 'VALID' or '0' based on signature validity } } // Private function to check the signature validity and return a Boolean #[generate_trait] impl PrivateImpl of PrivateTrait { // Validates the signature using a span of elements fn is_valid_signature_bool(self: @ContractState, hash: felt252, signature: Span<felt252>) -> bool { // Checks if the signature has the correct length let is_valid_length = signature.len() == 2_u32; // If the signature length is incorrect, returns false if !is_valid_length { return false; } // Verifies the signature using the stored public key check_ecdsa_signature( hash, self.public_key.read(), *signature.at(0_u32), *signature.at(1_u32) ) } } // ... Additional implementation details } }
In the __validate__ function, the is_valid_signature_bool method is utilized to confirm the integrity of transaction signatures.
#![allow(unused)] fn main() { #[starknet::contract] mod Account { // Import modules for transaction information retrieval use box::BoxTrait; use starknet::get_tx_info; // Protocol implementation for transaction validation #[external(v0)] #[generate_trait] impl ProtocolImpl of ProtocolTrait { // Validates the signature of a transaction fn __validate__(self: @ContractState, calls: Array<Call>) -> felt252 { self.only_protocol(); // Ensures protocol-only access // Retrieves transaction information and unpacks it let tx_info = get_tx_info().unbox(); let tx_hash = tx_info.transaction_hash; let signature = tx_info.signature; // Validates the signature and asserts its correctness let is_valid = self.is_valid_signature_bool(tx_hash, signature); assert(is_valid, 'Account: Incorrect tx signature'); // Stops execution if the signature is invalid 'VALID' // Indicates a valid signature } } // ... Additional implementation details } }
Unified Signature Validation for Contract Operations
The __validate_declare__ function is responsible for validating the signature
of the declare function. On the other hand, __validate_deploy__ facilitates
counterfactual deployment,a method to deploy an account contract without
associating it to a specific deployer address.
To streamline the validation process, we'll unify the behavior of the three
validation functions __validate__,__validate_declare__ and __validate_deploy__.
The core logic from __validate__ is abstracted to validate_transaction private
function, which is then invoked by the other two validation functions.
#![allow(unused)] fn main() { #[starknet::contract] mod Account { // Protocol implementation for the account contract #[external(v0)] #[generate_trait] impl ProtocolImpl of ProtocolTrait { // Validates general contract function calls fn __validate__(self: @ContractState, calls: Array<Call>) -> felt252 { self.only_protocol(); // Ensures only the Starknet protocol can call self.validate_transaction() // Centralized validation logic } // Validates the 'declare' function signature fn __validate_declare__(self: @ContractState, class_hash: felt252) -> felt252 { self.only_protocol(); // Ensures only the Starknet protocol can call self.validate_transaction() // Reuses the validation logic } // Validates counterfactual contract deployment fn __validate_deploy__(self: @ContractState, class_hash: felt252, salt: felt252, public_key: felt252) -> felt252 { self.only_protocol(); // Ensures only the Starknet protocol can call // Even though public_key is provided, it uses the one stored from the constructor self.validate_transaction() // Applies the same validation logic } } // Private trait implementation that contains shared validation logic #[generate_trait] impl PrivateImpl of PrivateTrait { // Abstracted core logic for validating transactions fn validate_transaction(self: @ContractState) -> felt252 { let tx_info = get_tx_info().unbox(); // Extracts transaction information let tx_hash = tx_info.transaction_hash; let signature = tx_info.signature; // Validates the transaction signature using an internal boolean function let is_valid = self.is_valid_signature_bool(tx_hash, signature); assert(is_valid, 'Account: Incorrect tx signature'); // Ensures signature correctness 'VALID' // Returns 'VALID' if the signature checks out } } } }
It's important to note that the __validate_deploy__ function receives the public key
as an argument. While this key is captured during the constructor phase before this function
is invoked, it remains crucial to provide it when initiating the transaction.
Alternatively, the public key can be directly utilized within the __validate_deploy__ function,
bypassing the constructor.
Efficient Multicall Transaction Execution
The __execute__ function within the Account module of a Starknet contract is designed to process an array of Call structures. This multicall feature consolidates several user operations into a single transaction, significantly improving the user experience by enabling batched operations.
#![allow(unused)] fn main() { ```rust #[starknet::contract] mod Account { // Protocol implementation to handle execution of calls #[external(v0)] #[generate_trait] impl ProtocolImpl of ProtocolTrait { // The __execute__ function processes an array of calls fn __execute__(ref self: ContractState, calls: Array<Call>) -> Array<Span<felt252>> { self.only_protocol(); // Ensures Starknet protocol level access self.execute_multiple_calls(calls) // Invokes batch processing of calls } // ... Additional implementation details } } }
Each Call represents the details required for executing a single operation by the smart contract:
#![allow(unused)] fn main() { // Data structure encapsulating a contract call #[derive(Drop, Serde)] struct Call { to: ContractAddress, // The target contract address selector: felt252, // The function selector calldata: Array<felt252> // The parameters for the function call } }
The contract defines a private function execute_single_call to handle individual calls. It utilizes the call_contract_syscall to directly invoke a function on another contract:
#![allow(unused)] fn main() { #[starknet::contract] mod Account { // Import syscall for contract function invocation use starknet::call_contract_syscall; // Private trait implementation for individual call execution #[generate_trait] impl PrivateImpl of PrivateTrait { // Executes a single call to another contract fn execute_single_call(self: @ContractState, call: Call) -> Span<felt252> { let Call{to, selector, calldata} = call; // Destructures the Call struct call_contract_syscall(to, selector, calldata.span()).unwrap_syscall() // Performs the contract call } } // ... Additional implementation details } }
For the execution of multiple calls, execute_multiple_calls iterates over the array of Call structures, invoking execute_single_call for each and collecting the responses:
#![allow(unused)] fn main() { #[starknet::contract] mod Account { // Private trait implementation for batch call execution #[generate_trait] impl PrivateImpl of PrivateTrait { // Handles an array of calls and accumulates the results fn execute_multiple_calls(self: @ContractState, mut calls: Array<Call>) -> Array<Span<felt252>> { let mut res = ArrayTrait::new(); // Initializes the result array loop { match calls.pop_front() { Option::Some(call) => { let response = self.execute_single_call(call); // Executes each call individually res.append(response); // Appends the result of the call to the result array }, Option::None(_) => { break (); // Exits the loop when no more calls are left }, }; }; res // Returns the array of results } } // ... Additional implementation details } }
In summary, the __execute__ function orchestrates the execution of multiple calls within a single transaction. It leverages these internal functions to handle each call efficiently and return the collective results:
#![allow(unused)] fn main() { #[starknet::contract] mod Account { // External function definition within the protocol implementation #[external(v0)] #[generate_trait] impl ProtocolImpl of ProtocolTrait { // The __execute__ function takes an array of Call structures and processes them fn __execute__(ref self: ContractState, calls: Array<Call>) -> Array<Span<felt252>> { self.only_protocol(); // Verifies that the function caller is the Starknet protocol self.execute_multiple_calls(calls) // Delegates to a function for processing multiple calls } // ... Additional implementation details may follow } // ... Further module code may be present } }
The __execute__ function first ensures that it is being called by the Starknet protocol itself, a security measure to prevent unauthorized access. It then calls the execute_multiple_calls function to handle the actual execution of the calls.
Ensuring Compatibility with Transaction Versioning
Starknet incorporates a versioning system for transactions to maintain backward compatibility while introducing new functionalities. The account contract tutorial showcases support for the latest transaction versions through a specific module, ensuring smooth operation of both legacy and updated transaction structures.
To accommodate the evolution of Starknet and its enhanced functionalities, a versioning system was introduced for transactions. This ensures backward compatibility, allowing both old and new transaction structures to operate concurrently.
- Version 1 for
invoketransactions - Version 1 for
deploy_accounttransactions - Version 2 for
declaretransactions
These supported versions are logically grouped in a module called SUPPORTED_TX_VERSION:
#![allow(unused)] fn main() { // Module defining supported transaction versions mod SUPPORTED_TX_VERSION { // Constants representing the supported versions const DEPLOY_ACCOUNT: felt252 = 1; // Supported version for deploy_account transactions const DECLARE: felt252 = 2; // Supported version for declare transactions const INVOKE: felt252 = 1; // Supported version for invoke transactions } #[starknet::contract] mod Account { // The rest of the account contract module code ... } }
To handle the version checking, the account contract includes a private function only_supported_tx_version. This function compares the version of an incoming transaction against the specified supported versions, halting execution with an error if a discrepancy is found.
The critical contract functions such as __execute__, __validate__, __validate_declare__, and __validate_deploy__ implement this version check to confirm transaction compatibility.
#![allow(unused)] fn main() { #[starknet::contract] mod Account { // Importing constants from the SUPPORTED_TX_VERSION module use super::SUPPORTED_TX_VERSION; // Protocol implementation for Starknet functions #[external(v0)] #[generate_trait] impl ProtocolImpl of ProtocolTrait { // Function to execute multiple calls with version check fn __execute__(ref self: ContractState, calls: Array<Call>) -> Array<Span<felt252>> { self.only_protocol(); // Checks if the function caller is the Starknet protocol self.only_supported_tx_version(SUPPORTED_TX_VERSION::INVOKE); // Ensures the transaction is the supported version self.execute_multiple_calls(calls) // Processes the calls if version check passes } // Each of the following functions also includes the version check to ensure compatibility fn __validate__(self: @ContractState, calls: Array<Call>) -> felt252 { self.only_protocol(); self.only_supported_tx_version(SUPPORTED_TX_VERSION::INVOKE); self.validate_transaction() } fn __validate_declare__(self: @ContractState, class_hash: felt252) -> felt252 { self.only_protocol(); self.only_supported_tx_version(SUPPORTED_TX_VERSION::DECLARE); self.validate_transaction() } fn __validate_deploy__(self: @ContractState, class_hash: felt252, salt: felt252, public_key: felt252) -> felt252 { self.only_protocol(); self.only_supported_tx_version(SUPPORTED_TX_VERSION::DEPLOY_ACCOUNT); self.validate_transaction() } } // Private implementation for checking supported transaction versions #[generate_trait] impl PrivateImpl of PrivateTrait { // Function to assert the transaction version is supported fn only_supported_tx_version(self: @ContractState, supported_tx_version: felt252) { let tx_info = get_tx_info().unbox(); // Retrieves transaction details let version = tx_info.version; // Extracts the version from the transaction assert( version == supported_tx_version, 'Account: Unsupported tx version' // Error message for unsupported versions ); } // ... Additional private functions } } }
By integrating transaction version control, the contract ensures it operates consistently with the network's current standards, providing a clear path for upgrading and maintaining compatibility with Starknet's evolving ecosystem.
Handling Simulated Transactions
Starknet's simulation feature allows developers to estimate the gas cost of transactions without actually committing them to the network. This is particularly useful during development and testing phases. The estimate-only flag available in tools like Starkli triggers the simulation process. To differentiate between actual transaction execution and simulation, Starknet uses a version offset strategy.
Simulated transactions are assigned a version number that is the sum of (2^{128}) and the version number of the actual transaction type. For example, if the latest version of a declare transaction is 2, then a simulated declare transaction would have a version number of (2^{128} + 2). The same logic applies to other transaction types like invoke and deploy_account.
Here's how the only_supported_tx_version function is adjusted to accommodate both actual and simulated transaction versions:
#![allow(unused)] fn main() { #[starknet::contract] mod Account { // Constant representing the version offset for simulated transactions const SIMULATE_TX_VERSION_OFFSET: felt252 = 340282366920938463463374607431768211456; // This is 2^128 // Private trait implementation updated to validate transaction versions #[generate_trait] impl PrivateImpl of PrivateTrait { // Function to check for supported transaction versions, accounting for simulations fn only_supported_tx_version(self: @ContractState, supported_tx_version: felt252) { let tx_info = get_tx_info().unbox(); // Retrieves the transaction metadata let version = tx_info.version; // Extracts the version for comparison // Validates whether the transaction version matches either the supported actual version or the simulated version assert( version == supported_tx_version || version == SIMULATE_TX_VERSION_OFFSET + supported_tx_version, 'Account: Unsupported tx version' // Assertion message for version mismatch ); } // Additional private functions may follow } // Remaining contract code may continue here } }
The code snippet showcases the account contract's capability to recognize and process both actual and simulated versions of transactions by incorporating the large numerical offset. This ensures that the system can seamlessly operate with and adjust to the estimation process without affecting the actual transaction processing logic.
SRC-5 Standard and Contract Introspection
Contract introspection is a feature that allows Starknet contracts to self-report the interfaces they support, in compliance with the SRC-5 standard. The supports_interface function is a fundamental part of this introspection process, enabling contracts to communicate their capabilities to others.
For a contract to be SRC-5 compliant, it must return true when the supports_interface function is called with a specific interface_id. This unique identifier is chosen to represent the SRC-6 standard's interface, which the contract claims to support. The identifier is a large integer specifically chosen to minimize the chance of accidental collisions with other identifiers.
In the account contract, the supports_interface function is part of the public interface, allowing other contracts to query its support for the SRC-6 standard:
#![allow(unused)] fn main() { // SRC-5 trait defining the introspection method trait ISRC5 { // Function to check interface support fn supports_interface(interface_id: felt252) -> bool; } // Extension of the account contract's interface for SRC-5 compliance #[starknet::interface] trait IAccount<T> { // ... Additional methods // Method to validate interface support fn supports_interface(self: @T, interface_id: felt252) -> bool; } #[starknet::contract] mod Account { // Constant identifier for the SRC-6 trait const SRC6_TRAIT_ID: felt252 = 1270010605630597976495846281167968799381097569185364931397797212080166453709; // Public interface implementation for the account contract #[external(v0)] impl AccountImpl of super::IAccount<ContractState> { // ... Other function implementations // Implementation of the interface support check fn supports_interface(self: @ContractState, interface_id: felt252) -> bool { // Compares the provided interface ID with the SRC-6 trait ID interface_id == SRC6_TRAIT_ID } } // ... Additional account contract code } }
By implementing this function, the account contract declares its ability to interact with other contracts expecting SRC-6 features, thus adhering to the standards of the Starknet protocol and enhancing interoperability within the network.
Public Key Accessibility
For enhanced transparency and debugging purposes, it's recommended to make the public key of the account contract's signer accessible. This allows users to verify the correct deployment of the account contract by comparing the stored public key with the signer's public key offline.
#![allow(unused)] fn main() { ... #[starknet::contract] mod Account { ... #[external(v0)] impl AccountImpl of IAccount<ContractState> { ... fn public_key(self: @ContractState) -> felt252 { self.public_key.read() } } } }
Final Implementation
We now have a fully functional account contract. Here's the final implementation;
#![allow(unused)] fn main() { use starknet::account::Call; mod SUPPORTED_TX_VERSION { const DEPLOY_ACCOUNT: felt252 = 1; const DECLARE: felt252 = 2; const INVOKE: felt252 = 1; } #[starknet::interface] trait IAccount<T> { fn is_valid_signature(self: @T, hash: felt252, signature: Array<felt252>) -> felt252; fn supports_interface(self: @T, interface_id: felt252) -> bool; fn public_key(self: @T) -> felt252; } #[starknet::contract] mod Account { use super::{Call, IAccount, SUPPORTED_TX_VERSION}; use starknet::{get_caller_address, call_contract_syscall, get_tx_info, VALIDATED}; use zeroable::Zeroable; use array::{ArrayTrait, SpanTrait}; use ecdsa::check_ecdsa_signature; use box::BoxTrait; const SIMULATE_TX_VERSION_OFFSET: felt252 = 340282366920938463463374607431768211456; // 2**128 const SRC6_TRAIT_ID: felt252 = 1270010605630597976495846281167968799381097569185364931397797212080166453709; // hash of SNIP-6 trait #[storage] struct Storage { public_key: felt252 } #[constructor] fn constructor(ref self: ContractState, public_key: felt252) { self.public_key.write(public_key); } #[external(v0)] impl AccountImpl of IAccount<ContractState> { fn is_valid_signature(self: @ContractState, hash: felt252, signature: Array<felt252>) -> felt252 { let is_valid = self.is_valid_signature_bool(hash, signature.span()); if is_valid { VALIDATED } else { 0 } } fn supports_interface(self: @ContractState, interface_id: felt252) -> bool { interface_id == SRC6_TRAIT_ID } fn public_key(self: @ContractState) -> felt252 { self.public_key.read() } } #[external(v0)] #[generate_trait] impl ProtocolImpl of ProtocolTrait { fn __execute__(ref self: ContractState, calls: Array<Call>) -> Array<Span<felt252>> { self.only_protocol(); self.only_supported_tx_version(SUPPORTED_TX_VERSION::INVOKE); self.execute_multiple_calls(calls) } fn __validate__(self: @ContractState, calls: Array<Call>) -> felt252 { self.only_protocol(); self.only_supported_tx_version(SUPPORTED_TX_VERSION::INVOKE); self.validate_transaction() } fn __validate_declare__(self: @ContractState, class_hash: felt252) -> felt252 { self.only_protocol(); self.only_supported_tx_version(SUPPORTED_TX_VERSION::DECLARE); self.validate_transaction() } fn __validate_deploy__(self: @ContractState, class_hash: felt252, salt: felt252, public_key: felt252) -> felt252 { self.only_protocol(); self.only_supported_tx_version(SUPPORTED_TX_VERSION::DEPLOY_ACCOUNT); self.validate_transaction() } } #[generate_trait] impl PrivateImpl of PrivateTrait { fn only_protocol(self: @ContractState) { let sender = get_caller_address(); assert(sender.is_zero(), 'Account: invalid caller'); } fn is_valid_signature_bool(self: @ContractState, hash: felt252, signature: Span<felt252>) -> bool { let is_valid_length = signature.len() == 2_u32; if !is_valid_length { return false; } check_ecdsa_signature( hash, self.public_key.read(), *signature.at(0_u32), *signature.at(1_u32) ) } fn validate_transaction(self: @ContractState) -> felt252 { let tx_info = get_tx_info().unbox(); let tx_hash = tx_info.transaction_hash; let signature = tx_info.signature; let is_valid = self.is_valid_signature_bool(tx_hash, signature); assert(is_valid, 'Account: Incorrect tx signature'); VALIDATED } fn execute_single_call(self: @ContractState, call: Call) -> Span<felt252> { let Call{to, selector, calldata} = call; call_contract_syscall(to, selector, calldata.span()).unwrap() } fn execute_multiple_calls(self: @ContractState, mut calls: Array<Call>) -> Array<Span<felt252>> { let mut res = ArrayTrait::new(); loop { match calls.pop_front() { Option::Some(call) => { let _res = self.execute_single_call(call); res.append(_res); }, Option::None(_) => { break (); }, }; }; res } fn only_supported_tx_version(self: @ContractState, supported_tx_version: felt252) { let tx_info = get_tx_info().unbox(); let version = tx_info.version; assert( version == supported_tx_version || version == SIMULATE_TX_VERSION_OFFSET + supported_tx_version, 'Account: Unsupported tx version' ); } } } }
Account Contract Creation Summary
-
SNIP-6 Implementation
- Implements the
ISRC6trait, defining the account contract's structure.
- Implements the
-
Protocol-Only Function Access
- Restricts
__validate__and__execute__to StarkNet protocol access. - Makes
is_valid_signatureavailable for external calls. - Adds a
only_protocolprivate function to enforce access rules.
- Restricts
-
Signature Validation Process
- Stores a public key to verify the signer's transactions.
- Initializes with a
constructorto set the public key. - Validates signatures with
is_valid_signature, returningVALIDor0. - Uses
is_valid_signature_boolto return a true or false validation result.
-
Declare and Deploy Function Validation
- Sets up
__validate_declare__to check thedeclarefunction's signature. - Designs
__validate_deploy__for counterfactual deployments. - Abstracts core validation to
validate_transaction.
- Sets up
-
Transaction Execution Logic
- Enables multicall capability with
__execute__. - Handles calls individually with
execute_single_calland in batches withexecute_multiple_calls.
- Enables multicall capability with
-
Transaction Version Compatibility
- Ensures compatibility with StarkNet updates using a versioning system.
- Defines supported transaction types in
SUPPORTED_TX_VERSION. - Checks transaction versions with
only_supported_tx_version.
-
Simulated Transaction Handling
- Adapts
only_supported_tx_versionto recognize both actual and simulated versions.
- Adapts
-
Contract Self-Identification
- Allows self-identification with the SRC-5 standard via
supports_interface.
- Allows self-identification with the SRC-5 standard via
-
Public Key Visibility
- Provides public key access for transparency.
-
Complete Implementation
- Presents the final account contract code.
Next, we will deploy the account using Starkli to the testnet and interact with other smart contracts.
Deploying Account Contracts
After building our account contract, we'll now deploy it using Starkli on the testnet and interact with other contracts.
Ensure you've installed starkli and scarb. Review the Basic Installation subchapter in Chapter 2 if you haven't.
Account Contract Configuration Files
Starkli requires two key configuration files:
keystore.json: A secure file that holds the private key.account.json: An open file with the account's public details like public key, class hash, and address.
Optionally, Starkli can use:
envars.sh: A script to set environment variables for Starkli commands.
For multiple wallets, keep a clean directory structure. Each wallet should have its own folder with the three files inside. Group these under a ~/.starkli-wallets directory.
Here's a suggested structure:
tree ~/.starkli-wallets
.starkli-wallets
├── wallet-a
│ ├── account.json
│ ├── envars.sh
│ └── keystore.json
└── wallet-b
├── account.json
├── envars.sh
└── keystore.json
This setup promotes better organization.
We'll make a custom folder in .starkli-wallets for our contract wallet:
mkdir ~/.starkli-wallets/custom
Next, we use Starkli to create keystore.json and account.json, then write envars.sh by hand.
Creating the Keystore File with Starkli
Starkli simplifies creating a keystore.json file. This encrypted file holds your private key and sits in the custom directory. You can create this with one command:
starkli signer keystore new ~/.starkli-wallets/custom/keystore.json
When you run this, you'll enter a password to secure the file. The resulting keystore.json is essential for setting up the envars.sh file, which stores environment variables.
Create envars.sh like this:
touch ~/.starkli-wallets/custom/envars.sh
Open the file and insert:
#!/bin/bash
export STARKNET_KEYSTORE=~/.starkli-wallets/custom/keystore.json
Activate the variable by sourcing the file:
source ~/.starkli-wallets/custom/envars.sh
Now, your environment is ready for the next step: creating the account.json file.
Generating the Account Configuration File
Our account contract's signature validation mirrors that in Open Zeppelin's default account contract, using a single signer and a STARK-compatible elliptic curve. Despite building our contract independently, we'll use Starkli's command for Open Zeppelin accounts to create our configuration:
starkli account oz init ~/.starkli-wallets/custom/account.json
After entering your keystore password, account.json is created. This file includes a class hash for OpenZeppelin's contract, not ours. Since the class hash influences the deployment address, the shown address won't match our contract.
Here's what account.json looks like:
{
"version": 1,
"variant": {
"type": "open_zeppelin",
"version": 1,
"public_key": "0x1445385497364c73fabf223c55b7b323586b61c42942c99715d842c6f0a781c",
"legacy": false
},
"deployment": {
"status": "undeployed",
"class_hash": "0x4c6d6cf894f8bc96bb9c525e6853e5483177841f7388f74a46cfda6f028c755",
"salt": "0x36cb2427f99a75b7d4c4ceeca1e412cd94b1fc396e09fec8adca14f8dc33374"
}
}
To deploy our unique contract, we must compile our project to obtain the correct class hash and update account.json accordingly.
Finding the Class Hash
Previously, we set up a aa directory for our account contract's Cairo code. If you don't have it, clone the repository:
git clone git@github.com:starknet-edu/aa-workshop.git aa
To compile the contract with Scarb, enter the project directory:
cd aa
scarb build
The compiled contract lies in target/dev. Use Starkli to get the class hash:
starkli class-hash target/dev/aa_Account.sierra.json
Next, edit account.json to insert the correct class hash:
code ~/.starkli-wallets/custom/account.json
Ensure the class_hash is updated:
{
"version": 1,
"variant": {
"type": "open_zeppelin",
"version": 1,
"public_key": "0x1445385497364c73fabf223c55b7b323586b61c42942c99715d842c6f0a781c",
"legacy": false
},
"deployment": {
"status": "undeployed",
"class_hash": "0x03480253c19b447b1d7e7a6422acf80b73866522de03126fa55796a712d9f092",
"salt": "0x36cb2427f99a75b7d4c4ceeca1e412cd94b1fc396e09fec8adca14f8dc33374"
}
}
To point to the updated account.json, modify envars.sh:
code ~/.starkli-wallets/custom/envars.sh
Add the account path:
#!/bin/bash
export STARKNET_KEYSTORE=~/.starkli-wallets/custom/keystore.json
export STARKNET_ACCOUNT=~/.starkli-wallets/custom/account.json
Source envars.sh to apply the changes:
source ~/.starkli-wallets/custom/envars.sh
Now, we're ready to declare the contract on the testnet.
Establishing an RPC Provider
For transactions on Starknet, an RPC provider is essential. This guide uses Infura but a personal node is a viable alternative.
Steps for Infura:
- Create an account.
- Start a new project for Starknet Goerli.
- Obtain the RPC URL.
- Add this URL to
envars.sh:
aa $ code ~/.starkli-wallets/custom/envars.sh
The file should now include:
#!/bin/bash
export STARKNET_KEYSTORE=~/.starkli-wallets/custom/keystore.json
export STARKNET_ACCOUNT=~/.starkli-wallets/custom/account.json
export STARKNET_RPC=https://starknet-goerli.infura.io/v3/your-api-key
Replace your-api-key with the actual API key provided by Infura.
Declaring the Account Contract
You'll need a funded account to pay gas fees. Configure Starkli with a Braavos or Argent X wallet as the deployer. Instructions are available here.
After setting up, your Starkli wallet structure will be:
tree .
.
├── custom
│ ├── account.json
│ ├── envars.sh
│ └── keystore.json
└── deployer
├── account.json
├── envars.sh
└── keystore.json
Source the deployer's environment file in the aa directory to use it:
source ~/.starkli-wallets/deployer/envars.sh
Declare the contract with the deployer covering gas:
starkli declare target/dev/aa_Account.sierra.json
After reaching "Accepted on L2," status (less than a minute) switch back to the account's environment:
source ~/.starkli-wallets/custom/envars.sh
Deploy the account with Starkli:
starkli account deploy ~/.starkli-wallets/custom/account.json
Starkli will wait for you to fund the address displayed with at least the estimated fee from Starknet's faucet.
Once funded, press ENTER to deploy:
...
Deployment transaction confirmed
Your account contract is now live on the Starknet testnet.
Using the Account Contract
To test our account contract, we can send 100 gwei to the wallet 0x070a...52d1 by calling the transfer function of the WETH smart contract on Starknet's testnet.
Invoke the transfer with Starkli (more details on Starkli's in Chapter 2):
starkli invoke eth transfer 0x070a012... u256:100
A successful invoke confirms that our account contract has authenticated the signature, executed the transfer, and managed the gas fees.
Here's a summary of all the steps from declaration to interaction:
# Quick Guide: Declare, Deploy, and Interact with a Custom Account Contract
# [1] Set up environment variables in envars.sh
export STARKNET_KEYSTORE=~/.starkli-wallets/custom/keystore.json
export STARKNET_ACCOUNT=~/.starkli-wallets/custom/account.json
export STARKNET_RPC=https://starknet-goerli.infura.io/v3/your-api-key
# [2] Generate keystore.json
starkli signer keystore new ~/.starkli-wallets/custom/keystore.json
# [3] Initialize account.json
starkli account oz init ~/.starkli-wallets/custom/account.json
# [4] Build the contract with Scarb
scarb build
# [5] Get the class hash
starkli class-hash target/dev/aa_Account.sierra.json
# [6] Update account.json with the real class hash
code ~/.starkli-wallets/custom/account.json
# [7] Set deployer wallet environment
source ~/.starkli-wallets/deployer/envars.sh
# [8] Declare the contract using the deployer
starkli declare target/dev/aa_Account.sierra.json
# [9] Switch to the custom wallet
source ~/.starkli-wallets/custom/envars.sh
# [10] Deploy the contract
starkli account deploy ~/.starkli-wallets/custom/account.json
# [11] Test the contract by transferring ETH
starkli invoke eth transfer 0x070a012... u256:100
# [bonus] Recommended directory structure
.
├── account.json
├── envars.sh
└── keystore.json
Summary
We've successfully deployed and used our custom account contract on Starknet with Starkli. Here's what we accomplished:
- Set environment variables in
envars.sh. - Created
keystore.jsonto securely store the private key. - Initialized
account.jsonas the account descriptor file. - Used Braavos smart wallet to set up the deployer environment.
- Declared and deployed our account contract to the Starknet testnet.
- Conducted a transfer to another wallet.
We matched the Open Zeppelin's contract in terms of signature methods for the constructor and __declare_deploy__ functions, which allowed us to use Starkli's Open Zeppelin preset. Should there be a need for signature modification, Starknet JS SDK would be the tool of choice.
Examples
Here, we will explore numerous examples, elucidating the principles and techniques to effectively design and implement Account contracts.
Before delving into the examples, we would like to issue a disclaimer: the contracts discussed in this chapter are for illustrative and educational purposes, and they have not undergone formal auditing. This signifies that, while we strive to provide accurate and informative content, the implementation of these contracts in a live environment should be approached with due diligence. We encourage users to thoroughly test and validate these contracts before their deployment on the mainnet.
The goal of this chapter is not only to furnish a library of contract examples but also to foster collaboration and knowledge sharing among the Starknet community. We believe that the exchange of ideas and constructive feedback is instrumental in advancing our collective understanding and expertise.
If you’ve developed or come across an innovative contract that could serve as a valuable learning resource for others, we invite you to contribute. Here are a few guidelines for your contribution:
-
Open a PR: To submit a contract example or suggest changes to existing ones, simply open a Pull Request. Ensure that your PR contains a thorough explanation of the contract, its use cases, and its functionality.
-
Code Standards: Please ensure that the submitted code is well-documented and adheres to the standard code conventions of Starknet. This will facilitate the review process and enhance the readability and comprehensibility of the contract.
-
Detailed Explanation: Accompany your code with a detailed explanation of the contract logic. Wherever possible, use diagrams, flowcharts, or pseudocode to illustrate complex mechanisms or workflows.
As we expand this repertoire of contract examples, we hope to equip the Starknet community with a robust toolset and inspire further exploration and innovation in the realm of custom account contracts.
MultiCaller Account
Multicall is a powerful technique that allows multiple constant smart contract function calls to be aggregated into a single call, resulting in a consolidated output. With Starknet’s account abstraction feature, multicalls can be seamlessly integrated into account contracts.
Why Multicalls?
Multicalls come handy in several scenarios. Here are some examples:
-
Token Swapping on Decentralized Exchanges: In a typical token swap operation on a decentralized exchange (DEX), you first need to approve the spending of the tokens and then initiate the swap. Executing these operations separately could be cumbersome from a user experience perspective. With multicall, these calls can be combined into a single transaction, simplifying the user’s task.
-
Fetching Blockchain Data: When you want to query the prices of two different tokens from the blockchain, it’s beneficial to have them both come from the same block for consistency. Multicall returns the latest block number along with the aggregated results, providing this consistency.
The benefits of multicall transactions can be realized more in the context of account abstraction.
Multicall Account Abstraction Creation.
This is because multicall is a feature of Account Abstraction that lets you bundle multiple user operations into a single transaction for a smoother UX.
The Call data type is a struct that has all the data you need to execute a single user operation.
There are different traits that a smart contract must implement to be considered an account contract. Let's create account abstraction from the scratch following the SNIP-6 and SRC-5 standards.
Project Setup.
In order to be able to compile an account contract to Sierra, a prerequisite to deploy it to testnet or mainnet, you’ll need to make sure to have a version of Scarb that includes a Cairo compiler that targets Sierra 1.3 as it’s the latest version supported by Starknet’s testnet. At this point in time Scarb 0.7 is used.
~ $ scarb --version
>>>
scarb 0.7.0 (58cc88efb 2023-08-23)
cairo: 2.2.0 (https://crates.io/crates/cairo-lang-compiler/2.2.0)
sierra: 1.3.0
Create a new project with Scarb using the new command.
~ $ scarb new aa
The command creates a folder with the same name that includes a configuration file for Scarb.
~ $ cd aa
aa $ tree .
>>>
.
├── Scarb.toml
└── src
└── lib.cairo
Scarb configures the project for vanilla Cairo instead of Starknet smart contracts by default.
# Scarb.toml
[package]
name = "aa"
version = "0.1.0"
[dependencies]
# foo = { path = "vendor/foo" }
There is a need to make some changes to the configuration file to activate the Starknet plugin in the compiler so we can work with smart contracts.
# Scarb.toml
[package]
name = "aa"
version = "0.1.0"
[dependencies]
starknet = "2.2.0"
[[target.starknet-contract]]
Let's now replace the content of the sample Cairo code that comes with a new project with the scaffold of our account contract.
#[starknet::contract]
mod Account {}
Given that one of the most important features of our account contract is to validate signatures, there is a need to store the public key associated with the private key of the signer.
#[starknet::contract]
mod Account {
#[storage]
struct Storage {
public_key: felt252
}
}
To make sure everything is wired up correctly, let’s compile our project.
aa $ scarb build
>>>
Compiling aa v0.1.0 (/Users/david/apps/sandbox/aa/Scarb.toml)
Finished release target(s) in 2 seconds
Welldone, It works, time to move to the interesting part of our tutorial.
SNIP-6
Remember that for a smart contract to be considered an account contract, it must implement the trait defined by SNIP-6.
trait ISRC6 {
fn __execute__(calls: Array<Call>) -> Array<Span<felt252>>;
fn __validate__(calls: Array<Call>) -> felt252;
fn is_valid_signature(hash: felt252, signature: Array<felt252>) -> felt252;
}
There is a need to eventually annotate the implementation of this trait with the external attribute, the contract state will be the first argument provided to each method. We can define the type of the contract state with the generic T.
trait ISRC6<T> {
fn __execute__(ref self: T, calls: Array<Call>) -> Array<Span<felt252>>;
fn __validate__(self: @T, calls: Array<Call>) -> felt252;
fn is_valid_signature(self: @T, hash: felt252, signature: Array<felt252>) -> felt252;
}
The execute function is the only one that receives a reference to the contract state because it’s the only one likely to either modify its internal state or to modify the state of another smart contract and thus to require the payment of gas fees for its execution. The other two functions, validate and is_valid_signature, are read-only and shouldn’t require the payment of gas fees. For this reason they are both receiving a snapshot of the contract state instead.
The question now becomes, how should we use this trait in our account contract. Should we annotate the trait with the interface attribute and then create an implementation like the code shown below?
#[starnet::interface]
trait ISRC6<T> {
fn __execute__(ref self: T, calls: Array<Call>) -> Array<Span<felt252>>;
fn __validate__(self: @T, calls: Array<Call>) -> felt252;
fn is_valid_signature(self: @T, hash: felt252, signature: Array<felt252>) -> felt252;
}
#[starknet::contract]
mod Account {
...
#[external(v0)]
impl ISRC6Impl of super::ISRC6<ContractState> {...}
}
Or should we use it instead without the interface attribute?
trait ISRC6<T> {
fn __execute__(ref self: T, calls: Array<Call>) -> Array<Span<felt252>>;
fn __validate__(self: @T, calls: Array<Call>) -> felt252;
fn is_valid_signature(self: @T, hash: felt252, signature: Array<felt252>) -> felt252;
}
#[starknet::contract]
mod Account {
...
#[external(v0)]
impl ISRC6Impl of super::ISRC6<ContractState> {...}
}
What happens without defining the trait explicitly?
#[starknet::contract]
mod Account {
...
#[external(v0)]
#[generate_trait]
impl ISRC6Impl of ISRC6Trait {...}
}
From a technical view, both are all valid alternatives but they all fail to capture the right intention.
Every function inside an implementation annotated with the external attribute will have its own selector that other people and smart contracts can use to interact with my account contract. But the thing is, even though they can use the derived selectors to call those functions, but one will be recommended for users to use and for the Starknet protocol.
The functions execute and validate are meant to be used only by the Starknet protocol even if the functions are publicly accessible via its selectors. The only function that is made public for web3 apps to use for signature validation is is_valid_signature.
Furthermore, a separate trait annotated with the interface attribute will be created and group all the functions in an account contract that users are expected to interact with. On the other hand, the trait will be auto generated, for all those functions that users are not expected to use directly even though they are public.
use starknet::account::Call;
#[starnet::interface]
trait IAccount<T> {
fn is_valid_signature(self: @T, hash: felt252, signature: Array<felt252>) -> felt252;
}
#[starknet::contract]
mod Account {
use super::Call;
#[storage]
struct Storage {
public_key: felt252
}
#[external(v0)]
impl AccountImpl of super::IAccount<ContractState> {
fn is_valid_signature(self: @ContractState, hash: felt252, signature: Array<felt252>) -> felt252 { ... }
}
#[external(v0)]
#[generate_trait]
impl ProtocolImpl of ProtocolTrait {
fn __execute__(ref self: ContractState, calls: Array<Call>) -> Array<Span<felt252>> { ... }
fn __validate__(self: @ContractState, calls: Array<Call>) -> felt252 { ... }
}
}
Protecting Protocol-Only Functions
Although there might be legitimate use cases for other smart contracts to directly interact with the functions execute and validate of an account contract, these will rather be restricted to be callable only by the Starknet protocol in case there’s an attack vector that has not been foresee.
To create private functions, this simply create a new implementation that is not annotated with the external attribute so no public selectors are created.
#[starknet::contract]
mod Account {
use starknet::get_caller_address;
use zeroable::Zeroable;
...
#[generate_trait]
impl PrivateImpl of PrivateTrait {
fn only_protocol(self: @ContractState) {
let sender = get_caller_address();
assert(sender.is_zero(), 'Account: invalid caller');
}
}
}
Validate Declare and Deploy
validate_declare is used to validate the signature of a declare transaction while validate_deploy is used for the same purpose but for the deploy_account transaction. The latter is often referred to as “counterfactual deployment”.
#[starknet::contract]
mod Account {
...
#[external(v0)]
#[generate_trait]
impl ProtocolImpl of ProtocolTrait {
fn __validate__(self: @ContractState, calls: Array<Call>) -> felt252 {
self.only_protocol();
self.validate_transaction()
}
fn __validate_declare__(self: @ContractState, class_hash: felt252) -> felt252 {
self.only_protocol();
self.validate_transaction()
}
fn __validate_deploy__(self: @ContractState, class_hash: felt252, salt: felt252, public_key: felt252) -> felt252 {
self.only_protocol();
self.validate_transaction()
}
}
#[generate_trait]
impl PrivateImpl of PrivateTrait {
...
fn validate_transaction(self: @ContractState) -> felt252 {
let tx_info = get_tx_info().unbox();
let tx_hash = tx_info.transaction_hash;
let signature = tx_info.signature;
let is_valid = self.is_valid_signature_bool(tx_hash, signature);
assert(is_valid, 'Account: Incorrect tx signature');
'VALID'
}
}
}
Execute Transactions
Looking at the signature of the execute function it is noticed that an array of calls are being passed instead of a single element.
#[starknet::contract]
mod Account {
...
#[external(v0)]
#[generate_trait]
impl ProtocolImpl of ProtocolTrait {
fn __execute__(ref self: ContractState, calls: Array<Call>) -> Array<Span<felt252>> { ... }
...
}
}
This is because multicall is a feature of Account Abstraction that lets you bundle multiple user operations into a single transaction for a smoother UX.
The Call data type is a struct that has all the data you need to execute a single user operation.
#[derive(Drop, Serde)]
struct Call {
to: ContractAddress,
selector: felt252,
calldata: Array<felt252>
}
Instead of trying to face the multicall head on, let’s first create a private function that deals with a single call that we can then reuse by iterating over the array of calls.
#[starknet::contract]
mod Account {
...
use starknet::call_contract_syscall;
#[generate_trait]
impl PrivateImpl of PrivateTrait {
...
fn execute_single_call(self: @ContractState, call: Call) -> Span<felt252> {
let Call{to, selector, calldata} = call;
call_contract_syscall(to, selector, calldata.span()).unwrap_syscall()
}
}
}
Destructure the Call struct and then we use the low level syscall call_contract_syscall to invoke a function on another smart contract without the help of a dispatcher.
However, with the single call function, multi call function can be built by iterating over a Call array and returning the responses as an array as well.
...
#[starknet::contract]
mod Account {
...
#[generate_trait]
impl PrivateImpl of PrivateTrait {
...
fn execute_multiple_calls(self: @ContractState, mut calls: Array<Call>) -> Array<Span<felt252>> {
let mut res = ArrayTrait::new();
loop {
match calls.pop_front() {
Option::Some(call) => {
let _res = self.execute_single_call(call);
res.append(_res);
},
Option::None(_) => {
break ();
},
};
};
res
}
}
}
Finally, let's go back to the execute function and make use of the functions that was just created.
...
#[starknet::contract]
mod Account {
...
#[external(v0)]
#[generate_trait]
impl ProtocolImpl of ProtocolTrait {
fn __execute__(ref self: ContractState, calls: Array<Call>) -> Array<Span<felt252>> {
self.only_protocol();
self.execute_multiple_calls(calls)
}
...
}
...
}
Supported Transaction Versions
As Starknet evolved, changes have been required to the structure of the transactions to accommodate more advanced functionality. To avoid creating breaking changes whenever a transaction structure needs to be updated, a “version” field was added to all transactions so older and newer transactions can co-exist.
Maintaining different transaction versions is complex and because this is just a tutorial, I’ll restrict my account contract to only support the newest version of each type of transaction and those are:
- Version 1 for invoke transactions
- Version 1 for deploy_account transactions
- Version 2 for declare transactions
The supported transaction versions will be discussed below in a module for logical grouping.
...
mod SUPPORTED_TX_VERSION {
const DEPLOY_ACCOUNT: felt252 = 1;
const DECLARE: felt252 = 2;
const INVOKE: felt252 = 1;
}
#[starknet::contract]
mod Account { ... }
Now create a private function that will check if the executed transaction is of the latest version and hence supported by your account contract. If not, you should abort the transaction execution with an assert.
...
#[starknet::contract]
mod Account {
...
use super::SUPPORTED_TX_VERSION;
...
#[external(v0)]
#[generate_trait]
impl ProtocolImpl of ProtocolTrait {
fn __execute__(ref self: ContractState, calls: Array<Call>) -> Array<Span<felt252>> {
self.only_protocol();
self.only_supported_tx_version(SUPPORTED_TX_VERSION::INVOKE);
self.execute_multiple_calls(calls)
}
fn __validate__(self: @ContractState, calls: Array<Call>) -> felt252 {
self.only_protocol();
self.only_supported_tx_version(SUPPORTED_TX_VERSION::INVOKE);
self.validate_transaction()
}
fn __validate_declare__(self: @ContractState, class_hash: felt252) -> felt252 {
self.only_protocol();
self.only_supported_tx_version(SUPPORTED_TX_VERSION::DECLARE);
self.validate_transaction()
}
fn __validate_deploy__(self: @ContractState, class_hash: felt252, salt: felt252, public_key: felt252) -> felt252 {
self.only_protocol();
self.only_supported_tx_version(SUPPORTED_TX_VERSION::DEPLOY_ACCOUNT);
self.validate_transaction()
}
}
#[generate_trait]
impl PrivateImpl of PrivateTrait {
...
fn only_supported_tx_version(self: @ContractState, supported_tx_version: felt252) {
let tx_info = get_tx_info().unbox();
let version = tx_info.version;
assert(
version == supported_tx_version,
'Account: Unsupported tx version'
);
}
}
}
Simulated Transactions
It’s possible to request the Sequencer to estimate the amount of gas required to execute a transaction without actually executing it. Starkli for example provides the flag estimate-only that you can append to any transaction to instruct the Sequencer to only simulate the transaction and return the estimated cost.
To differentiate a regular transaction from a transaction simulation while protecting against replay attacks, the version of a transaction simulation is the same value as the normal transaction but offset by the value 2^128. For example, the version of a simulated declare transaction is 2^128 + 2 because the latest version of a regular declare transaction is 2.
With that in mind, we can modify the function only_supported_tx_version to account for simulated transactions.
...
#[starknet::contract]
mod Account {
...
const SIMULATE_TX_VERSION_OFFSET: felt252 = 340282366920938463463374607431768211456; // 2**128
...
#[generate_trait]
impl PrivateImpl of PrivateTrait {
...
fn only_supported_tx_version(self: @ContractState, supported_tx_version: felt252) {
let tx_info = get_tx_info().unbox();
let version = tx_info.version;
assert(
version == supported_tx_version ||
version == SIMULATE_TX_VERSION_OFFSET + supported_tx_version,
'Account: Unsupported tx version'
);
}
}
}
Introspection
Previously mentioned the standard SRC-5 is for introspection.
trait ISRC5 {
fn supports_interface(interface_id: felt252) -> bool;
}
For an account contract to self identify as such, it must return true when passed the interface_id 1270010605630597976495846281167968799381097569185364931397797212080166453709. The reason why that particular number is used is explained in the previous article so go check it out for more details.
Because this is a public function that I do expect people and other smart contracts to call on my account contract, will add this function to its public interface.
...
#[starnet::interface]
trait IAccount<T> {
...
fn supports_interface(self: @T, interface_id: felt252) -> bool;
}
#[starknet::contract]
mod Account {
...
const SRC6_TRAIT_ID: felt252 = 1270010605630597976495846281167968799381097569185364931397797212080166453709;
...
#[external(v0)]
impl AccountImpl of super::IAccount<ContractState> {
...
fn supports_interface(self: @ContractState, interface_id: felt252) -> bool {
interface_id == SRC6_TRAIT_ID
}
}
...
}
Exposing the Public Key
Although not required, it is a good idea to expose the public key associated with the account contract’s signer. One use case is to easily and safely debug the correct deployment of the account contract by reading the stored public key and comparing it (offline) to the public key of my signer.
...
#[starknet::contract]
mod Account {
...
#[external(v0)]
impl AccountImpl of IAccount<ContractState> {
...
fn public_key(self: @ContractState) -> felt252 {
self.public_key.read()
}
}
}
Finally, we have a fully functional account contract.
Conclusion
The account contract created now might look complex but it’s actually one of the simplests that can be created. The account contracts created by Braavos and Argent X are much more complex as they support features like social recovery, multisig, hardware signer, email/password signer, etc.
Both Braavos and Argent have open sourced their Cairo 0 version of their account contracts but Argent is the first one to also open source their Cairo version. OpenZeppelin (OZ) is also developing their own implementation of a Cairo account contract but it’s still a work in progress. This inspiration was deduced from OZ’s implementation when creating this tutorial.
SNIP-6 is referenced multiple times as a standard to follow for an account contract but so far it’s only a proposal under discussion that could change. This will not only affect the interface of your account contract but also the ID used for introspection.
Considerations
While multicall provides significant benefits in terms of UX and data consistency, it’s important to note that it may not significantly reduce gas fees compared to individual calls. However, the primary advantage of using multicall is that it ensures results are derived from the same block, providing a much-improved user experience.
The Book is a community-driven effort created for the community.
-
If you’ve learned something, or not, please take a moment to provide feedback through this 3-question survey.
-
If you discover any errors or have additional suggestions, don’t hesitate to open an issue on our GitHub repository.
Reference
- [1] OpenZeppelin, 2023: https://github.com/OpenZeppelin/cairo-contracts/blob/release-v0.7.0-rc.0/src/account/account.cairo
- [2] David Barreto, 2023: https://medium.com/starknet-edu/account-abstraction-on-starknet-part-ii-24d52874e0bd
Multisignature (multisig) Account.
Multisig, refers to a system where multiple signatures are required to authorize a transaction. This is commonly used in the context of cryptocurrency wallets, where funds can only be spent if a certain number of private keys agree to the transaction.
Multisignature (multisig) technology is an integral part of the modern blockchain landscape. It enhances security by requiring multiple signatures to confirm a transaction, hence reducing the risk of fraudulent transactions and increasing control over asset management.
In Starknet, the concept of multisig accounts is abstracted at the protocol level, allowing developers to implement custom account contracts that embody this concept. In this chapter, we’ll delve into the workings of a multisig account and see how it’s created in Starknet using an account contract.
Why Multisig.
There are several reasons why someone might choose to use a multisig wallet:
Enhanced security:
Multisig contract account are much more secure than traditional single-signature contract accounts. With a single-signature contract account, if your private key is lost or stolen, your funds are gone. With a multisig contract account, even if one private key is compromised, the funds are still safe. This is because at least two (or more) private keys are required to authorize a transaction.
Disaster recovery:
Multisig contract account can be used to protect against the loss of a private key. If one private key is lost, the other keys can still be used to recover the funds. This can be helpful in the event of a natural disaster, hardware failure, or other unforeseen event.
Transparency and accountability:
Multisig contract account can be used to increase transparency and accountability in organizations. For example, a company might use a multisig wallet to store its funds, and require the signatures of two or more executives to authorize any spending. This can help to prevent fraud and ensure that everyone is aware of how the company's money is being spent.
The benefits of Multisig contract account can be realized more in the context of account abstraction.
Multisig Account Abstraction Creation.
Account abstraction enables built-in multisig functionality within accounts. Each account can be programmed to demand multiple signatures before transaction execution. This eliminates the need for separate multisig smart contracts, simplifying their use.
A multisig account must have different traits that a smart contract must implement to be considered an account contract. In this book we will create an account contract from scratch following the SNIP-6 and SRC-5 standards.
Project Setup
In order to be able to compile an account contract to Sierra, a prerequisite to deploy it to testnet or mainnet, you’ll need to make sure to have a version of Scarb that includes a Cairo compiler that targets Sierra 1.3 as it’s the latest version supported by Starknet’s testnet. At this point in time is Scarb 2.4.4 is used.
mac@Macs-MacBook-Pro-2 Desktop % scarb --version
scarb 2.4.4 (0c8def3aa 2023-10-31)
cairo: 2.4.4 (https://crates.io/crates/cairo-lang-compiler/2.4.4)
sierra: 1.3.0
With Scarb we can create a new project using the new command.
~ $ scarb new multisign
The command creates a folder with the same name that includes a configuration file for Scarb.
~ $ cd multisign
aa $ tree .
>>>
.
├── Scarb.toml
└── src
└── lib.cairo
By default, Scarb configures our project for vanilla Cairo instead of Starknet smart contracts.
# Scarb.toml
[package]
name = "multisign"
version = "0.1.0"
[dependencies]
# foo = { path = "vendor/foo" }
We need to make some changes to the configuration file to activate the Starknet plugin in the compiler so we can work with smart contracts.
# Scarb.toml
[package]
name = " multisign "
version = "0.1.0"
# See more keys and their definitions at https://docs.swmansion.com/scarb/docs/reference/manifest.html
[dependencies]
starknet = ">=2.4.4"
[[target.starknet-contract]]
sierra = true
casm = true
We can now replace the content of the sample Cairo code that comes with a new project with the scaffold of our account contract.
#[starknet::contract]
mod Multisign {}
Given that one of the most important features of our account contract is to validate signatures, we need to store the public key associated with the private key of the signer.
#[starknet::contract]
mod Multisign {
#[storage]
struct Storage {
public_key: felt252
}
}
To make sure everything is wired up correctly, let’s compile our project.
mac@Macs-MacBook-Pro-2 multisign % scarb build
>>>
Compiling multisign v0.1.0 (/Users/mac/multisig/Scarb.toml)
Finished release target(s) in 2 seconds
It works, time to move to the interesting part of our tutorial.
SNIP-6
Recall that for a smart contract to be considered an account contract, it must implement the trait defined by SNIP-6.
trait ISRC6 {
fn __execute__(calls: Array<Call>) -> Array<Span<felt252>>;
fn __validate__(calls: Array<Call>) -> felt252;
fn is_valid_signature(hash: felt252, signature: Array<felt252>) -> felt252;
}
Because we will eventually annotate the implementation of this trait with the external attribute, the contract state will be the first argument provided to each method. We can define the type of the contract state with the generic T.
trait ISRC6<T> {
fn __execute__(ref self: T, calls: Array<Call>) -> Array<Span<felt252>>;
fn __validate__(self: @T, calls: Array<Call>) -> felt252;
fn is_valid_signature(self: @T, hash: felt252, signature: Array<felt252>) -> felt252;
}
The execute function is the only one that receives a reference to the contract state because it’s the only one likely to either modify its internal state or to modify the state of another smart contract and thus to require the payment of gas fees for its execution. The other two functions, validate and is_valid_signature, are read-only and shouldn’t require the payment of gas fees. For this reason they are both receiving a snapshot of the contract state instead.
Let's now define the trait for our multisig account explicitly.
#[starknet::interface]
trait TestMultisign<T> {
fn __execute__(ref self: T, calls: Array<account::Call>) -> Array<Span<felt252>>;
fn __validate__(self: @T, calls: Array<account::Call>) -> felt252;
fn is_valid_signature( self: @T, hash: felt252, signature: Array<felt252>) -> felt252;
fn supports_interface(self: @T, interface_id: felt252) -> bool;
}
Each function inside an implementation annotated with the external attribute will have its own selector that other people and smart contracts can use to interact with my account contract.
The functions execute and validate are meant to be used only by the Starknet protocol even if the functions are publicly accessible via its selectors. The only function that I want to make public for web3 apps to use for signature validation is is_valid_signature.
In addition, we will create a separate trait annotated with the interface attribute that will group all the functions in the account contract that is expected to interact with. On the other hand, we will auto generate the trait for all those functions that users will not see to use directly even though they are public.
use starknet::account;
// @title SRC-6 Standard Account
#[starknet::interface]
trait ISRC6<T> {
// @notice Execute a transaction through the account
// @param calls The list of calls to execute
// @return The list of each call's serialized return value
fn __execute__(
ref self: T,
calls: Array<account::Call>
) -> Array<Span<felt252>>;
// @notice Assert whether the transaction is valid to be executed
// @param calls The list of calls to execute
// @return The string 'VALID' represented as a felt when is valid
fn __validate__(self: @T, calls: Array<account::Call>) -> felt252;
// @notice Assert whether a given signature for a given hash is valid
// @dev signatures must be deserialized
// @param hash The hash of the data
// @param signature The signature to be validated
// @return The string 'VALID' represented as a felt when is valid
fn is_valid_signature(
self: @T,
hash: felt252,
signature: Array<felt252>
) -> felt252;
}
// @title SRC-5 Iterface detection
#[starknet::interface]
trait ISRC5<T> {
// @notice Query if a contract implements an interface
// @param interface_id The interface identifier, as specified in SRC-5
// @return `true` if the contract implements `interface_id`, `false` otherwise
fn supports_interface(self: @T, interface_id: felt252) -> bool;
}
// @title Multisign Account
#[starknet::contract]
mod Multisign {
use super::ISRC6;
use super::ISRC5;
use starknet::account;
const SRC6_INTERFACE_ID: felt252 = 1270010605630597976495846281167968799381097569185364931397797212080166453709; // hash of SNIP-6 trait
const MAX_SIGNERS_COUNT: usize = 32;
#[storage]
struct Storage {
signers: LegacyMap<felt252, felt252>,
threshold: usize,
outside_nonce: LegacyMap<felt252, felt252>
}
// @notice Contructor of the account
// @dev Asserts threshold in relation with signers-len
// @param threshold Initial threshold
// @param signers Array of inital signers' public-keys
#[constructor]
fn constructor(
ref self: ContractState,
threshold: usize,
signers: Array<felt252>) {
assert_threshold(threshold, signers.len());
self.add_signers(signers.span(), 0);
self.threshold.write(threshold);
}
#[external(v0)]
impl SRC6 of ISRC6<ContractState> {
fn __execute__(
ref self: ContractState,
calls: Array<account::Call>
) -> Array<Span<felt252>> {
assert_only_protocol();
execute_multi_call(calls.span())
}
fn __validate__(
self: @ContractState,
calls: Array<account::Call>
) -> felt252 {
assert_only_protocol();
assert(calls.len() > 0, 'validate/no-calls');
self.assert_valid_calls(calls.span());
starknet::VALIDATED
}
fn is_valid_signature(
self: @ContractState,
hash: felt252,
signature: Array<felt252>
) -> felt252 {
if self.is_valid_signature_span(hash, signature.span()) {
starknet::VALIDATED
} else {
0
}
}
}
#[external(v0)]
impl SRC5 of ISRC5<ContractState> {
fn supports_interface(
self: @ContractState,
interface_id: felt252
) -> bool {
interface_id == SRC6_INTERFACE_ID
}
}
#[generate_trait]
impl Private of PrivateTrait {
fn add_signers(
ref self: ContractState,
mut signers: Span<felt252>,
last: felt252
) {
match signers.pop_front() {
Option::Some(signer_ref) => {
let signer = *signer_ref;
assert(signer != 0, 'signer/zero-signer');
assert(!self.is_signer_using_last(signer, last),
'signer/is-already-signer');
self.signers.write(last, signer);
self.add_signers(signers, signer);
},
Option::None => ()
}
}
fn is_signer_using_last(
self: @ContractState,
signer: felt252,
last: felt252
) -> bool {
if signer == 0 {
return false;
}
let next = self.signers.read(signer);
if next != 0 {
return true;
}
last == signer
}
fn is_valid_signature_span(
self: @ContractState,
hash: felt252,
signature: Span<felt252>
) -> bool {
let threshold = self.threshold.read();
assert(threshold != 0, 'Uninitialized');
let mut signatures = deserialize_signatures(signature)
.expect('signature/invalid-len');
assert(threshold == signatures.len(), 'signature/invalid-len');
let mut last: u256 = 0;
loop {
match signatures.pop_front() {
Option::Some(signature_ref) => {
let signature = *signature_ref;
let signer_uint = signature.signer.into();
assert(signer_uint > last, 'signature/not-sorted');
if !self.is_valid_signer_signature(
hash,
signature.signer,
signature.signature_r,
signature.signature_s,
) {
break false;
}
last = signer_uint;
},
Option::None => {
break true;
}
}
}
}
fn is_valid_signer_signature(
self: @ContractState,
hash: felt252,
signer: felt252,
signature_r: felt252,
signature_s: felt252
) -> bool {
assert(self.is_signer(signer), 'signer/not-a-signer');
ecdsa::check_ecdsa_signature(hash, signer, signature_r, signature_s)
}
fn is_signer(self: @ContractState, signer: felt252) -> bool {
if signer == 0 {
return false;
}
let next = self.signers.read(signer);
if next != 0 {
return true;
}
self.get_last() == signer
}
fn get_last(self: @ContractState) -> felt252 {
let mut curr = self.signers.read(0);
loop {
let next = self.signers.read(curr);
if next == 0 {
break curr;
}
curr = next;
}
}
fn assert_valid_calls(
self: @ContractState,
calls: Span<account::Call>
) {
assert_no_self_call(calls);
let tx_info = starknet::get_tx_info().unbox();
assert(
self.is_valid_signature_span(
tx_info.transaction_hash,
tx_info.signature
),
'call/invalid-signature'
)
}
}
fn assert_threshold(threshold: usize, signers_len: usize) {
assert(threshold != 0, 'threshold/is-zero');
assert(signers_len != 0, 'signers_len/is-zero');
assert(signers_len <= MAX_SIGNERS_COUNT,
'signers_len/too-high');
assert(threshold <= signers_len, 'threshold/too-high');
}
#[derive(Copy, Drop, Serde)]
struct SignerSignature {
signer: felt252,
signature_r: felt252,
signature_s: felt252
}
fn deserialize_signatures(
mut serialized: Span<felt252>
) -> Option<Span<SignerSignature>> {
let mut signatures = ArrayTrait::new();
loop {
if serialized.len() == 0 {
break Option::Some(signatures.span());
}
match Serde::deserialize(ref serialized) {
Option::Some(s) => { signatures.append(s) },
Option::None => { break Option::None; },
}
}
}
fn assert_only_protocol() {
assert(starknet::get_caller_address().is_zero(), 'caller/non-zero');
}
fn assert_no_self_call(
mut calls: Span<account::Call>
) {
let self = starknet::get_contract_address();
loop {
match calls.pop_front() {
Option::Some(call) => {
assert(*call.to != self, 'call/call-to-self');
},
Option::None => {
break ;
}
}
}
}
fn execute_multi_call(mut calls: Span<account::Call>) -> Array<Span<felt252>> {
assert(calls.len() != 0, 'execute/no-calls');
let mut result: Array<Span<felt252>> = ArrayTrait::new();
let mut idx = 0;
loop {
match calls.pop_front() {
Option::Some(call) => {
match starknet::call_contract_syscall(
*call.to,
*call.selector,
call.calldata.span()
) {
Result::Ok(retdata) => {
result.append(retdata);
idx += 1;
},
Result::Err(err) => {
let mut data = ArrayTrait::new();
data.append('call/multicall-faild');
data.append(idx);
let mut err = err;
loop {
match err.pop_front() {
Option::Some(v) => {
data.append(v);
},
Option::None => {
break;
}
}
};
panic(data);
}
}
},
Option::None => {
break;
}
}
};
result
}
}
Exploring Multisig Functions
Let’s take a closer look at the various functions associated with multisig functionality in the provided contract.
add_signers Function
This is an internal function designed to add the public keys of the account owners to a permanent storage. Ideally, a multisig account structure should permit adding and deleting owners as per the agreement of the account owners. However, each change should be a transaction requiring the threshold number of signatures.
#[generate_trait]
impl Private of PrivateTrait {
fn add_signers(
ref self: ContractState,
mut signers: Span<felt252>,
last: felt252
) {
match signers.pop_front() {
Option::Some(signer_ref) => {
let signer = *signer_ref;
assert(signer != 0, 'signer/zero-signer');
assert(!self.is_signer_using_last(signer, last),
'signer/is-already-signer');
self.signers.write(last, signer);
self.add_signers(signers, signer);
},
Option::None => ()
}
}
is_signer_using_last Function
This function allows the owners of the account to submit transactions. Upon submission, the function checks the validity of the signer, ensures the caller is one of the account owners, and adds the transaction to the transactions map. It also increments the current transaction index.
fn is_signer_using_last(
self: @ContractState,
signer: felt252,
last: felt252
) -> bool {
if signer == 0 {
return false;
}
let next = self.signers.read(signer);
if next != 0 {
return true;
}
last == signer
}
fn is_valid_signature_span(
self: @ContractState,
hash: felt252,
signature: Span<felt252>
) -> bool {
let threshold = self.threshold.read();
assert(threshold != 0, 'Uninitialized');
let mut signatures = deserialize_signatures(signature)
.expect('signature/invalid-len');
assert(threshold == signatures.len(), 'signature/invalid-len');
let mut last: u256 = 0;
loop {
match signatures.pop_front() {
Option::Some(signature_ref) => {
let signature = *signature_ref;
let signer_uint = signature.signer.into();
assert(signer_uint > last, 'signature/not-sorted');
if !self.is_valid_signer_signature(
hash,
signature.signer,
signature.signature_r,
signature.signature_s,
) {
break false;
}
last = signer_uint;
},
Option::None => {
break true;
}
}
}
}
is_valid_signer_signature Function
Similarly, the is_valid_signer_signature function provides a way to record
confirmations for each signer. An account owner, who did not submit
the transaction, can confirm it, increasing its confirmation count.
fn is_valid_signer_signature(
self: @ContractState,
hash: felt252,
signer: felt252,
signature_r: felt252,
signature_s: felt252
) -> bool {
assert(self.is_signer(signer), 'signer/not-a-signer');
ecdsa::check_ecdsa_signature(hash, signer, signature_r, signature_s)
}
fn is_signer(self: @ContractState, signer: felt252) -> bool {
if signer == 0 {
return false;
}
let next = self.signers.read(signer);
if next != 0 {
return true;
}
self.get_last() == signer
}
execute_multi_call Function
The execute_multi_call function serves as the final step in the transaction process. It checks the validity of the transaction, whether it has been previously executed, and if the threshold number of signatures has been reached. The transaction is executed if all the checks pass.
fn execute_multi_call(mut calls: Span<account::Call>) -> Array<Span<felt252>> {
assert(calls.len() != 0, 'execute/no-calls');
let mut result: Array<Span<felt252>> = ArrayTrait::new();
let mut idx = 0;
loop {
match calls.pop_front() {
Option::Some(call) => {
match starknet::call_contract_syscall(
*call.to,
*call.selector,
call.calldata.span()
) {
Result::Ok(retdata) => {
result.append(retdata);
idx += 1;
},
Result::Err(err) => {
let mut data = ArrayTrait::new();
data.append('call/multicall-faild');
data.append(idx);
let mut err = err;
loop {
match err.pop_front() {
Option::Some(v) => {
data.append(v);
},
Option::None => {
break;
}
}
};
panic(data);
}
}
},
Option::None => {
break;
}
}
};
result
}
}
Protecting Protocol-Only Functions
There maybe other use cases for other smart contracts to directly interact with the functions execute and validate of my account contract, I would rather restrict them to be callable only by the Starknet protocol in case there’s an attack vector that I’m failing to foresee.
When the Starknet protocol calls a function it uses the zero address as the caller. We can use this fact to create a private function named only_protocol. To create private functions we simply create a new implementation that is not annotated with the external attribute so no public selectors are created.
fn assert_only_protocol() {
assert(starknet::get_caller_address().is_zero(), 'caller/non-zero');
}
fn assert_no_self_call(
mut calls: Span<account::Call>
) {
let self = starknet::get_contract_address();
loop {
match calls.pop_front() {
Option::Some(call) => {
assert(*call.to != self, 'call/call-to-self');
},
Option::None => {
break ;
}
}
}
}
fn execute_multi_call(mut calls: Span<account::Call>) -> Array<Span<felt252>> {
assert(calls.len() != 0, 'execute/no-calls');
let mut result: Array<Span<felt252>> = ArrayTrait::new();
let mut idx = 0;
loop {
match calls.pop_front() {
Option::Some(call) => {
match starknet::call_contract_syscall(
*call.to,
*call.selector,
call.calldata.span()
) {
Result::Ok(retdata) => {
result.append(retdata);
idx += 1;
},
Result::Err(err) => {
let mut data = ArrayTrait::new();
data.append('call/multicall-faild');
data.append(idx);
let mut err = err;
loop {
match err.pop_front() {
Option::Some(v) => {
data.append(v);
},
Option::None => {
break;
}
}
};
panic(data);
}
}
},
Option::None => {
break;
}
}
};
result
}
}
Notice that the function is_valid_signature is not protected by the only_protocol function because we do want to allow anyone to use it.
Signature Validation
To validate the signature of a transaction we will need to use the public key associated with the signer of the account contract. We have already defined public_key to be part of the storage of our account but we need to capture its value during deployment using the constructor.
#[storage]
#[starknet::contract]
mod Multisign {
use super::ISRC6;
use super::ISRC5;
use starknet::account;
const SRC6_INTERFACE_ID: felt252 = 1270010605630597976495846281167968799381097569185364931397797212080166453709; // hash of SNIP-6 trait
const MAX_SIGNERS_COUNT: usize = 32;
#[storage]
struct Storage {
signers: LegacyMap<felt252, felt252>,
threshold: usize,
outside_nonce: LegacyMap<felt252, felt252>
}
// @notice Contructor of the account
// @dev Asserts threshold in relation with signers-len
// @param threshold Initial threshold
// @param signers Array of inital signers' public-keys
#[constructor]
fn constructor(
ref self: ContractState,
threshold: usize,
signers: Array<felt252>) {
assert_threshold(threshold, signers.len());
self.add_signers(signers.span(), 0);
self.threshold.write(threshold);
}
The logic of the function is_valid_signature can be implemented , if the signature is valid, it should return the short string ‘VALID’ and if not it should return the value 0. Returning zero is just a convention, we can return any felt as long as it is not the felt that represents the short string ‘VALID’.
The logic of returning a felt252 value instead of a boolean maybe confusing. That’s why there is a need to create an internal function called is_valid_signature_bool that will perform the same logic but will return a boolean instead of a felt252 depending on the result of validating a signature.
fn is_valid_signature_span(
self: @ContractState,
hash: felt252,
signature: Span<felt252>
) -> bool {
let threshold = self.threshold.read();
assert(threshold != 0, 'Uninitialized');
let mut signatures = deserialize_signatures(signature)
.expect('signature/invalid-len');
assert(threshold == signatures.len(), 'signature/invalid-len');
let mut last: u256 = 0;
loop {
match signatures.pop_front() {
Option::Some(signature_ref) => {
let signature = *signature_ref;
let signer_uint = signature.signer.into();
assert(signer_uint > last, 'signature/not-sorted');
if !self.is_valid_signer_signature(
hash,
signature.signer,
signature.signature_r,
signature.signature_s,
) {
break false;
}
last = signer_uint;
},
Option::None => {
break true;
}
}
}
}
fn is_valid_signer_signature(
self: @ContractState,
hash: felt252,
signer: felt252,
signature_r: felt252,
signature_s: felt252
) -> bool {
assert(self.is_signer(signer), 'signer/not-a-signer');
ecdsa::check_ecdsa_signature(hash, signer, signature_r, signature_s)
}
Private function can be used to validate a transaction signature as required by the validate function. In contrast to the function is_valid_signature we will use an assert to stop the transaction execution in case the signature is found to be invalid. Here’s a little casting problem. The function is_valid_signature_bool expects the signature to be passed as an Array but the signature variable inside the validate function is a Span. Because it is easier (and cheaper) to derive a Span from an Array than the opposite, I’ll change the function signature of is_valid_signature_bool to expect a Span instead of an Array.
This little change will require deriving a Span from the signature variable inside the function is_valid_signature before calling is_valid_signature_bool which we can easily do with the span() method available on the ArrayTrait.
Conclusion
In conclusion, account abstraction and multisig converge to create a more secure, flexible, and user-centric approach to account management in blockchain ecosystems. Additional benefits of this relationship include:
Social recovery: Account abstraction enables social recovery mechanisms for multisig accounts, allowing for account recovery in case of key loss.
Fee payment delegation: Account contracts can be configured to pay transaction fees, reducing friction for multisig transactions.
As account abstraction gains traction, multisig is poised to become a more accessible and versatile tool for safeguarding assets and enhancing control in Starknet protocol. This chapter is an introduction to the concept of multisig accounts in Starknet and illustrated how they can be implemented using an account contract. However, it’s important to note that this is a simplified example, and a production-grade multisig contract should contain additional checks and validations for robustness and security.
Auto-Payments 🚧
As blockchain adoption increases, there will be a greater need for products with a superior user experience and core functionality that support real use cases. In a few simple steps, we can set up automatic recurring payments today directly on our mobile banking applications. In fact, online bill pay is growing rapidly, and customers especially younger ones have come to expect the ability to set up recurring payments and take advantage of other conveniences associated with using auto-payments. About 3 in 10 surveyed users have changed the way they pay their bills in the past two years and finding a more convenient way to pay was the most frequently cited reason. However, this is not a trivial task on a blockchain like Ethereum, the largest blockchain network by on-chain payment volumes. For certain types of digital wallets, such as a self-custodial wallet where the user has sole control over the wallet and private keys, automated programmable payments that can pull payments automatically from a user’s account at recurring intervals requires engineering work.
The concept and one of the leading Ethereum developer proposals known as Account Abstraction to explore how smart contracts can be implemented to enable automated programmable payments. We propose a new solution towards a real-world application of auto payments to demonstrate how to write a smart contract for a self-custodial wallet that can pull funds automatically, instead of requiring the user's active participation each time to instruct and push payments on a blockchain.
Consider a hypothetical scenario: today is the 25th of February. Alex is going away on vacation to the Alps, and she will be returning on March 10th. She must pay her mortgage, TV subscription and utility bills by the 5th of every month. She does not have enough money to pay before she goes on vacation, but she will have enough money when she gets her paycheck on the 1st of March. How is Alex going to enjoy her vacation without missing her payments?
All Alex needs to do is set up recurring payments to automatically pay for her recurring bills. However, this is not as straightforward to execute on a blockchain. To see why this is the case, let us consider the Ethereum network. We will begin by setting up some terminology that will help us better understand the issue at hand.
Accounts on Ethereum
Ethereum has two types of accounts: Externally Owned Accounts (EOA) and Contract Accounts. EOAs have a private and public key pairing which helps them initiate transactions. On the other hand, Contract Accounts are smart contracts that rely on predefined codes to trigger particular transactions. In that view, accounts abstraction refers to the process of unifying both contracts under a single merged type that makes it easier for users to interact with blockchain-based applications. This mechanism would enable user accounts to behave like smart contracts, unlocking many new use cases. For instance, users could set up delegate accounts that process automatic periodic payments on users' behalf. Account abstraction can also unlock a broader range of innovative features that simplify the Web 3 experience for average users, including gasless transactions or changing the account signer at every particular interval to increase security.
Auto Payments on Ethereum
Let us revisit Alex’s situation. Suppose Alex owns a user account which is where her paychecks are deposited and from where she would like to pay her mortgage, TV subscription and utility bills. Today, to pay her bills, Alex has to initiate a transaction that transfers tokens from her EOA to a user account belonging to the recipient, that is, to whomever she is paying her bills. In more detail, Alex’s EOA has an associated secret or private key known only to Alex. This private key is used by Alex in the generation of an Elliptic Curve Digital Signature Algorithm (ECDSA) signature that is crucial for the creation of a valid transaction. And this already brings us to the problem at hand. If Alex is away on holiday, who will generate this signature to create the transaction that will make her payment?
One solution is for Alex to use what is known as a custodial wallet. With a custodial wallet, another party controls Alex’s private key. In other words, Alex trusts a third party to secure her funds and return them if she wanted to trade or send them somewhere else. The upside here is that Alex can set up an auto payment connected to her custodial wallet. Since the custodian, who is the party that manages her wallet, has access to her private key, they will be able to generate the signature needed to create the transactions for her scheduled auto payments. And this can happen while Alex is away on holiday. The downside is that while a custodial wallet lessens Alex’s personal responsibility, it requires Alex’s trust in the custodian who holds her funds.
With a self-custodial wallet, one where the user has total control over her wallet, Alex has sole control of her private key. While there is no need to trust a third party when using a self-custodial wallet, this also means that Alex will not be able to set up an auto payment as she must be the one using her key to generate the signature needed for the payment transaction.
Another way to understand this is through the terminology of pull and push payments. A pull payment is a payment transaction that is triggered by the payee, while a push payment on the other hand is a payment transaction that is triggered by the payer. Ethereum supports push payments but doesn’t natively support pull payments – auto payments are an example of pull payments.
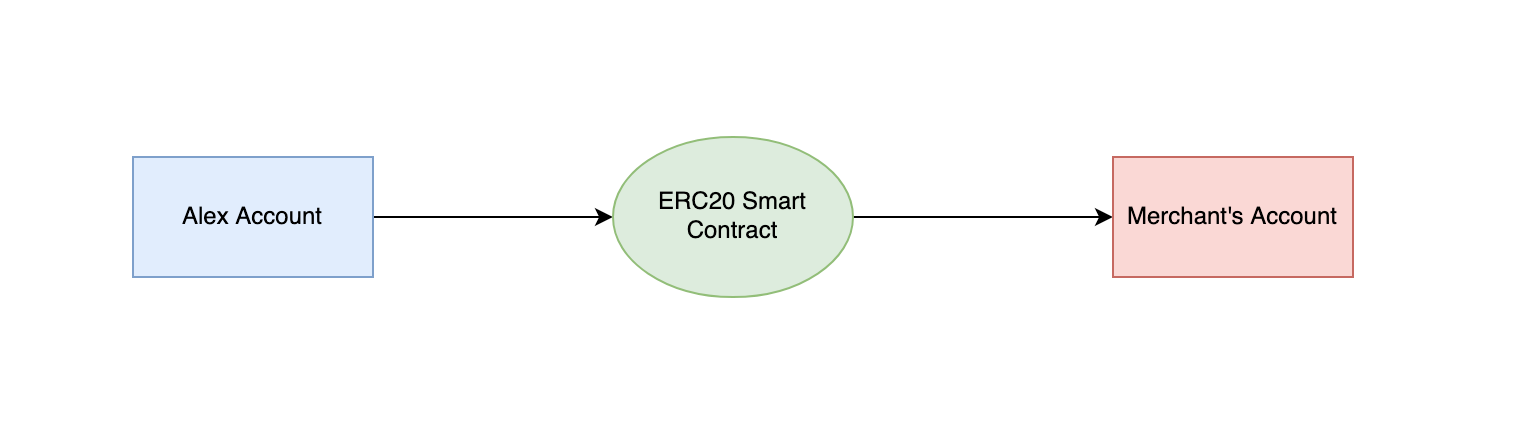
Account Abstraction
Account abstraction (AA) is a proposal that attempts to combine user accounts and smart contracts into just one Ethereum account type by making user accounts function like smart contracts. As we will see ahead, AA allows us to design a neat solution for auto payments. But more generally, the motivating rationale behind AA is quite simple but fundamental: Ethereum transactions today have several rigid requirements hardcoded into the Ethereum protocol. For instance, transactions on the Ethereum blockchain today are valid only if they have a valid ECDSA signature, a valid nonce and sufficient account balance to cover the cost of computation.
AA proposes having more flexibility in the process for validating a transaction on the blockchain:
- It enables multi-owner accounts via multisig signature verification.
- It enables the use of post-quantum signatures for the verification of transactions.
- It also allows for a so-called public account from which anyone could make a transaction, by removing signature verification entirely.
Essentially, AA allows for programmable validity to verify and validate any blockchain transaction. This means that instead of hard coding validity conditions into the Ethereum protocol that will apply to all transactions in a generalized way, validity conditions can instead be programmed in a customizable way into a smart contract on a per-account basis. With AA, a user deploys an account contract with any of the features described above, among others.
And, most importantly for us in the use case described, AA enables auto payments as we can set up validity rules that no longer include signature verification. We will elaborate on this next.
Delegable Accounts – Account Abstraction Enables Auto Payments
Our solution for auto payments is to leverage AA and create a new type of account contract – a delegable account. Our main idea is to extend programmable validity rules for transactions to include a pre-approved allow list. In essence, AA allows us to delegate the ability to instruct the user’s account to initiate a push payment to a pre-approved auto payment smart contract.
First, a merchant deploys an auto payment smart contract. When a user with a delegable account visits the merchant’s website, they will see a request to approve auto payments – similar to Visa acceptance for billers today. Here, the user can see the actions that the auto payment contract will do in the user’s name. For example, it can only charge the user once per month, or it cannot charge more than a maximum amount. Crucially, because this is a smart contract, a user can be confident that the auto payment contract cannot execute in a way other than how it is written.
If the user agrees to approve auto payments, the wallet will add the auto payment contract’s address to the list of allowed contracts on the user’s delegable account.
Implementing Auto-payment on Starknet
For a smart contract to be considered an account contract it must at least implement the interface defined by SNIP-6. Additional methods might be required for advanced account functionality.
// Cheat sheet
struct Call {
to: ContractAddress,
selector: felt252,
calldata: Array<felt252>
}
trait ISRC6 {
fn __execute__(calls: Array<Call>) -> Array<Span<felt252>>;
fn __validate__(calls: Array<Call>) -> felt252;
fn is_valid_signature(hash: felt252, signature: Array<felt252>) -> felt252;
}
trait ISRC5 {
fn supports_interface(interface_id: felt252) -> bool;
}
trait IAccountAddon {
fn __validate_declare__(class_hash: felt252) -> felt252;
fn __validate_deploy__(class_hash: felt252, salt: felt252, public_key: felt252) -> felt252;
fn public_key() -> felt252;
}
Much has been said about the need to improve the user experience (UX) of web3 if we want to increase adoption. Account Abstraction (AA) is one of the most powerful tools on Starknet to improve UX as it enables users to sign transactions with FaceID or TouchID, to execute multiple operations in a single transaction and to allow for third party services to perform operations on behalf of the user with fine grain control. No wonder why Visa has been so interested in exploring Starknet for auto payments.
With Account Abstraction, and in contrast to Externally Owned Accounts (EOA), the signer is decoupled from the account. The signer is the piece of code that signs transactions using a private key and elliptic curve cryptography to uniquely identify a user. The account is a smart contract on Starknet that defines how signature verification is performed, executes the transactions signed by the user and ultimately owns the user’s assets (aka tokens) on L2.
Note: Using an Elliptic Curve Digital Signature Algorithtm (ECDSA) is not the only way to authenticate a signer, other mechanisms are possible but they come with tradeoffs of performance, cost and ecosystem support. ECDSA remains the most widely used algorithm on Starknet and different curves are supported.
The contract will be create account, declared and deploy it to testnet using Starkli and then use it to interact with Starknet.
SNIP-6
For a smart contract to be considered an account (aka account contract) it must adhere to a specific public interface defined by the Starknet Improvement Proposal number 6 (SNIP-6).
/// @title Represents a call to a target contract
/// @param to The target contract address
/// @param selector The target function selector
/// @param calldata The serialized function parameters
struct Call {
to: ContractAddress,
selector: felt252,
calldata: Array<felt252>
}
/// @title SRC-6 Standard Account
trait ISRC6 {
/// @notice Execute a transaction through the account
/// @param calls The list of calls to execute
/// @return The list of each call's serialized return value
fn __execute__(calls: Array<Call>) -> Array<Span<felt252>>;
/// @notice Assert whether the transaction is valid to be executed
/// @param calls The list of calls to execute
/// @return The string 'VALID' represented as felt when is valid
fn __validate__(calls: Array<Call>) -> felt252;
/// @notice Assert whether a given signature for a given hash is valid
/// @param hash The hash of the data
/// @param signature The signature to validate
/// @return The string 'VALID' represented as felt when the signature is valid
fn is_valid_signature(hash: felt252, signature: Array<felt252>) -> felt252;
}
/// @title SRC-5 Standard Interface Detection
trait ISRC5 {
/// @notice Query if a contract implements an interface
/// @param interface_id The interface identifier, as specified in SRC-5
/// @return `true` if the contract implements `interface_id`, `false` otherwise
fn supports_interface(interface_id: felt252) -> bool;
}
As you can see in the proposal, an account contract must implement at least the methods execute, validate and is_valid_signature.
The methods execute and validate are meant to be called by the Starknet protocol during different stages of the lifecycle of a transaction. This doesn’t mean that only the Starknet protocol can use those methods, as a matter of fact, anyone can call those methods even if the contract account doesn’t belong to them. Something to keep an eye on when securing our account.
When a user sends an invoke transaction, the first thing that the protocol does is to call the validate method to check the signature of the transaction. In other words, to authenticate the signer associated with the account. There are restrictions on what you can do inside the validate method to protect the Sequencer against Denial of Service (DoS) attacks [3].
Notice that if the signature verification is successful, the validate method should return the short string VALID as opposed to a boolean. In Cairo, a short string is simply the ASCII representation of a single felt and not a real string. This is why the return type of the method is felt252. If the signature verification fails, you can stop execution with an assert or return literally any other felt that is not the aforementioned short string.
If the protocol is able to authenticate the signer, it will then call the function execute passing as an argument an array of all the operations or “calls” the user wants to perform as a multicall. Each one of these calls define a target smart contract, a method to call (the “selector”) and the arguments expected by the method.
The execution of each Call might result in a value being returned from the target smart contract. This value could be a simple scalar like a felt252 or a boolean, or a complex data structure like a struct or an array. In any case, the Starknet protocol serializes the response using a Span of felt252 elements. Remember that Span represents a snapshot of an Array [4]. This is why the return type of the execute method is an Array of Spans which represents a serialized response from each call in the multicall.
The method is_valid_signature is not defined or used by the Starknet protocol. It was instead an agreement between builders in the Starknet community as a way to allow web3 apps to perform user authentication. Think of a user trying to authenticate to an NFT marketplace using their wallet. The web app will ask the user to sign a message and then it will call the function is_valid_signature to verify that the connected wallet address belongs to the user.
To allow other smart contracts to know if your account contract adheres to the SNIP-6 interface, you should implement the method supports_interface from the SRC5 introspection standard. The interface_id for the SNIP-6 interface is the combined hash of the trait’s selectors as defined by Ethereum’s ERC165 [5]. You can calculate the id yourself by using the src5-rs utility [6] or you can take my word for it that the id is 1270010605630597976495846281167968799381097569185364931397797212080166453709. Additional Interface
Although the interface defined by the SNIP-6 is enough to guarantee that a smart contract is in fact an account contract, it is the minimum requirement and not the whole story. For an account to be able to declare other smart contracts and pay for the associated gas fees it will need to also implement the method validate_declare. If we also want to be able to deploy our account contract using the counterfactual deployment method then it also needs to implement the validate_deploy method.
Counterfactual deployment is a mechanism to deploy an account contract without relying on another account contract to pay for the related gas fees. This is important if we don’t want to associate a new account contract with its deployer address and instead have a “pristine” beginning.
This deployment process starts by calculating locally the would-be-address of our account contract without actually deploying it yet. This is possible to do with tools like Starkli [7]. Once we know the address, we then send enough ETH to that address to cover the costs of deploying our account contract. Once the address is funded we can finally send a deploy_account transaction to Starknet with the compiled code of our account contract. The Sequencer will deploy the account contract to the precalculated address and pay itself gas fees with the ETH we sent there. There’s no need to declare an account contract before deploying it.
To allow tools like Starkli to easily integrate with our smart contract in the future, it is recommended to expose the public_key of the signer as a view function as part of the public interface. With all this in mind, the extended interface of an account contract is shown below.
/// @title IAccount Additional account contract interface
trait IAccountAddon {
/// @notice Assert whether a declare transaction is valid to be executed
/// @param class_hash The class hash of the smart contract to be declared
/// @return The string 'VALID' represented as felt when is valid
fn __validate_declare__(class_hash: felt252) -> felt252;
/// @notice Assert whether counterfactual deployment is valid to be executed
/// @param class_hash The class hash of the account contract to be deployed
/// @param salt Account address randomizer
/// @param public_key The public key of the account signer
/// @return The string 'VALID' represented as felt when is valid
fn __validate_deploy__(class_hash: felt252, salt: felt252, public_key: felt252) -> felt252;
/// @notice Exposes the signer's public key
/// @return The public key
fn public_key() -> felt252;
}
In summary, a fully fledged account contract should implement the SNIP-5, SNIP-6 and the Addon interface.
References
[1] Auto Payments for Self-Custodial Wallets
[2] SNIP-6 Standard Account Interface: https://github.com/ericnordelo/SNIPs/blob/feat/standard-account/SNIPS/snip-6.md
[3] Starknet Docs: Limitations on the validate function: https://docs.starknet.io/documentation/architecture_and_concepts/Accounts/validate_and_execute/#validate_limitations
[4] Cairo Book: The Span data type: https://book.cairo-lang.org/ch02-02-data-types.html
[5] ERC-165: Standard Interface Detection: https://eips.ethereum.org/EIPS/eip-165
[6] Github: src5-rs: https://github.com/starknet-io/SNIPs/blob/main/SNIPS/snip-5.md
[7] Github: starkli: https://github.com/xJonathanLEI/starkli
Alternative Signature Schemes 🚧
Web Wallet: Web2 Simplicity with self-custody
Web Wallet, developed by Argent (documentation), is a tool that uses the full power and capacity of Account Abstraction. It's a self-custodial, browser-based wallet that simplifies blockchain interactions. Unlike traditional wallets that often involve seed phrases and wallet downloads, Web Wallet utilizes a simple email and password setup. This approach blends the ease of web2 interfaces with the advanced capabilities of web3, making Starknet more accessible and user-friendly.
Key Features:
- Simplified Seed Phrases: Web Wallet eliminates the need for seed phrases. Access your wallet easily using your email and password. Accounts are easily recoverable if lost.
- No Downloads Needed: Access Starknet directly from your browser using your email. No need to download an application or extension to create a wallet.
- Multi-Device Support: Web Wallet can be used across various devices seamlessly, like any standard web2 application.
dApps Integration Guide
To integrate Web Wallet in a dApp, start by installing starknetkit:
yarn add starknetkit
Import necessary methods such as connect and disconnect:
import { connect, disconnect } from "starknetkit";
Create a wallet connection using the connect method:
const connection = await connect({ webWalletUrl: "https://web.argent.xyz" });
Below is an example function that establishes a connection, then sets the connection, provider, and address states:
const connectWallet = async () => {
const connection = await connect({ webWalletUrl: "https://web.argent.xyz" });
if (connection && connection.isConnected) {
setConnection(connection);
setProvider(connection.account);
setAddress(connection.selectedAddress);
}
};
NOTE: Web Wallet is currently available only on the mainnet. For testnet access, contact the Argent team.
Transaction Signing Process
Signing transactions with Web Wallet follows a process akin to the Argent X browser extension:
const tx = await connection.account.execute({
//let's assume this is an erc20 contract
contractAddress: "0x...",
selector: "transfer",
calldata: [
"0x...",
// ...
],
});
Users will see a transaction confirmation request. Upon approval, the dApp receives a transaction hash:
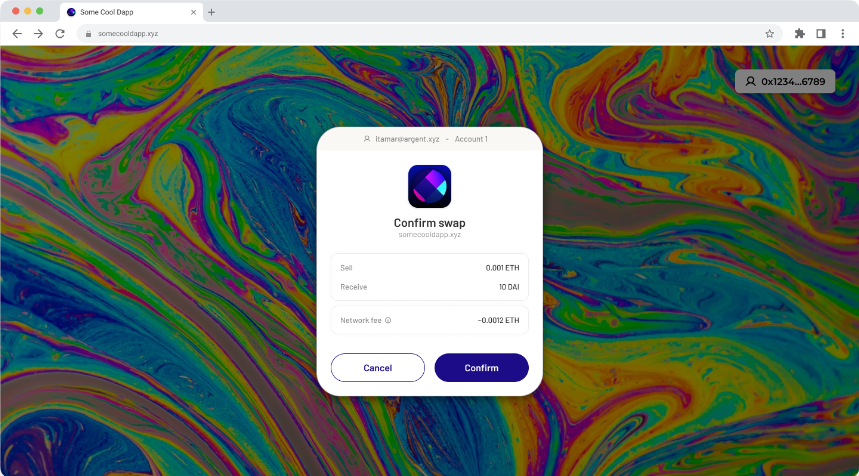
If the user's wallet is already funded it will ask the user to confirm the transaction. The dapp will get feedback if the user has confirmed or rejected the transaction request. If confirmed, the dapp will get a transaction hash.
Addressing Unfunded Wallets
When users lack funds, they are guided through simple "Add Funds" steps. This includes access to on-ramps for easy funding. The process is streamlined with minimal KYC requirements, ensuring a user-friendly experience. Once complete, the wallet is funded and prepared for deployment.
Preparing for First Transaction
Once the wallet is funded, it's set for the initial transaction. Wallet deployment occurs simultaneously with this first transaction, typically unnoticed by the user. It's important to note that a wallet may be connected but not yet deployed.