Starknet-js: Javascript SDK
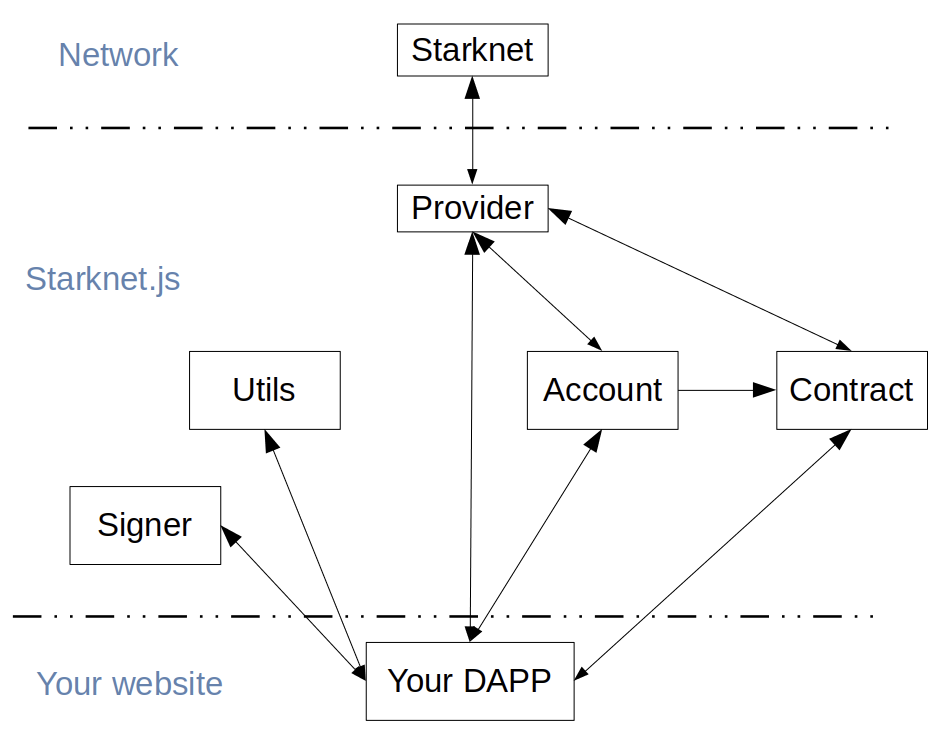
Starknet.js is a JavaScript/TypeScript library designed to connect your website or decentralized application (D-App) to Starknet. It aims to mimic the architecture of ethers.js, so if you are familiar with ethers, you should find Starknet.js easy to work with.
Starknet-js in your dapp
Installation
To install Starknet.js, follow these steps:
- For the latest official release (main branch):
npm install starknet
- To use the latest features (merges in develop branch):
npm install starknet@next
Getting Started
To build an app that users are able to connect to and interact with Starknet, we recommend adding the get-starknet library, which allows you to manage wallet connections.
With these tools ready, there are basically 3 main concepts to know on the frontend: Account, Provider, and Contracts.
Account
We can generally think of the account as the "end user" of a dapp, and some user interaction will be involved to gain access to it.
Think of a dapp where the user connects their browser extension wallet (such as ArgentX or Braavos) - if the user accepts the connection, that gives us access to the account and signer, which can sign transactions and messages.
Unlike Ethereum, where user accounts are Externally Owned Accounts, Starknet accounts are contracts. This might not necessarily impact your dapp’s frontend, but you should definitely be aware of this difference.
async function connectWallet() {
    const starknet = await connect();
    console.log(starknet.account);

    const nonce = await starknet.account.getNonce();
    const message = await starknet.account.signMessage(...)
}
The snippet above uses the connect function provided by get-starknet to establish a connection to the user wallet. Once connected, we are able to access account methods, such as signMessage or execute.
Provider
The provider allows you to interact with the Starknet network. You can think of it as a "read" connection to the blockchain, as it doesn’t allow signing transactions or messages. Just like in Ethereum, you can use a default provider, or use services such as Infura or Alchemy, both of which support Starknet, to create an RPC provider.
By default, the Provider is a sequencer provider.
export const provider = new Provider({
  sequencer: {
    network: "goerli-alpha",
  },
  // rpc: {
  //   nodeUrl: INFURA_ENDPOINT
  // }
});

const block = await provider.getBlock("latest"); // <- Get latest block
console.log(block.block_number);
Contracts
Your frontend will likely be interacting with deployed contracts. For each contract, there should be a counterpart on the frontend. To create these instances, you will need the contract’s address and ABI, and either a provider or signer.
const contract = new Contract(abi_erc20, contractAddress, starknet.account);

const balance = await contract.balanceOf(starknet.account.address);
const transfer = await contract.transfer(recipientAddress, amountFormatted);
//or: const transfer = await contract.invoke("transfer", [to, amountFormatted]);

console.log(`Tx hash: ${transfer.transaction_hash}`);
If you create a contract instance with a provider, you’ll be limited to
calling read functions on the contract - only with a signer can you
change the state of the blockchain. However, you are able to connect a
previously created Contract instance with a new account:
const contract = new Contract(abi_erc20, contractAddress, provider);

contract.connect(starknet.account);
In the snippet above, after
calling the connect method, it would be possible to call read
functions on the contract, but not before.
Units
If you have previous experience with web3, you know dealing with units requires care, and Starknet is no exception. Once again, the docs are very useful here, in particular this section on data transformation.
Very often you will need to convert Cairo structs (such as Uint256) that are returned from contracts into numbers:
// Uint256 shape:
// {
//    type: 'struct',
//    low: Uint256.low,
//    high: Uint256.high
//
// }
const balance = await contract.balanceOf(address); // <- uint256
const asBN = uint256.uint256ToBN(uint256); // <- uint256 into BN
const asString = asBN.toString(); //<- BN into string
And vice versa:
const amount = 1;

const amountFormatted = {
  type: "struct",
  ...uint256.bnToUint256(amount),
};
There are other helpful utils, besides bnToUint256 and uint256ToBN,
provided by Starknet.js.
We now have a solid foundation to build a Starknet dapp. However, there are framework specific tools that help us build Starknet dapps, which are covered in chapter 5.
With Starknet.js, you can also automate the process of deploying a smart contract to Starknet testnet / mainnet.
Deployment of Smart Contracts using Starknet.js
Starknet.js offers capabilities for deploying smart contracts. In this tutorial, we demonstrate this by deploying an account contract, which we previously developed in Chapter 4, through a scripted approach.
STEP 1: Initial Setup and Dependency Installation
To begin, set up your project environment for the account contract deployment. Within your project'sroot directory, start by initializing a Node.js environment:
npm init -y
This command generates a package.json file. Next, update this file to include the latest versions of the necessary dependencies:
"@tsconfig/node20": "^20.1.2",
"axios": "^1.6.0",
"chalk": "^5.3.0",
"dotenv": "^16.3.1",
"starknet": "^5.19.5",
"ts-node": "^10.9.1",
"typescript": "^5.2.2"
With the dependencies specified, install them using:
npm install
Configuration of TypeScript Environment
Create a tsconfig.json file in your project directory:
{
  "extends": "./node_modules/@tsconfig/node20/tsconfig.json",
  "include": ["scripts/**/*"]
}
Ensure your Node.js version aligns with v20 to match this configuration.
Furthermore, establish a .env file at the root of your project. This file should contain your RPC endpoint and the private key of your deployer account:
DEPLOYER_PRIVATE_KEY=<YOUR_WALLET_ADDRESS_PRIVATE_KEY>
RPC_ENDPOINT="<INFURA_STARKNET_GOERLI_API_KEY>"
Your environment is successfully set up.
Preparation of Deployment Scripts
To facilitate the deployment of the account contract, three key files are necessary:
utils.ts: This file will contain the functions and logic for deployment.deploy.ts: This is the main deployment script.l2-eth-abi.json: This file will hold the ABI (Application Binary Interface) for the account contract.
STEP 2: Import Required Modules and Functions
In the utils.ts file, import the necessary modules and functions from various packages. This includes functionality from Starknet, filesystem operations, path handling, and environment variable configuration:
import {
  Account,
  stark,
  ec,
  hash,
  CallData,
  RpcProvider,
  Contract,
  cairo,
} from "starknet";
import { promises as fs } from "fs";
import path from "path";
import readline from "readline";
import "dotenv/config";
STEP 3: Implementing the waitForEnter Function
To enhance user interaction during the deployment process, implement the waitForEnter function. This function prompts the user to press 'Enter' to proceed, ensuring an interactive session:
export async function waitForEnter(message: string): Promise<void> {
  return new Promise((resolve) => {
    const rl = readline.createInterface({
      input: process.stdin,
      output: process.stdout,
    });

    rl.question(message, (_) => {
      rl.close();
      resolve();
    });
  });
}
STEP 4: Styling Terminal Output Messages
Integrate the chalk module for styling terminal output messages. This enhances the readability and user experience in the command line interface:
export async function importChalk() {
  return import("chalk").then((m) => m.default);
}
STEP 5: Establishing Connection to the Starknet Network
Configure the RpcProvider object to connect to the Starknet network. This connection uses the RPC endpoint specified in the .env file, facilitating communication through the Infura client:
export function connectToStarknet() {
  return new RpcProvider({
    nodeUrl: process.env.RPC_ENDPOINT as string,
  });
}
STEP 6: Preparing the Deployer Account
Set up the deployer account for contract deployment.
Utilize the private key from the .env file and its respective pre-deployed address to create a new Account object:
export function getDeployerWallet(provider: RpcProvider) {
  const privateKey = process.env.DEPLOYER_PRIVATE_KEY as string;
  const address =
    "0x070a0122733c00716cb9f4ab5a77b8bcfc04b707756bbc27dc90973844a752d1";
  return new Account(provider, address, privateKey);
}
STEP 7: Generating a Key Pair for the Account Contract
The next step involves generating a key pair for the account contract using the stark object from Starknet.js. The key pair consists of a private key and a corresponding public key:
export function createKeyPair() {
  const privateKey = stark.randomAddress();
  const publicKey = ec.starkCurve.getStarkKey(privateKey);
  return {
    privateKey,
    publicKey,
  };
}
Note: If a specific private key is required, replace stark.randomAddress() with the desired private key.
STEP 8: Importing Compiled Account Contract Files
After compiling the account contract with scarb build, Sierra and Casm files are generated in the target/dev/directory:
- Sierra File:
<Project_File_Name>.contract_class.json - Casm File:
<Project_File_Name>.compiled_contract_class.json
To import these files into the deployment script, specify their absolute paths:
export async function getCompiledCode(filename: string) {
  const sierraFilePath = path.join(
    __dirname,
    `../target/dev/${filename}.contract_class.json`,
  );
  const casmFilePath = path.join(
    __dirname,
    `../target/dev/${filename}.compiled_contract_class.json`,
  );

  const code = [sierraFilePath, casmFilePath].map(async (filePath) => {
    const file = await fs.readFile(filePath);
    return JSON.parse(file.toString("ascii"));
  });

  const [sierraCode, casmCode] = await Promise.all(code);

  return {
    sierraCode,
    casmCode,
  };
}
We use fs method to read the file contents.
STEP 9: Declaration of the Account Contract
To declare the account contract's class, define an interface containing all necessary fields for the declaration, then use the declare() method:
interface DeclareAccountConfig {
  provider: RpcProvider;
  deployer: Account;
  sierraCode: any;
  casmCode: any;
}

export async function declareContract({
  provider,
  deployer,
  sierraCode,
  casmCode,
}: DeclareAccountConfig) {
  const declare = await deployer.declare({
    contract: sierraCode,
    casm: casmCode,
  });
  await provider.waitForTransaction(declare.transaction_hash);
}
STEP 10: Deploying the Account Contract
To deploy the account contract, calculate its address using the contract's class hash. After determining the address, fund it using the Starknet Faucet to cover gas fees during deployment:
interface DeployAccountConfig {
  privateKey: string;
  publicKey: string;
  classHash: string;
  provider: RpcProvider;
}

export async function deployAccount({
  privateKey,
  publicKey,
  classHash,
  provider,
}: DeployAccountConfig) {
  const chalk = await importChalk();

  const constructorArgs = CallData.compile({
    public_key: publicKey,
  });

  const myAccountAddress = hash.calculateContractAddressFromHash(
    publicKey,
    classHash,
    constructorArgs,
    0,
  );

  console.log(`Send ETH to contract address ${chalk.bold(myAccountAddress)}`);
  const message = "Press [Enter] when ready...";
  await waitForEnter(message);

  const account = new Account(provider, myAccountAddress, privateKey, "1");

  const deploy = await account.deployAccount({
    classHash: classHash,
    constructorCalldata: constructorArgs,
    addressSalt: publicKey,
  });

  await provider.waitForTransaction(deploy.transaction_hash);
  return deploy.contract_address;
}
STEP 11: Interacting with the Deployed Account Contract
Once the account contract is successfully deployed, we can test it by sending test Ethereum (ETH) to another address:
interface TransferEthConfig {
  provider: RpcProvider;
  account: Account;
}

export async function transferEth({ provider, account }: TransferEthConfig) {
  const L2EthAddress =
    "0x049d36570d4e46f48e99674bd3fcc84644ddd6b96f7c741b1562b82f9e004dc7";

  const L2EthAbiPath = path.join(__dirname, "./l2-eth-abi.json");
  const L2EthAbiFile = await fs.readFile(L2EthAbiPath);
  const L2ETHAbi = JSON.parse(L2EthAbiFile.toString("ascii"));

  const contract = new Contract(L2ETHAbi, L2EthAddress, provider);

  contract.connect(account);

  const recipient =
    "0x05feeb3a0611b8f1f602db065d36c0f70bb01032fc1f218bf9614f96c8f546a9";
  const amountInGwei = cairo.uint256(100);

  await contract.transfer(recipient, amountInGwei);
}

export async function isContractAlreadyDeclared(
  classHash: string,
  provider: RpcProvider,
) {
  try {
    await provider.getClassByHash(classHash);
    return true;
  } catch (error) {
    return false;
  }
}
With the necessary functions in place, we can now write the deployment script in deploy.ts, which orchestrates the deployment and verification process:
import { hash, LibraryError, Account } from "starknet";

import {
  importChalk,
  connectToStarknet,
  getDeployerWallet,
  createKeyPair,
  getCompiledCode,
  declareContract,
  deployAccount,
  transferEth,
  isContractAlreadyDeclared,
} from "./utils";

async function main() {
  const chalk = await importChalk();
  const provider = connectToStarknet();
  const deployer = getDeployerWallet(provider);
  const { privateKey, publicKey } = createKeyPair();

  console.log(chalk.yellow("Account Contract:"));
  console.log(`Private Key = ${privateKey}`);
  console.log(`Public Key = ${publicKey}`);

  let sierraCode, casmCode;
  try {
    ({ sierraCode, casmCode } = await getCompiledCode("aa_Account"));
  } catch (error: any) {
    console.log(chalk.red("Failed to read contract files"));
    process.exit(1);
  }

  const classHash = hash.computeContractClassHash(sierraCode);
  const isAlreadyDeclared = await isContractAlreadyDeclared(
    classHash,
    provider,
  );

  if (isAlreadyDeclared) {
    console.log(chalk.yellow("Contract class already declared"));
  } else {
    try {
      console.log("Declaring account contract...");
      await declareContract({ provider, deployer, sierraCode, casmCode });
      console.log(chalk.green("Account contract successfully declared"));
    } catch (error: any) {
      console.log(chalk.red("Declare transaction failed"));
      console.log(error);
      process.exit(1);
    }
  }

  console.log(`Class Hash = ${classHash}`);

  let address: string;
  try {
    console.log("Deploying account contract...");
    address = await deployAccount({
      privateKey,
      publicKey,
      classHash,
      provider,
    });
    console.log(
      chalk.green(`Account contract successfully deployed to Starknet testnet`),
    );
  } catch (error: any) {
    if (
      error instanceof LibraryError &&
      error.message.includes("balance is smaller")
    ) {
      console.log(chalk.red("Insufficient account balance for deployment"));
      process.exit(1);
    } else {
      console.log(chalk.red("Deploy account transaction failed"));
      process.exit(1);
    }
  }

  const account = new Account(provider, address, privateKey, "1");

  try {
    console.log("Testing account by transferring ETH...");
    await transferEth({ provider, account });
    console.log(chalk.green(`Account works!`));
  } catch (error) {
    console.log(chalk.red("Failed to transfer ETH"));
    process.exit(1);
  }
}

main();
The main function orchestrates the entire deployment process, from creating a key pair to declaring and deploying the account contract, and finally testing its functionality by executing a transfer transaction.
Conclusion
We have walked through the process of deploying an account contract using Starknet.js. Starting from setting up the environment, compiling the contract, and preparing the deployment scripts, to the final steps of declaring, deploying, and interacting with the contract, each phase has been covered in detail. This approach ensures that developers can easily deploy their account contracts on the Starknet network.